

搜索到
238
篇与
的结果
-
 H3C STP生成树协议与环路检测配置实战 一、环境介绍 本次实验环境为一台H3C S5130交换机,两台TP-LINK TL-SG1008D八口千兆傻瓜交换机,一台TP-LINK TL-SG1005D五口千兆傻瓜交换机。二、实验目的 在各种条件下,测试交换机防环功能和状态,H3C交换机默认STP协议为MSTP协议。三、实验步骤 1、普通环路实验拓扑图关闭STP协议[H3C]un stp global en [H3C]%Jan 1 02:19:16:001 2013 H3C STP/6/STP_DISABLE: STP is now disabled on the device.将交换机1口2口通过网线连接,查看接口状态[H3C]dis int br Interface Link Speed Duplex Type PVID Description GE1/0/1 UP 1G(a) F(a) A 1 GE1/0/2 UP 1G(a) F(a) A 1查看CPU使用率[H3C]dis cpu Slot 1 CPU 0 CPU usage: 3% in last 5 seconds 4% in last 1 minute 3% in last 5 minutes 在网络静默状态下,无广播包,CPU使用率不会飙升将电脑接入交换机,交换机ping电脑,仅一台电脑的网络下,因为环路,CPU使用率即出现飙升,交换机指示灯狂闪,且通讯中断。[H3C]dis cpu Slot 1 CPU 0 CPU usage: 30% in last 5 seconds 31% in last 1 minute 3% in last 5 minutes 在交换机开启STP协议[H3C]stp global en %Jan 1 02:25:56:729 2013 H3C STP/6/STP_ENABLE: STP is now enabled on the device. %Jan 1 02:25:56:775 2013 H3C STP/6/STP_DETECTED_TC: Instance 0's port GigabitEthernet1/0/1 detected a topology change.查看CPU使用率恢复正常[H3C]dis cpu Slot 1 CPU 0 CPU usage: 2% in last 5 seconds 30% in last 1 minute 3% in last 5 minutes 查看接口状态,1 2口仍为UP状态Interface Link Speed Duplex Type PVID Description GE1/0/1 UP 1G(a) F(a) A 1 GE1/0/2 UP 1G(a) F(a) A 1查看STP接口状态,2号口为DISCARDING阻塞状态,防环功能正常启动。[H3C]dis stp brief MST ID Port Role STP State Protection 0 GigabitEthernet1/0/1 DESI FORWARDING NONE 0 GigabitEthernet1/0/2 BACK DISCARDING NONE 0 GigabitEthernet1/0/15 DESI FORWARDING NONE 2、接入傻瓜交换机形成大环路网络拓扑通过傻瓜交换机串联形成环路,STP工作正常,环路被屏蔽[H3C]dis stp brief MST ID Port Role STP State Protection 0 GigabitEthernet1/0/1 DESI FORWARDING NONE 0 GigabitEthernet1/0/2 BACK DISCARDING NONE 3、接入傻瓜交换机形成小环路网络拓扑通过傻瓜交换机串联形成小环路,STP工作正常,环路在网管交换机处被屏蔽,但傻瓜交换机等狂闪,仍为环路状态。[H3C]dis stp brief MST ID Port Role STP State Protection 0 GigabitEthernet1/0/1 DESI DISCARDING NONE 一段时间后,STP进入转发状态,网络瘫痪,即STP可以无法运行在傻瓜交换机上[H3C]dis stp brief MST ID Port Role STP State Protection 0 GigabitEthernet1/0/1 DESI FORWARDING NONE 4、普通环路检测拓扑图开启基于VLAN的全局环路检测,配置环路检测处理模式为关闭接口,配置检测间隔为35秒[H3C]loopback-detection global enable vlan all [H3C]loopback-detection global action shutdown [H3C]loopback-detection interval-time 35使用网线连接1 2口,查看STP状态[H3C]dis stp brief MST ID Port Role STP State Protection 0 GigabitEthernet1/0/1 DESI FORWARDING NONE 0 GigabitEthernet1/0/2 BACK DISCARDING NONE 查看接口状态,当STP正常工作时,环路检测不会检测出环路Interface Link Speed Duplex Type PVID Description GE1/0/1 UP 1G(a) F(a) A 1 GE1/0/2 UP 1G(a) F(a) A 1 关闭STP[H3C]un stp global en查看接口状态[H3C]%Jan 1 03:02:05:069 2013 H3C LPDT/4/LPDT_LOOPED: A loop was detected on GigabitEthernet1/0/1. %Jan 1 03:02:05:076 2013 H3C LLDP/6/LLDP_DELETE_NEIGHBOR: Nearest bridge agent neighbor deleted on port GigabitEthernet1/0/2 (IfIndex 2), neighbor's chassis ID is 6893-20d4-f004, port ID is GigabitEthernet1/0/1. %Jan 1 03:02:05:212 2013 H3C IFNET/3/PHY_UPDOWN: Physical state on the interface GigabitEthernet1/0/1 changed to down. %Jan 1 03:02:05:223 2013 H3C IFNET/5/LINK_UPDOWN: Line protocol state on the interface GigabitEthernet1/0/1 changed to down. %Jan 1 03:02:05:227 2013 H3C LPDT/4/LPDT_VLAN_LOOPED: A loop was detected on GigabitEthernet1/0/1 in VLAN 1. 环路的两个接口被关闭,环路检测功能正常Interface Link Speed Duplex Type PVID Description GE1/0/1 DOWN auto A A 1 GE1/0/2 DOWN auto A A 1 5、接入傻瓜交换机形成大环路进行环路检测网络拓扑检测到环路%Jan 1 03:12:36:560 2013 H3C LPDT/4/LPDT_VLAN_LOOPED: A loop was detected on GigabitEthernet1/0/1 in VLAN 1. %Jan 1 03:12:36:560 2013 H3C LPDT/5/LPDT_VLAN_RECOVERED: A loop was removed on GigabitEthernet1/0/11 in VLAN 1. %Jan 1 03:12:36:561 2013 H3C LPDT/5/LPDT_RECOVERED: All loops were removed on GigabitEthernet1/0/11. %Jan 1 03:12:36:563 2013 H3C LPDT/5/LPDT_VLAN_RECOVERED: A loop was removed on GigabitEthernet1/0/1 in VLAN 1. %Jan 1 03:12:36:563 2013 H3C LPDT/5/LPDT_RECOVERED: All loops were removed on GigabitEthernet1/0/1. %Jan 1 03:12:36:571 2013 H3C IFNET/3/PHY_UPDOWN: Physical state on the interface Vlan-interface1 changed to down. %Jan 1 03:12:36:572 2013 H3C IFNET/5/LINK_UPDOWN: Line protocol state on the interface Vlan-interface1 changed to down. 查看接口状态,接口被Loopback关闭,环路检测正常Type: A - access; T - trunk; H - hybrid Interface Link Speed Duplex Type PVID Description GE1/0/1 DOWN auto A A 1 GE1/0/2 DOWN auto A A 1 [H3C]dis interface g1/0/1 GigabitEthernet1/0/1 Current state: DOWN (Loopback detection down) Line protocol state: DOWN 6、接入傻瓜交换机形成小环路进行环路检测网络拓扑环路检测检测到环路,接口被关闭%Jan 1 03:18:51:179 2013 H3C IFNET/3/PHY_UPDOWN: Physical state on the interface GigabitEthernet1/0/1 changed to down. %Jan 1 03:18:51:186 2013 H3C IFNET/5/LINK_UPDOWN: Line protocol state on the interface GigabitEthernet1/0/1 changed to down. %Jan 1 03:18:51:189 2013 H3C LPDT/4/LPDT_VLAN_LOOPED: A loop was detected on GigabitEthernet1/0/1 in VLAN 1. %Jan 1 03:18:51:213 2013 H3C LPDT/5/LPDT_VLAN_RECOVERED: A loop was removed on GigabitEthernet1/0/1 in VLAN 1. %Jan 1 03:18:51:214 2013 H3C LPDT/5/LPDT_RECOVERED: All loops were removed on GigabitEthernet1/0/1. %Jan 1 03:18:51:231 2013 H3C IFNET/3/PHY_UPDOWN: Physical state on the interface Vlan-interface1 changed to down. Interface Link Speed Duplex Type PVID Description GE1/0/1 DOWN auto A A 1 GE1/0/2 DOWN auto A A 1但傻瓜交换机的网络仍然为瘫痪状态四、实验总结 网管交换机不可与傻瓜交换机混用1、即使STP与环路检测生效,傻瓜交换机仍为环路满载状态。2、傻瓜交换机无法支持STP与环路检测协议,仍会造成网络故障另外,配置环路检测后,需要配置日志告警系统,对环路协议报告进行告警。
 -
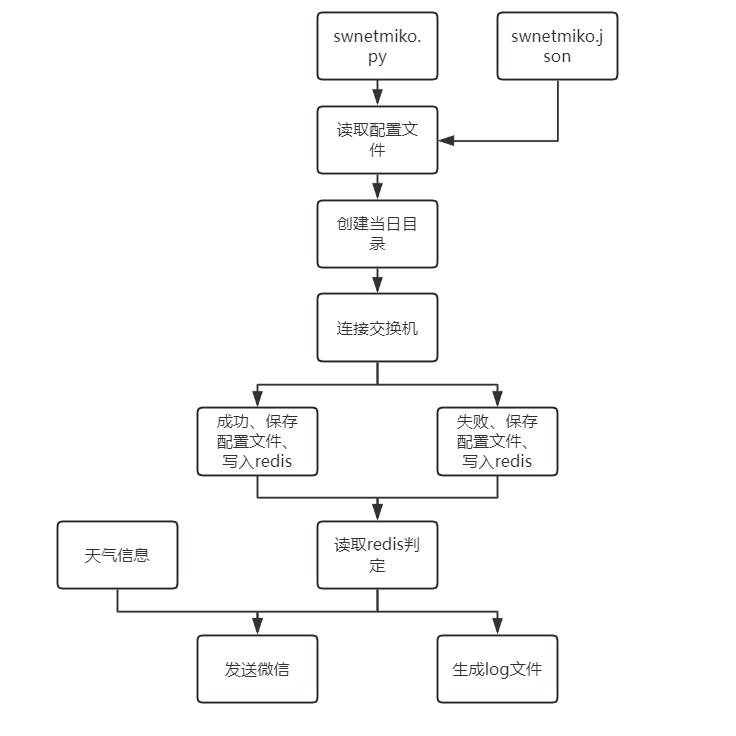
0基础上手python3编程,多进程交换机配置自动备份软件 架构图 通过多线程telnet备份交换机配置并企业微信通知备份结果,生成log日志,速度飞快;配置文件均通过json定义预览 系统组成 由两个文件组成 swnetmiko.py swnetmiko.jsonnetmiko项目主页http://ktbyers.github.io/netmiko/如H3C交换机telnet代码为"device_type" : "hp_comware_telnet"代码 swnetmiko.pyfrom multiprocessing import Pool import os,json,time,requests,redis,multiprocessing,codecs from netmiko import ConnectHandler def get_config(): config = json.loads(open("swnetmiko.json", encoding='utf-8').read()) #读取配置文件 return config def post_weixin(stats): #发送微信 url = swnetmiko_config['weixin']['url'] body = { "msgtype": "news", "news": { "articles": [ { "title": swnetmiko_config['weixin']['title'], "description": tianqi()+yiyan()+stats, "url": swnetmiko_config['weixin']['url2'], "picurl": swnetmiko_config['weixin']['picurl'] } ] }} response = requests.post(url, json=body) print(response.text) print(response.status_code) def yiyan(): try: url = 'https://v1.hitokoto.cn/?c=d&c=k' response = requests.get(url) res = json.loads(response.text) text1 = res['hitokoto'] if res['from'] == None: text2 = "" else: text2 = res['from'] if res['from_who'] == None: text3 = "" else: text3 = res['from_who'] return text1 + " " + text2 + " " + text3 + "\n\n" except: return "一言API故障\n\n" def tianqi(): try: response2 = requests.get(swnetmiko_config['weatherapi']) data1 = json.loads(response2.text) data2 = json.dumps(data1['now']) data2 = json.loads(data2) data3 = "环境温度" + data2['temp'] + " 体感温度" + data2['feelsLike'] + " 天气状况 " + data2[ 'text'] + "\n风向 " + data2['windDir'] + " 风力等级" + data2['windScale'] + " 风速" + data2[ 'windSpeed'] + " 湿度" + data2['humidity'] + " 能见度" + data2['vis'] + "公里\n\n" return data3 except: return "天气API故障\n\n" dirpath = os.path.abspath('.') # 配置运行目录为当前目录 nowtime = time.strftime("%Y%m%d", time.localtime()) # 获取当前日期 try: os.mkdir(dirpath + "/" + nowtime) print("创建当日目录") except: print("当日目录已存在") nowdir = (dirpath + "/" + nowtime) print(nowdir) swnetmiko_config = get_config() # 读取配置文件 readredis = redis.Redis(connection_pool=redis.ConnectionPool(host=swnetmiko_config['redis']['host'], port=swnetmiko_config['redis']['port'], password=swnetmiko_config['redis']['password'], decode_responses=swnetmiko_config['redis']['decode'])) def sw_save(swconfig): #保存交换机配置 try: net_connect = ConnectHandler(**swconfig) output = net_connect.send_command("dis cu") print(swconfig['ip']+" OK") readredis.set(swconfig['ip'], "success") saveconfig = codecs.open(nowdir +'/'+ swconfig['ip'] +".conf", 'w+', encoding='utf-8') saveconfig.write(output) saveconfig.close() except: print(swconfig['ip'] + " NO") readredis.set(swconfig['ip'], "fail") if __name__ == '__main__': total = 0 fail = 0 weixindata = "" readredis.flushall() print("初始化redis数据库") #multiprocessing.freeze_support() #防止windows无限创建进程 multi_process = int(swnetmiko_config["multi-process"]) with Pool(multi_process) as p: p.map(sw_save, swnetmiko_config["data"]) for key in swnetmiko_config["data"]: if readredis.get(key["ip"]) == "fail": weixindata = weixindata + (key["ip"]+" 网络或账号密码错误\n") fail = fail + 1 total = total + 1 weixinpost = "总计巡检:"+str(total)+"台"+",故障交换机:"+str(fail)+"台\n"+weixindata post_weixin(weixinpost) flog = codecs.open(nowdir + "/" + nowtime + ".log", 'w', encoding='utf-8') flog.write(weixinpost) flog.close() print("程序执行完成")config.json{ "multi-process" : "4", "weatherapi" : "qweather.com申请api", "weixin" : { "url" : "https://qyapi.weixin.qq.com/cgi-bin/webhook/send?key=用自己的", "title": "交换机巡检多线程版", "url2": "90apt.com", "picurl": "用自己的图片" }, "redis" : { "host": "自己的redis数据库IP", "port": "端口", "password": "密码", "decode": "True" }, "data" : [ {"device_type" : "hp_comware_telnet" , "ip" : "172.16.1.1" , "username" : "admin" , "password" : "passwd" , "port" : "23"}, {"device_type" : "hp_comware_telnet" , "ip" : "172.16.1.2" , "username" : "admin" , "password" : "passwd" , "port" : "23"} ] }配置定时任务crontab 每天早上7:30巡检30 7 * * * cd /root/swbackup/;python3.11 /root/swbackup/swnetmiko.py总结 简单
-
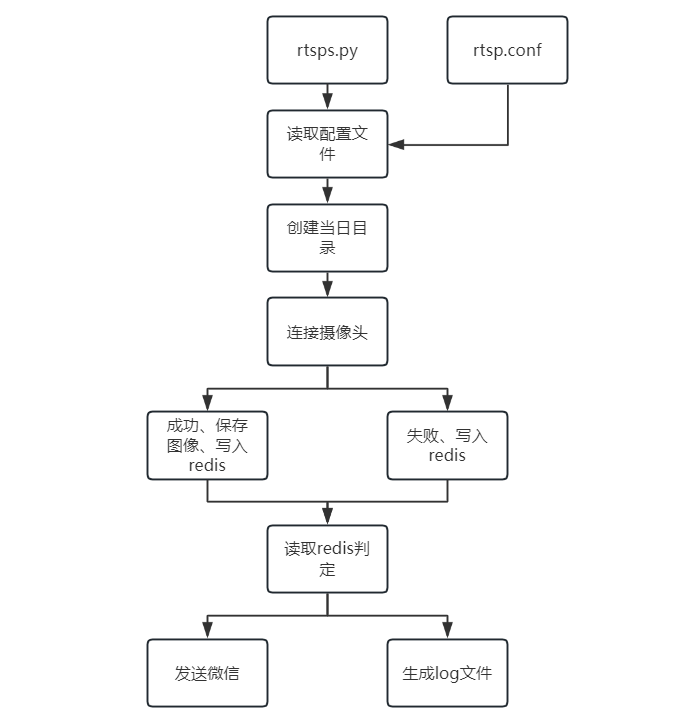
0基础上手python3编程,多进程监控摄像头巡检平台 架构图 读取配置文件;通过rtsp连接摄像头,保存一张截图;发送企业微信通知;记录log日志;多线程运行,速度起飞!预览 系统组成 rtsps.py rtsp.json代码 由于代码在windows平台运行,因此使用绝对路径C:\\jiankong\,文件放置在此目录下。rtsps.pyfrom multiprocessing import Pool,Value,Manager import cv2,os,json,time,requests,codecs,sys,redis,multiprocessing from func_timeout import func_set_timeout def get_config(): config = json.loads(open("C:\\jiankong\\rtsp.json", encoding='utf-8').read()) #读取配置文件 return config rtsp_config = get_config() path1 = ("C:\\jiankong\\") nowtime = time.strftime("%Y%m%d", time.localtime()) try: os.mkdir(path1 + "\\" + nowtime) print("创建当日目录") except: print("当日目录已存在") nowdir = (path1 + "\\" + nowtime) rtsp_config = get_config() readredis = redis.Redis(connection_pool=redis.ConnectionPool(host="IP地址", port="端口", password="密码",decode_responses=True)) #redis连接信息 #企业微信机器人 def post_weixin(stats): url = 'https://qyapi.weixin.qq.com/cgi-bin/webhook/send?key=用你自己的' body = { "msgtype": "news", "news": { "articles": [ { "title": "监控摄像头自动巡检多进程版", "description": stats, "url": "90apt.com", "picurl": "https://www.hikvision.com/content/dam/hikvision/cn/product/network-camera/fixed-ipc/%E7%BB%8F%E9%94%80%E7%B3%BB%E5%88%97/%E7%BB%8F%E9%94%80%E7%B3%BB%E5%88%97%E5%AF%BC%E8%88%AA%E7%9B%AE%E5%BD%95.jpg" } ] }} response = requests.post(url, json=body) print(response.text) print(response.status_code) @func_set_timeout(5) #连接失败超时时间5秒 def linkvideo(link): video = cv2.VideoCapture(link) return video def dayin(rtspconfig): video1 = "rtsp://" + rtspconfig['name'] + ":" + rtspconfig['password'] + "@" + rtspconfig['ip'] + rtsp_config[rtspconfig['brand']] #拼接rtsp参数 try: cap = linkvideo(video1) i = 0 for i in range(5): i = i + 1 ret, frame = cap.read() if ret == False: # 若没有帧返回,则重新刷新rtsp视频流 print("重新获取图像") print(i) if i == 5: readredis.set(rtspconfig['ip'], "fail") print("重新连接5次失败") else: cv2.imwrite(nowdir + "\\" + rtspconfig['ip'] + ".jpeg", frame) #保存图像 print("图像保存成功") readredis.set(rtspconfig['ip'], "success") cap.release() #关闭摄像头 break except: print("连接失败,网络或用户名密码错误") readredis.set(rtspconfig['ip'], "fail") if __name__ == '__main__': total = 0 fail = 0 weixindata = "" readredis.flushall() print("初始化redis数据库") multiprocessing.freeze_support() #防止windows无限创建进程 with Pool(8) as p: #8进程 p.map(dayin, rtsp_config["rtsp"]) for key in rtsp_config["rtsp"]: if readredis.get(key["ip"]) == "fail": weixindata = weixindata + (key["ip"]+" 网络或账号密码错误\n") fail = fail + 1 total = total + 1 weixinpost = "总计巡检:"+str(total)+"台"+",故障摄像头:"+str(fail)+"台\n"+weixindata post_weixin(weixinpost) flog = codecs.open(nowdir + "\\" + nowtime + ".log", 'w', encoding='utf-8') flog.write(weixinpost) flog.close() print("程序执行完成") rtsp.json yushi指宇视品牌摄像头,haikang指海康威视{ "haikang" : ":554/h264/ch1/main/av_stream", "yushi" : ":554/video1", "rtsp" : [ {"ip" : "172.16.1.1","hostname" : "摄像头1","brand" : "yushi","name": "admin","password": "admin"}, {"ip" : "172.16.1.2","hostname" : "摄像头2","brand" : "yushi","name": "admin","password": "admin"}, {"ip" : "172.16.1.3","hostname" : "摄像头3","brand" : "haikang","name": "admin","password": "admin"} ] }总结 有点困难哦
-
VLAN非常规实验,给你带来一个不一样的VLAN2 查看本文前请先查看第一篇VLAN非常规实验,给你带来一个不一样的VLAN1https://90apt.com/2901本期为大家带来两个VLAN非常规实验1、傻瓜网络网管改造2、VLAN串联一、傻瓜网络网管改造 1、项目需求此需求来源真实,监控网络全部为傻瓜式连接交换机,需求逐步进行网管改造,改造应减小对监控网络的影响,监控网络可临时中断数分钟,不允许完全停机进行改造。2、改造前简化拓扑交换机均无配置,硬盘录像机与摄像头互通3、改造思路监控网络配置为vlan10,监控交换机管理网络配置为vlan20SW1 SW2 SW3 IP配置为192.168.20.1 192.168.20.2 192.168.20.3为保证监控不完全停机,需要用到trunk与pvid技术4、监控汇聚交换机改造将1-24口划入vlan10,将25-28划入trunk,配置vlan1 10 20通过,配置pvid10,为vlan20配置ip,最后测试硬盘录像机与摄像头是否互通[SW1]vlan 10 [SW1-vlan10]vlan 20 [SW1-vlan20]qu [SW1]int range g1/0/1 to g1/0/24 [SW1-if-range]port access vlan 10 [SW1-if-range]qu [SW1]int range g1/0/25 to g1/0/28 [SW1-if-range]port link-type trunk [SW1-if-range]port trunk permit vlan 1 10 20 [SW1-if-range]port trunk pvid vlan 10 [SW1]int vlan 20 [SW1-Vlan-interface20]ip add 192.168.20.1 24使用硬盘录像机ping摄像头[H3C]ping 192.168.1.2 Ping 192.168.1.2 (192.168.1.2): 56 data bytes, press CTRL_C to break 56 bytes from 192.168.1.2: icmp_seq=0 ttl=255 time=1.658 ms 56 bytes from 192.168.1.2: icmp_seq=1 ttl=255 time=2.110 ms5、技术解析在此改造中,为什么可以使用trunk接口对接无配置交换机并且不影响监控网络运行?此配置重点在于对vlan的理解,access接口为出撕标签入打标签,trunk接口默认不处理标签,当trunk接口配置pvid时,trunk接口对于此pvid的vlan同样具备access的作用,即出撕标签入打标签,因此trunk pvid vlan10可以与傻瓜交换机的access接口通讯,保证监控网络运行。6、其他监控交换机改造,测试监控交换机之间是否互通,测试硬盘录像机与摄像头是否互通[SW2]vlan 10 [SW2-vlan10]vlan 20 [SW2]int range g1/0/1 to g1/0/24 [SW2-if-range]port access vlan 10 [SW2-if-range]int range g1/0/25 to g1/0/28 [SW2-if-range]port link-type trunk [SW2-if-range]port trunk permit vlan 1 10 20 [SW2-if-range]port trunk pvid vlan 10 [SW2-if-range]qu [SW2]int vlan 20 [SW2-Vlan-interface20]ip add 192.168.20.2 24[SW3]vlan 10 [SW3-vlan10]vlan 20 [SW3-vlan20]qu [SW3]int range g1/0/1 to g1/0/24 [SW3-if-range]port access vlan 10 [SW3-if-range]int range g1/0/25 to g1/0/28 [SW3-if-range]port link-type trunk [SW3-if-range]port trunk permit vlan 1 10 20 [SW3-if-range]port trunk pvid vlan 10 [SW3-if-range]qu [SW3]int vlan 20 [SW3-Vlan-interface20]ip add 192.168.20.3 24硬盘录像机ping摄像头[H3C]ping 192.168.1.2 Ping 192.168.1.2 (192.168.1.2): 56 data bytes, press CTRL_C to break 56 bytes from 192.168.1.2: icmp_seq=0 ttl=255 time=1.230 ms 56 bytes from 192.168.1.2: icmp_seq=1 ttl=255 time=2.140 ms监控汇聚ping监控交换机3<SW1>ping 192.168.20.3 Ping 192.168.20.3 (192.168.20.3): 56 data bytes, press CTRL_C to break 56 bytes from 192.168.20.3: icmp_seq=0 ttl=255 time=1.000 ms 56 bytes from 192.168.20.3: icmp_seq=1 ttl=255 time=1.000 ms改造完成二、VLAN串联 1、项目需求此需求来源真实,SW1、SW2均为网管交换机,SW1 g1-g24为accessVLAN5 g25-g28为trunkALL,SW2 g1-g24为accessVLAN1 g25-g28为trunkALL,此时SW2所在区域已经封闭无法进入,请通过SW1的调整使服务器与读卡器互通。2、现状测试服务器无法ping通读卡器<H3C>ping 192.168.1.2 Ping 192.168.1.2 (192.168.1.2): 56 data bytes, press CTRL_C to break Request time out Request time out3、技术解析由于SW2无法操作,因此要在SW1上将VLAN5与VLAN1互联,通过VLAN1穿过trunk接口将数据送达读卡器,我们在SW1上创建一个VLAN1接口,将VLAN1与VLAN5接口通过网线串联。注意:我们是无法直接为端口配置VLAN1的,但可以通过default使接口恢复为VLAN1.[SW1-GigabitEthernet1/0/4]dis th # interface GigabitEthernet1/0/4 port link-mode bridge port access vlan 5 combo enable fiber # return [SW1-GigabitEthernet1/0/4]default This command will restore the default settings. Continue? [Y/N]:y [SW1-GigabitEthernet1/0/4]dis th # interface GigabitEthernet1/0/4 port link-mode bridge combo enable fiber # return [SW1-GigabitEthernet1/0/4]dis interface brief GE1/0/1 UP 1G(a) F(a) A 5 GE1/0/2 DOWN auto A A 5 GE1/0/3 DOWN auto A A 5 GE1/0/4 DOWN auto A A 1 GE1/0/5 DOWN auto A A 54、测试发现仍无法ping通ping 192.168.1.2 Ping 192.168.1.2 (192.168.1.2): 56 data bytes, press CTRL_C to break Request time out Request time out5、技术分析在同一台交换机上串联接口,我们首先要考虑STP防环协议是否阻止了接口,查看STP接口状态,发现g4接口被屏蔽[SW1]dis stp brief MST ID Port Role STP State Protection 0 GigabitEthernet1/0/1 DESI FORWARDING NONE 0 GigabitEthernet1/0/3 DESI FORWARDING NONE 0 GigabitEthernet1/0/4 BACK DISCARDING NONE 0 GigabitEthernet1/0/28 DESI FORWARDING NONE关闭stp协议[SW1]un stp global en检查服务器与读卡器是否互通<H3C>ping 192.168.1.2 Ping 192.168.1.2 (192.168.1.2): 56 data bytes, press CTRL_C to break 56 bytes from 192.168.1.2: icmp_seq=0 ttl=255 time=1.227 ms 56 bytes from 192.168.1.2: icmp_seq=1 ttl=255 time=1.665 ms测试通过注意:此方法仅用于特殊情况下的紧急处理,请勿实施于正常网络中。
-
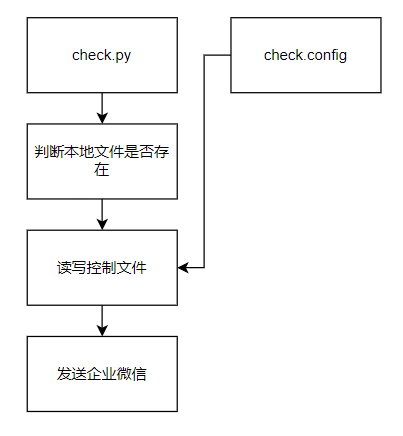
0基础上手python3编程,本地文件存活监控 架构图 判断文件是否存在;如果文件不存在,判断check.config是否为1,如果为1程序退出,如果不存在或为0,生成或写入1并发送企业微信告警;如果文件存在,判断check.config是否为0,如果为0程序退出,如果不存在或为1,生成或写入0并发送企业微信告警;预览 系统组成 由两个文件组成 check.py check.conf,其中 check.conf为自动生成代码 check.pyimport os,requests #企业微信机器人 def post_weixin(stats): url = 'https://qyapi.weixin.qq.com/cgi-bin/webhook/send?key=用自己的' body = { "msgtype": "news", "news": { "articles": [ { "title": "文件监控", "description": stats, "url": "90apt.com", "picurl": "用自己的" } ] }} response = requests.post(url, json=body) print(response.text) print(response.status_code) if os.path.exists("D:\hello.txt") == False: #判断文件是否存在 f1 = open("D:\check.config", 'r') #读取文件 config = f1.read() if config == "1": f1.close() else: f1.close() f1 = open("D:\check.config", 'w+') f1.write("1") #写入文件 post_weixin("监控到文件丢失") f1.close() else: f1 = open("D:\check.config", 'r') config = f1.read() if config == "0": f1.close() else: f1 = open("D:\check.config", 'w+') f1.write("0") post_weixin("监控到文件已生成") f1.close()总结 简单
-
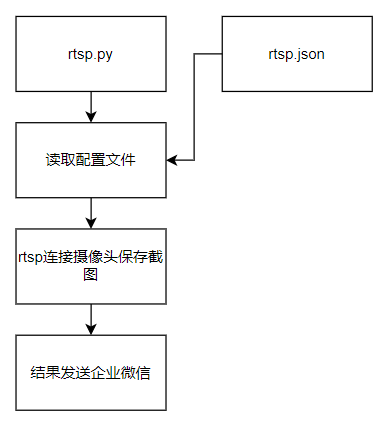
0基础上手python3编程,单线程监控摄像头巡检平台 架构图 读取配置文件;通过rtsp连接摄像头,保存一张截图;发送企业微信通知;记录log日志;预览 系统组成 rtsp.py rtsp.json代码 由于代码在windows平台运行,因此使用绝对路径C:\\jiankong\,文件放置在此目录下。rtsp.pyimport cv2,os,json,time,requests,codecs from func_timeout import func_set_timeout from multiprocessing import Process @func_set_timeout(5) def dayin(): video1 = "rtsp://"+rtspconfig['name']+":"+rtspconfig['password']+"@"+rtspconfig['ip']+rtsp_config[rtspconfig['brand']] cap = cv2.VideoCapture(video1) # 使用整数,此处打开的本地摄像头 while 1: ret, frame = cap.read() if ret == False: # 若没有帧返回,则重新刷新rtsp视频流 continue else: break; # cv2.imshow("capture",frame) cv2.imwrite(nowdir+"\\"+rtspconfig['ip']+".jpeg", frame) cap.release() return rtspconfig['hostname']+"保存成功" def get_config(): config = json.loads(open("C:\\jiankong\\rtsp.json", encoding='utf-8').read()) return config def post_weixin(stats): url = 'https://qyapi.weixin.qq.com/cgi-bin/webhook/send?key=用自己的' body = { "msgtype": "news", "news": { "articles": [ { "title": "监控摄像头自动巡检", "description": stats, "url": "90apt.com", "picurl": "https://www.hikvision.com/content/dam/hikvision/cn/product/network-camera/fixed-ipc/%E7%BB%8F%E9%94%80%E7%B3%BB%E5%88%97/%E7%BB%8F%E9%94%80%E7%B3%BB%E5%88%97%E5%AF%BC%E8%88%AA%E7%9B%AE%E5%BD%95.jpg" } ] }} response = requests.post(url, json=body) print(response.text) print(response.status_code) total = 0 fail = 0 weixindata = "" rtsp_config = get_config() print(rtsp_config) #path1=os.path.abspath('.') path1=("C:\\jiankong\\") nowtime = time.strftime("%Y%m%d", time.localtime()) try: os.mkdir(path1 + "\\" + nowtime) except: None nowdir = (path1 + "\\" + nowtime) for rtspconfig in rtsp_config['rtsp']: total = total + 1 try: dayin() except: weixindata = weixindata + (rtspconfig['hostname']+" "+rtspconfig['ip']+" 网络或账号密码错误\n") fail = fail + 1 weixinpost = "总计巡检:"+str(total)+"台"+",故障摄像头:"+str(fail)+"台\n"+weixindata post_weixin(weixinpost) flog = codecs.open(nowdir+"\\"+nowtime+".log", 'w',encoding='utf-8') flog.write(weixinpost) flog.close() rtsp.json yushi指宇视品牌摄像头,haikang指海康威视{ "haikang" : ":554/h264/ch1/main/av_stream", "yushi" : ":554/video1", "rtsp" : [ {"ip" : "172.16.1.1","hostname" : "摄像头1","brand" : "yushi","name": "admin","password": "admin"}, {"ip" : "172.16.1.2","hostname" : "摄像头2","brand" : "yushi","name": "admin","password": "admin"}, {"ip" : "172.16.1.3","hostname" : "摄像头3","brand" : "haikang","name": "admin","password": "admin"} ] }总结 简单
-
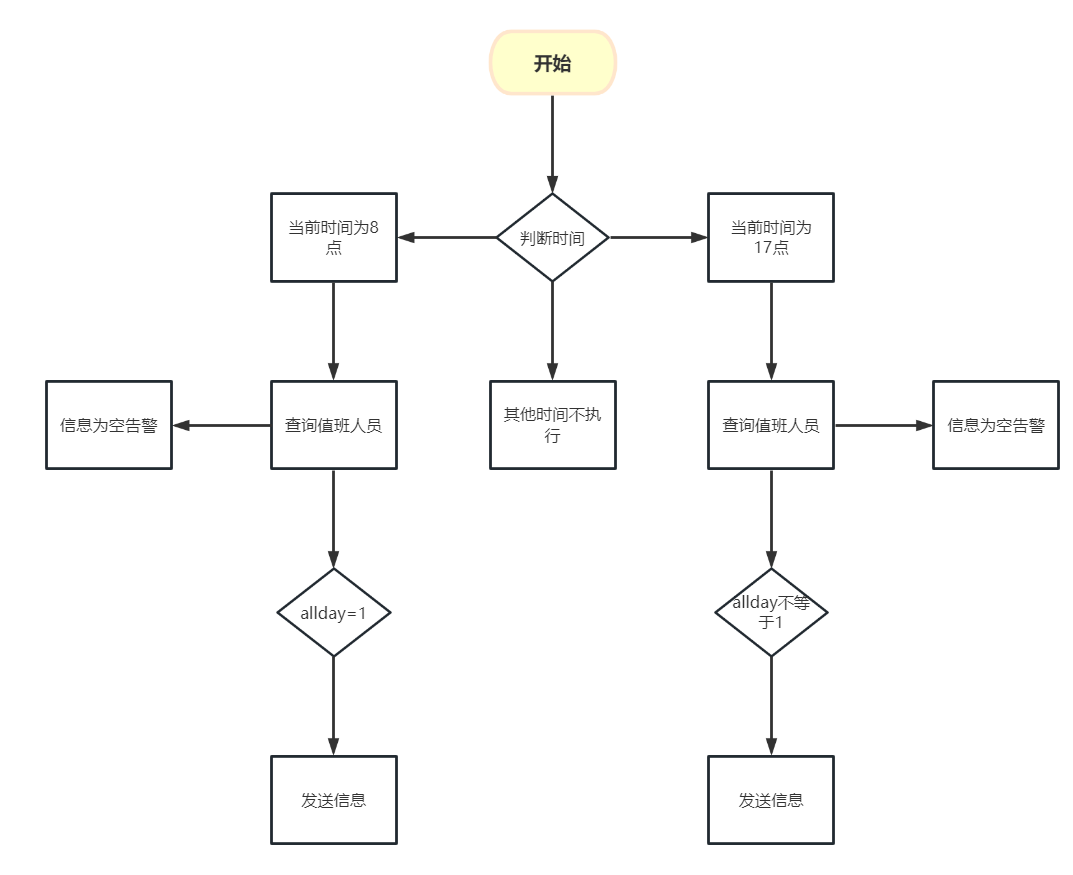
0基础上手python编程,企业微信值班提醒助手 架构图 通过数据库查询并推送值班人员信息,其中allday字段代表24小时值班,24小时值班时8点和17点均进行推送,不填写此字段时只在17点推送。预览 值班人员提醒人员未维护提醒数据库维护,按此格式维护renyuan表zhibanbiao表系统组成 zhibantouch.py 初始化数据库zhiban.py 主程序初始化数据库 首先手动创建库和用户,通过zhibantouch.py初始化,生成表import mysql.connector mqdb = mysql.connector.connect( host="127.0.0.1", user="zhiban", passwd="passwd", database="zhiban" ) mqcursor = mqdb.cursor() mqcursor.execute("CREATE TABLE renyuan (id INT AUTO_INCREMENT PRIMARY KEY,name VARCHAR(255), phone VARCHAR(255))charset=utf8mb4") mqcursor.execute("CREATE TABLE zhibanbiao (id INT AUTO_INCREMENT PRIMARY KEY, time VARCHAR(255), name VARCHAR(255), allday VARCHAR(255))charset=utf8mb4") mqdb.commit() mqcursor.close()初始化后的数据库监控主程序通过定时任务运行zhiban.py主程序定时任务,每天的8:01和17:01执行脚本1 8,17 * * * python3 /root/zhibancheck/zhiban.py 程序代码import requests,time import mysql.connector def check_user(): nowtime = time.strftime("%Y-%m-%d", time.localtime()) mqdb = mysql.connector.connect( host="127.0.0.1", user="zhiban", passwd="passwd", database="zhiban" ) mqcursor = mqdb.cursor() mqcursor.execute("SELECT * FROM zhibanbiao WHERE time = '%s'" % (nowtime)) if mqcursor.fetchall() == []: return None else: mqcursor.execute( "select renyuan.name,renyuan.phone,zhibanbiao.allday from zhibanbiao inner join renyuan on zhibanbiao.name=renyuan.name where zhibanbiao.time='%s'" % ( nowtime)) info = mqcursor.fetchall() return info def post_weixin(data): url = 'https://qyapi.weixin.qq.com/cgi-bin/webhook/send?key=用你自己的' body = { "msgtype": "news", "news": { "articles": [ { "title": "值班信息", "description": data, "url": "90apt.com", "picurl": "用你自己的图片" } ] } } headers = {"Content-Type": "application/json"} response = requests.post(url, json=body) print(response.text) print(response.status_code) checkuser = check_user() if time.strftime("%H", time.localtime()) == "8": if checkuser == None: post_weixin("没有维护值班人员信息") elif checkuser[0][2] == "1": post_weixin("今日值班人员 "+checkuser[0][0]+"\n电话:"+checkuser[0][1]) else: None elif time.strftime("%H", time.localtime()) == "17": if checkuser == None: post_weixin("没有维护值班人员信息") elif checkuser[0][2] == "1": None else: post_weixin("今晚值班人员 " + checkuser[0][0] + "\n电话:" + checkuser[0][1]) else: print("禁止推送时间")总结 简单
-
-
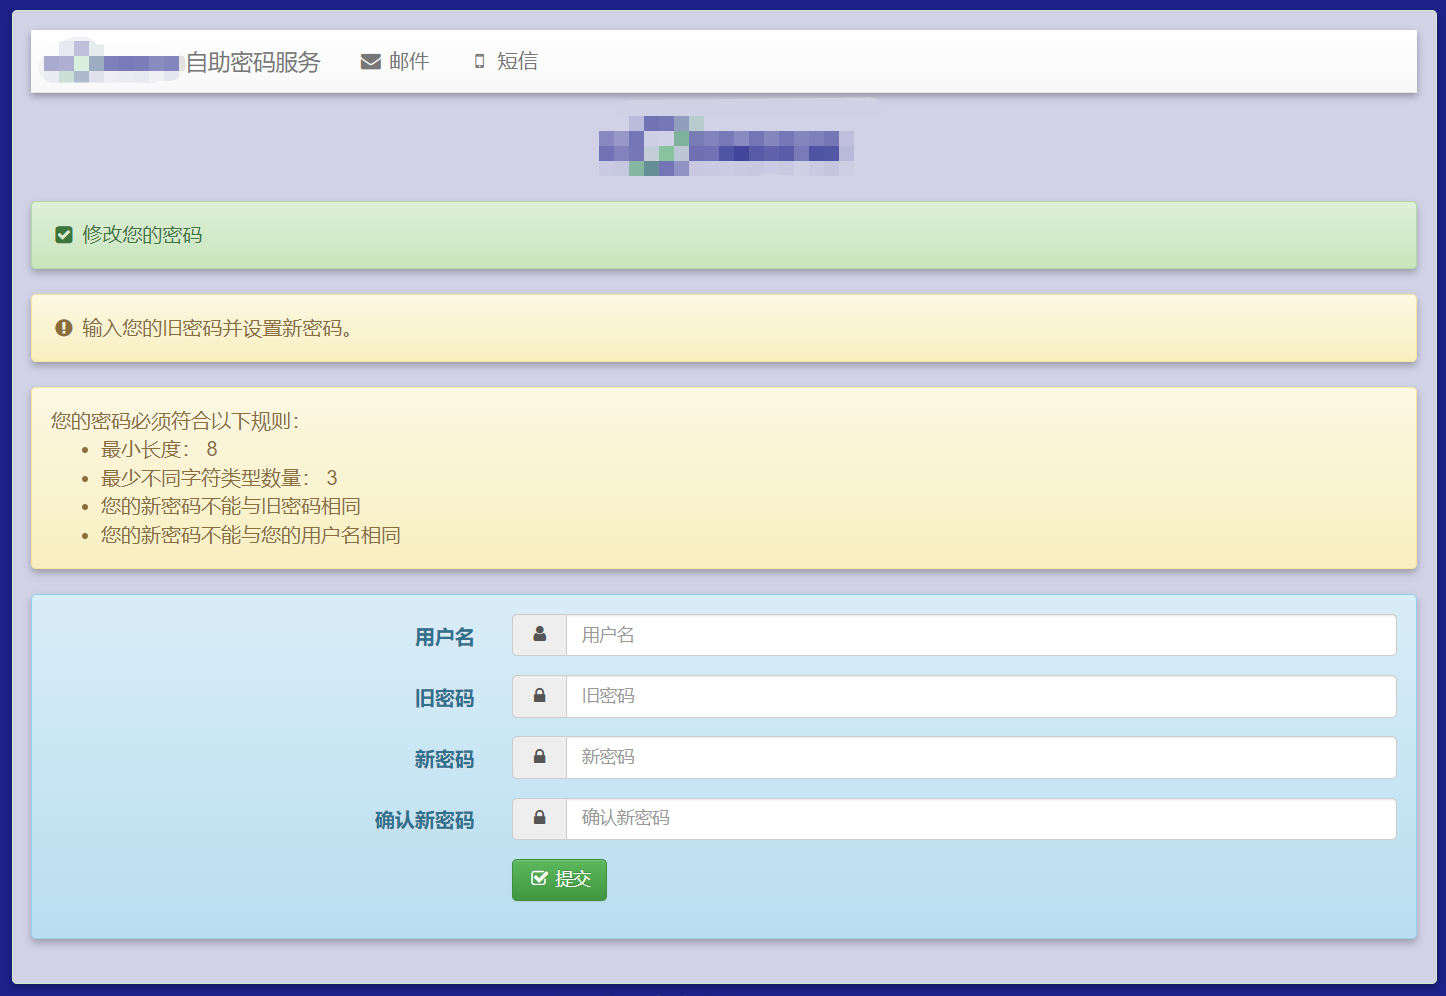
Self Service Password域账号自助服务台 已更新docker版,1分钟部署完成https://90apt.com/4604{lamp/}项目官网:https://www.ltb-project.org/documentation/self-service-password.htmlgithub:https://github.com/ltb-project/self-service-password文档:https://self-service-password.readthedocs.io/en/latest/本文采用oracle linux8系统安装安装:1、安装php-smartyhttps://pkgs.org/download/php-SmartyDownload latest remi-release rpm from http://rpms.remirepo.net/enterprise/8/remi/x86_64/ Install remi-release rpm: rpm -Uvh remi-release*rpm Install php-Smarty rpm package: dnf --enablerepo=remi install php-Smarty2、安装self-service-passwordConfigure the yum repository: /etc/yum.repos.d/ltb-project.repo [ltb-project-noarch] name=LTB project packages (noarch) baseurl=https://ltb-project.org/rpm/$releasever/noarch enabled=1 gpgcheck=1 gpgkey=file:///etc/pki/rpm-gpg/RPM-GPG-KEY-LTB-project Then update: yum update Import repository key: rpm --import https://ltb-project.org/documentation/_static/RPM-GPG-KEY-LTB-project You are now ready to install: yum install self-service-password3、安装openldapyum install -y openldap4、AD域导出证书Self Service Password必须以LDAPS方式连接域控,因此需要加载证书添加角色和功能-AD证书服务证书颁发机构web注册配置证书服务证书颁发机构开启AD域证书服务刷新策略导出证书个人证书导出转换证书openssl x509 -inform der -in ad01.cer -out ad01.pem cat ad01.pem >> /etc/openldap/certs/ldaps.pemopenldap配置文件/etc/openldap/ldap.conf TLS_CACERT /etc/openldap/certs/ldaps.pem TLS_REQCERT allow5、Self Service Password配置文件需生成独立配置文件cd /usr/share/self-service-password/conf/ cp config.inc.php config.inc.local.php我的配置文件config.inc.local.php,主要放上改动的部分和注释<?php $debug = false; //debug模式关闭 # LDAP $ldap_url = "ldaps://ad1.90apt.com:636"; //AD服务器 $ldap_starttls = false; $ldap_binddn = "CN=wangwangjie,CN=Users,DC=90apt,DC=com"; //使用的域控管理员用户 $ldap_bindpw = "passwd@123"; //上面域控管理员密码 $ldap_base = "OU=王工有限公司,OU=用户OU,DC=90apt,DC=com"; //应用的OU范围 $ldap_login_attribute = "sAMAccountName"; //登陆属性 $ldap_fullname_attribute = "cn"; //全名属性 $ldap_filter = "(&(objectClass=user)(sAMAccountName={login})(!(userAccountControl:1.2.840.113556.1.4.803:=2)))"; //AD需要这么配置 $ldap_use_exop_passwd = false; $ldap_use_ppolicy_control = false; $ad_mode = true; //启用AD模式 $ad_options=[]; # Force account unlock when password is changed $ad_options['force_unlock'] = true; //更改密码时强制解锁账户 # Force user change password at next login $ad_options['force_pwd_change'] = false; # Allow user with expired password to change password $ad_options['change_expired_password'] = true; //允许过期的用户修改密码 # Local password policy # This is applied before directory password policy # Minimal length $pwd_min_length = 8; //最短密码位数 # Maximal length $pwd_max_length = 0; # Minimal lower characters $pwd_min_lower = 0; # Minimal upper characters $pwd_min_upper = 0; # Minimal digit characters $pwd_min_digit = 0; # Minimal special characters $pwd_min_special = 0; # Definition of special characters $pwd_special_chars = "^a-zA-Z0-9"; //特殊字符 # Forbidden characters #$pwd_forbidden_chars = "@%"; # Don't reuse the same password as currently $pwd_no_reuse = true; //不使用重复密码 # Check that password is different than login $pwd_diff_login = true; //密码不能与账号相同 # Check new passwords differs from old one - minimum characters count $pwd_diff_last_min_chars = 0; # Forbidden words which must not appear in the password $pwd_forbidden_words = array(); # Forbidden ldap fields # Respective values of the user's entry must not appear in the password # example: $pwd_forbidden_ldap_fields = array('cn', 'givenName', 'sn', 'mail'); $pwd_forbidden_ldap_fields = array(); # Complexity: number of different class of character required $pwd_complexity = 3; //需要不同类别的字符 # use pwnedpasswords api v2 to securely check if the password has been on a leak $use_pwnedpasswords = false; # Show policy constraints message: # always # never # onerror $pwd_show_policy = "always"; //显示约束信息 # Position of password policy constraints message: # above - the form # below - the form $pwd_show_policy_pos = "above"; //在表格上显示 # disallow use of the only special character as defined in `$pwd_special_chars` at the beginning and end $pwd_no_special_at_ends = false; # Who changes the password? # Also applicable for question/answer save # user: the user itself # manager: the above binddn $who_change_password = "manager"; //谁的权限修改 ## Token # Use tokens? # true (default) # false $use_tokens = true; # Crypt tokens? # true (default) # false $crypt_tokens = true; # Token lifetime in seconds $token_lifetime = "3600"; ## Mail # LDAP mail attribute $mail_attributes = array( "userPrincipalName","mail", "gosaMailAlternateAddress", "proxyAddresses" ); //邮箱形式 # Get mail address directly from LDAP (only first mail entry) # and hide mail input field # default = false $mail_address_use_ldap = true; //直接从域控获取邮箱 # Who the email should come from $mail_from = "wangwangjie@90apt.com"; $mail_from_name = "域账号自助改密解锁服务"; $mail_signature = "本邮件为通过密码自助修改LDAP账号密码,无需回复,如有重置密码遇到问题可以联系运维同学"; # Notify users anytime their password is changed $notify_on_change = true; # PHPMailer configuration (see https://github.com/PHPMailer/PHPMailer) $mail_sendmailpath = '/usr/sbin/sendmail'; $mail_protocol = 'smtp'; $mail_smtp_debug = 0; $mail_debug_format = 'html'; $mail_smtp_host = 'smtp.90apt.com'; $mail_smtp_auth = true; $mail_smtp_user = 'wangwangjie@90apt.com'; $mail_smtp_pass = 'passwd@123'; $mail_smtp_port = 25; $mail_smtp_timeout = 30; $mail_smtp_keepalive = false; $mail_smtp_secure = 'tls'; $mail_smtp_autotls = true; $mail_smtp_options = array(); $mail_contenttype = 'text/plain'; $mail_wordwrap = 0; $mail_charset = 'utf-8'; $mail_priority = 3; ## SMS # Use sms $use_sms = true; # SMS method (mail, api) $sms_method = "api"; $sms_api_lib = "lib/smsapi.inc.php"; //自编写短信api,从短信平台的帮助文档里找 # GSM number attribute $sms_attributes = array( "mobile", "pager", "ipPhone", "homephone" ); # Partially hide number $sms_partially_hide_number = true; # Send SMS mail to address. {sms_attribute} will be replaced by real sms number $smsmailto = "{sms_attribute}@service.provider.com"; # Subject when sending email to SMTP to SMS provider $smsmail_subject = "Provider code"; # Message $sms_message = "{smsresetmessage} {smstoken}"; # Remove non digit characters from GSM number $sms_sanitize_number = false; # Truncate GSM number $sms_truncate_number = false; $sms_truncate_number_length = 10; # SMS token length $sms_token_length = 6; # Max attempts allowed for SMS token $max_attempts = 5; # Encryption, decryption keyphrase, required if $use_tokens = true and $crypt_tokens = true, or $use_sms, or $crypt_answer # Please change it to anything long, random and complicated, you do not have to remember it # Changing it will also invalidate all previous tokens and SMS codes $keyphrase = "90apt"; //关键词 # Display menu on top $show_menu = true; //显示菜单 # Logo $logo = "images/logo.png"; //logo # Background image $background_image = "images/90apt.png"; //壁纸 参考链接:https://blog.csdn.net/qq_33574974/article/details/128440776https://blog.csdn.net/qq_43536701/article/details/112290651https://blog.csdn.net/sunny05296/article/details/87634602https://blog.csdn.net/jnloverll/article/details/120333488https://www.cnblogs.com/cf-cf/p/12027495.htmlhttps://hebye.com/docs/ldap/ldap-1d9e6e2dts5avhttps://zhuanlan.zhihu.com/p/445700057?utm_id=0https://cloud.tencent.com/developer/article/1937696https://blog.csdn.net/weixin_44728369/article/details/117558938https://blog.csdn.net/weixin_34163313/article/details/115243146https://blog.csdn.net/hc1017/article/details/81293323?locationNum=1&fps=1https://www.cnblogs.com/skymyyang/p/13653294.htmlhttps://blog.csdn.net/qq461391728/article/details/115867721?ops_request_misc=%257B%2522request%255Fid%2522%253A%2522162848744116780265427748%2522%252C%2522scm%2522%253A%252220140713.130102334..%2522%257D&request_id=162848744116780265427748&biz_id=0&utm_medium=distribute.pc_search_result.none-task-blog-2~all~sobaiduend~default-1-115867721.pc_search_result_control_group&utm_term=self+service+password+%E5%9F%9F%E8%B4%A6%E5%8F%B7&spm=1018.2226.3001.4187https://blog.csdn.net/yanchuandong/article/details/119598665https://blog.51cto.com/u_10630242/2538982
-
-
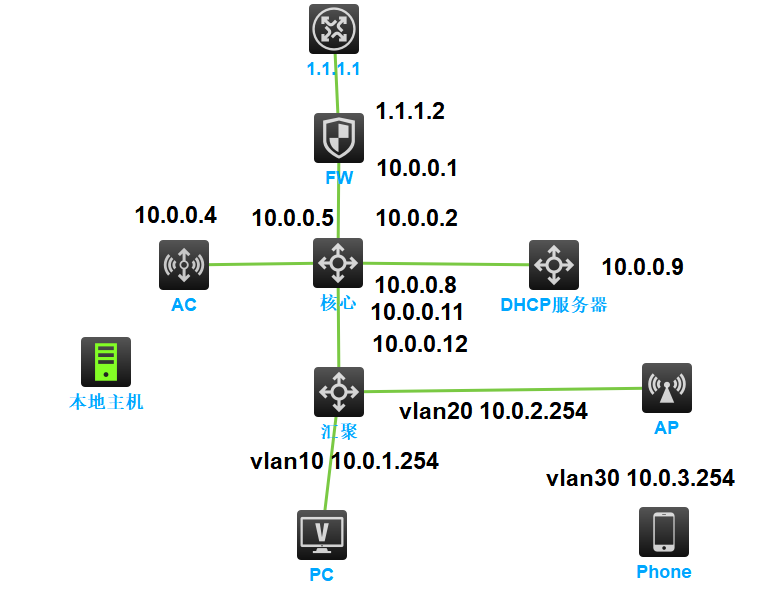
2023年华三H3C HCL新版模拟器防火墙、AC、AP、Phone、Host新功能使用 当前H3C最新版模拟器加入了防火墙、AC、AP、Phone等新设备,本文重点介绍新设备的使用整体规划 采用三层网络结构,核心、汇聚、防火墙、AC、DHCP服务器均采用三层链接,AP采用三层上线,管理业务分离功能实现 1、ospf三层互联,为简化网络,不配置lookback接口2、配置DHCP服务器,配置DHCP中继,为多个VLAN提供服务3、外网通过防火墙NAT访问最终目标 实现Phone通过AP联网并自动获取IP,能够访问外网1.1.1.1配置步骤 1、配置核心交换机 配置三层接口interface GigabitEthernet1/0/1 port link-mode route combo enable fiber ip address 10.0.0.2 255.255.255.252 # interface GigabitEthernet1/0/2 port link-mode route combo enable fiber ip address 10.0.0.9 255.255.255.252 # interface GigabitEthernet1/0/3 port link-mode route combo enable fiber ip address 10.0.0.6 255.255.255.252 # interface GigabitEthernet1/0/4 port link-mode route combo enable fiber ip address 10.0.0.13 255.255.255.252配置ospf协议 ospf 1 area 0.0.0.0 network 10.0.0.0 0.0.0.3 network 10.0.0.4 0.0.0.3 network 10.0.0.8 0.0.0.3 network 10.0.0.12 0.0.0.32、配置DHCP服务器 使用路由器模拟,配置接口interface GigabitEthernet1/0/2 port link-mode route combo enable fiber ip address 10.0.0.10 255.255.255.252配置ospfospf 1 area 0.0.0.0 network 10.0.0.8 0.0.0.3配置dhcp池 dhcp enable dhcp server ip-pool vlan10 gateway-list 10.0.1.254 network 10.0.1.0 mask 255.255.255.0 dns-list 10.0.0.1 # dhcp server ip-pool vlan20 gateway-list 10.0.2.254 network 10.0.2.0 mask 255.255.255.0 dns-list 10.0.0.1 # dhcp server ip-pool vlan30 gateway-list 10.0.3.254 network 10.0.3.0 mask 255.255.255.0 dns-list 10.0.0.13、配置汇聚交换机 配置VLANIF与三层接口interface Vlan-interface10 ip address 10.0.1.254 255.255.255.0 dhcp select relay dhcp relay server-address 10.0.0.10 # interface Vlan-interface20 ip address 10.0.2.254 255.255.255.0 dhcp select relay dhcp relay server-address 10.0.0.10 # interface Vlan-interface30 ip address 10.0.3.254 255.255.255.0 dhcp select relay dhcp relay server-address 10.0.0.10 # interface GigabitEthernet1/0/4 port link-mode route combo enable fiber ip address 10.0.0.14 255.255.255.252配置OSPF ospf 1 area 0.0.0.0 network 10.0.0.12 0.0.0.3 network 10.0.1.0 0.0.0.255 network 10.0.2.0 0.0.0.255 network 10.0.3.0 0.0.0.255开启DHCP中继服务 dhcp enable4、调试pc 配置汇聚交换机对应接口为vlan10interface GigabitEthernet1/0/6 port link-mode bridge port access vlan 10 combo enable fiberPC配置自动获取,成功获取IP5、防火墙 将 本地主机 vbox网卡接口 与 防火墙相连,登陆防火墙,为接口配置IP地址。我的vbox网卡地址为192.168.56.254为防火墙配置192.168.56.2interface GigabitEthernet1/0/0 port link-mode route combo enable copper ip address 192.168.56.2 255.255.255.0配置acl规则,允许此接口进行web登录acl advanced 3000 rule 0 permit ip为接口引入规则security-zone name Management import interface GigabitEthernet1/0/0 # zone-pair security source Local destination Management packet-filter 3000 # zone-pair security source Management destination Local packet-filter 3000登录防火墙进行配置 admin admin配置内网接口配置外网接口配置防火墙静态路由,从防火墙返回内网的路由配置防火墙安全策略,所有区域互通配置NAT转换配置核心默认路由,声明ospf默认路由ip route-static 0.0.0.0 0 10.0.0.1 ospf 1 default-route-advertise配置外网设备1.1.1.1,配置IPinterface GigabitEthernet0/2 port link-mode route combo enable copper ip address 1.1.1.1 255.255.255.0测试pc与防火墙内外网地址互通,实现通讯<H3C>ping 1.1.1.2 Ping 1.1.1.2 (1.1.1.2): 56 data bytes, press CTRL_C to break 56 bytes from 1.1.1.2: icmp_seq=0 ttl=253 time=1.000 ms注意,多外网接口通讯还需配置策略路由防火墙配置至此完成6、AC配置 断开本地主机与防火墙的连接,将本地主机连接至AC为ac配置IP并配置web登录[ac]int vlan 1 [ac-Vlan-interface1]ip add 192.168.56.3 24 [ac]ip http en [ac]local-user admin New local user added. [ac-luser-manage-admin]password simple pass@123456 [ac-luser-manage-admin]authorization-attribute user-role level-15 [ac-luser-manage-admin]service-type http [ac-luser-manage-admin]save因模拟器存在bug,将AC接口改为三层接口后所有接口失效,因此为AC和核心交换机配置trunk及vlan,若已经触发bug,需要删除AC重新添加 核心配置interface Vlan-interface100 ip address 10.0.0.6 255.255.255.252 interface GigabitEthernet1/0/3 port link-mode bridge port link-type trunk port trunk permit vlan all combo enable fiberAC配置interface Vlan-interface100 ip address 10.0.0.5 255.255.255.252 interface GigabitEthernet1/0/3 port link-mode bridge port link-type trunk port trunk permit vlan all为AC设置默认路由ip route-static 0.0.0.0 0 10.0.0.6使用pc测试,可以与AC通讯<H3C>ping 10.0.0.5 Ping 10.0.0.5 (10.0.0.5): 56 data bytes, press CTRL_C to break 56 bytes from 10.0.0.5: icmp_seq=0 ttl=253 time=2.000 ms为DHCP服务器配置option43选项,AP上线网段为VLAN20option43格式简要说明: 80 07 00 00 01 02 02 02 02 80:固定值,不用改变; 07:长度字段,其后面所跟数据的字节长度; 00 00:固定值,不用改变; 01:表示后面的IP地址的个数,此处为一个IP地址; 02 02 02 02:IP地址在线转换工具 https://tool.520101.com/wangluo/jinzhizhuanhuan/10.0.0.5 = A000005 拼接默认字段option 43 hex 80070000010A000005,位数不够补零DHCP服务器配置dhcp server ip-pool vlan20 gateway-list 10.0.2.254 network 10.0.2.0 mask 255.255.255.0 dns-list 10.0.0.1 option 43 hex 80070000010a000005汇聚为AP对应的接口配置trunk及默认pvidinterface GigabitEthernet1/0/5 port link-mode bridge port link-type trunk port trunk permit vlan all port trunk pvid vlan 20重启AP,查看获取IP情况查看IPdis int br Vlan1 UP UP 10.0.2.1登录ac,开启自动AP进行AP固化及重命名创建本地转发网络为ap创建map文件,vlan30为业务vlan自定义名字officecfg.txt,因为接口配置了pvid,所以对ap来说,管理vlan是vlan1,不需要再配置system-view vlan 30 quit interface GigabitEthernet 0/0/0 port link-type trunk port trunk permit vlan 30在AP上部署map文件在AP上部署无线网络,vlan填写业务vlan 30客户端联网测试,成功获取vlan30的ipphone ping通外网1.1.1.1,实验完成小结 华三模拟器,牛逼!
-
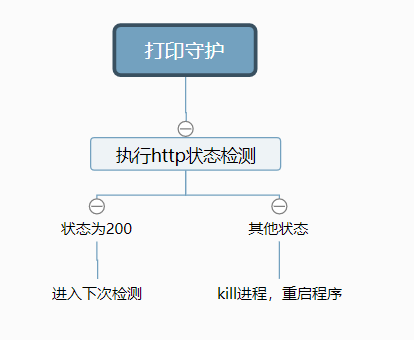
0基础上手python编程,实践进程+URL守护程序+企业微信机器人告警 全民制作人大家好,我是学习python两天半的练习生王忘杰,喜欢路由交换、linux、网络安全,开整!这是我的第三篇0基础python文章,请大家支持,谢谢~开发思路用于监控指定的URL或进程,在我的场景中,使用了httpprinter打印机插件,这个程序提供了http接口的打印功能,当程序死机时,http接口无法连接,则需要重启程序设计思路很简单,访问失败发送告警并重启程序即可。绘制开发流程图使用python语言实现import os,requests,win32api,json,psutil def process_check(processname): #检查进程是否存在,存在返回1 pl = psutil.pids() for pid in pl: if psutil.Process(pid).name() == processname: return 1 else: return 0 def url_check(url): #检查URL try: r = requests.get(url, timeout=3, verify=False) if r.status_code == 200: print("运行中,无异常") else: msg = "http打印程序状态异常,重启程序" yun_push(msg) # 关闭程序 os.system("taskkill /F /IM HttpPrinter.exe") # 启动程序 win32api.ShellExecute(0,'open','C:\\HttpPrinter_latest\\HttpPrinter.exe','','',1) except: msg = "http打印程序状态异常,重启程序" yun_push(msg) # 关闭程序 os.system("taskkill /f /im HttpPrinter.exe") # 启动程序 win32api.ShellExecute(0,'open','C:\\HttpPrinter_latest\\HttpPrinter.exe','','',1) def yun_push(content): #企业微信推送 url = 'https://qyapi.weixin.qq.com/cgi-bin/webhook/send?key=用自己的' s = json.dumps({'msgtype': 'text', 'text': {"content": content}}) print(requests.post(url, data=s).text) if __name__ == '__main__': #检查进程是否存在 #if(process_check("HttpPrinter.exe")) #检查URL url_check("http://10.0.0.1:1234/")编译成EXE程序pyinstaller -F -w .\main.py部署windows计划任务运行效果