
搜索到
332
篇与
的结果
-
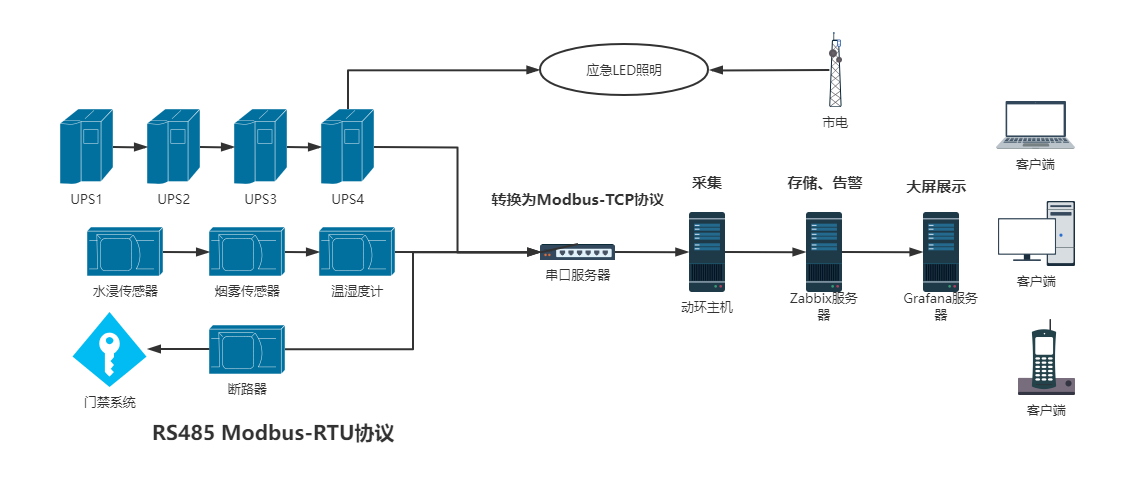
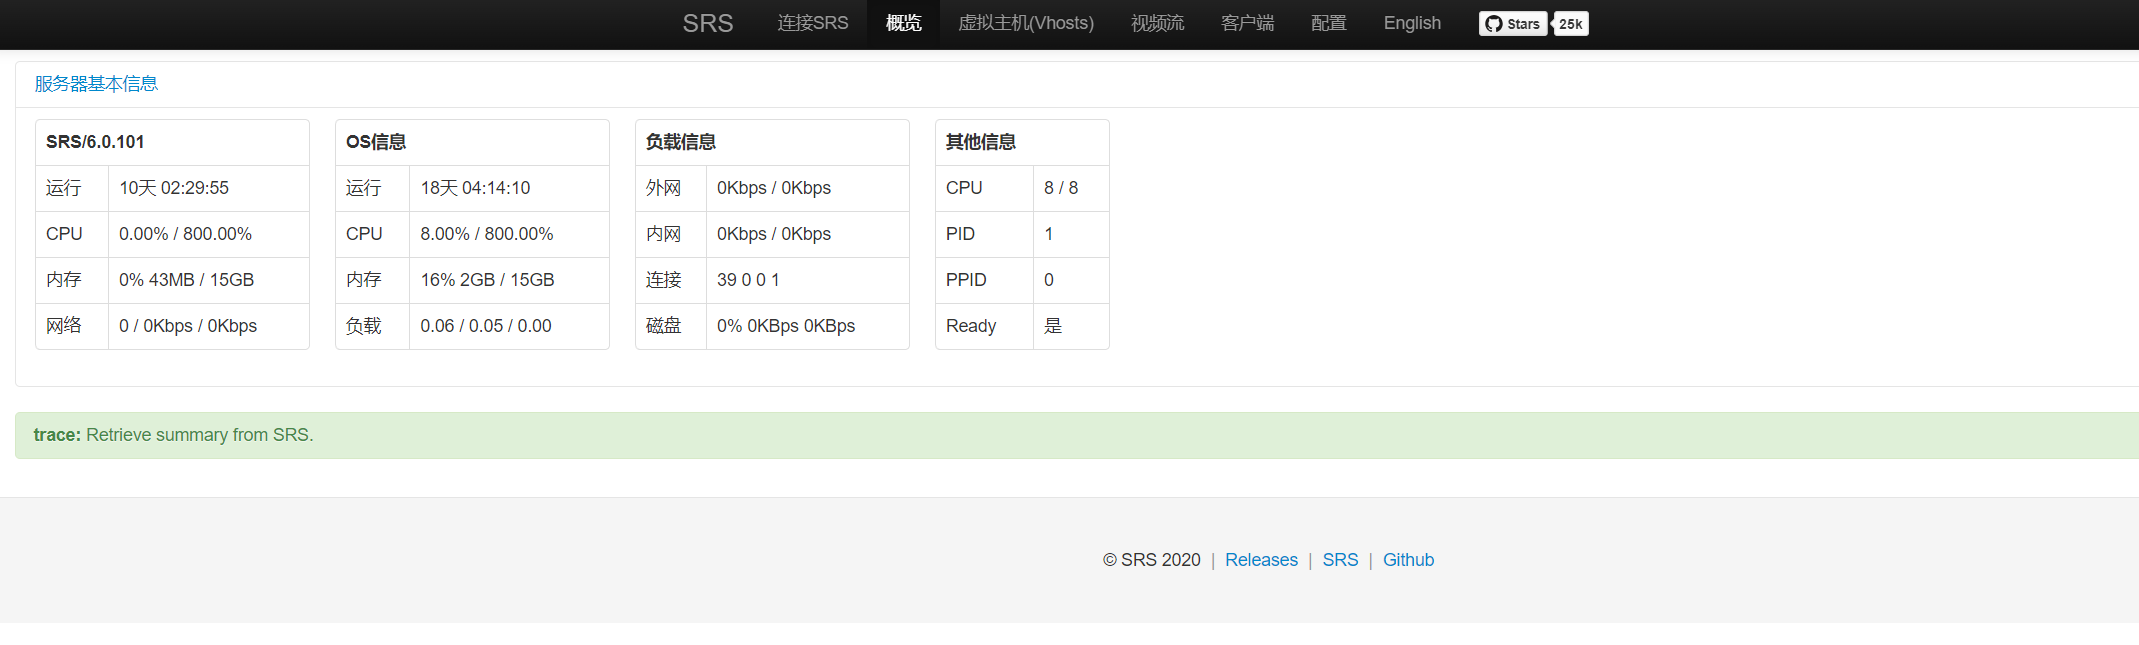
 采用开源Zabbix+500块硬件平替5万块动环检测系统,实现UPS、温湿度、烟雾等数据采集、存储、告警、大屏展示、RS485 Modbus采集、RS232采集 架构展示: 大屏展示: 所需软件: ZabbixGrafana安装Zabbix-agent2的采集服务器MThings串口调试软件厂家自带UPS监控软件USR-VCOM有人虚拟串口软件所需硬件: 有人串口服务器(USR-N510)有人串口服务器 USR-TCP232-306自制RS485连接线万图思睿 SD123-ST01 RS485温湿度变送器万图思睿 SD123-SA01-R4 RS485烟感报警器所需资料: 科士达YDC3330 modbus开发文档YDC3330说明书一、安装、配置串口服务器 1、硬件安装制作UPS所需要的RS485通讯线,我使用了1、2、8,分别是485+、485-、GND地线,而12V是不需要连接的,因为我们连接的对象是UPS,它并不需要我们通过12V为其供电。如果我们连接的是温湿度计,则需要通过12V为其供电。YDC3330自带两个RS485接口,其支持菊花链连接,所以我使用RS485线一根接一根串起来,这样外观美观。注意,UPS接线非常危险,注意安全!串口服务器只需要将串口模式拨到RS485,并且连接电源、网线、串口线即可2、网络更改按串口服务器背面IP地址,登录,修改IP地址和串口参数、协议参数。右上角更改语言,左侧更改IP地址、按UPS说明书要求调整串口内容,我这里使用的9600:8n1,下方我这里需要使用厂家的UPS软件测试,所以使用的TcpServer None,后面使用Zabbix modbus-get的时候,就需要改成ModbusTCP了二、解析文档 1、使用厂家软件测试安装USR-VCOM有人虚拟串口软件,这个软件的作用可以理解为通过网络将串口无限延长。串口 - 有人串口服务器 - 虚拟串口此时我们使用厂家的UPS软件,软件正常运行通过菊花链串联的方式,4台UPS都上线了,可以搜索到站号分别为1、5、6、7,这个后面要用到2、解析参数如何获取我们需要的参数呢假设,我们要获取A相输入电压,查看说明书采用的modbus-RTU报文格式如图功能码对照表A相输入电压地址,大小2Byte按modbus-RTU组合参数,此时的报文为 01 04 75 30 00 01 XX XX01为站号1 04为功能码,我们要取的30001在功能码中为04H读 75 30为30000的十六进制 00 01为读取一个寄存器地址,即30001的数据,同理我们要读取ABC三相输入,此处就为00 03三个寄存器地址 XX XX为校验码,modbus调试软件可以自动生成使用MThings调试,确认我们要获取的数据没问题此处发现厂家说明书印刷错误,印刷运行状态为30070,实际测试为30080三、配置Zabbix 1、修改串口服务器为modbus-tcp模式2、通过zabbix-agent2获取数据安装一台主机,并安装zabbix-agent2,接入zabbix在zabbix服务器上通过命令请求数据,可以看到数据返回正常zabbix_get -s 172.16.1.5 -k modbus.get[tcp://172.16.1.201:9000,1,4,30000,81] zabbix_get -s 172.16.11.5 指定请求的客户端 -k modbus.get 以modbus.get方式请求 tcp://172.16.1.201:9000,1,4,30000,81 串口服务器IP端口,站号1,功能码4,从30000开始请求,请求81个寄存器数据3、制作zabbix监控项我们采用的方式是一次请求,分段解析添加监控项制作modbus-get监控项,按图片填写即可键值:modbus.get[tcp://172.16.1.201:9000,1,4,30000,81] 信息类型:文本添加监控项制作数据分类监控项,从modbus-get监控项获取数据注意类型为:相关项目 主要项是modbus-get监控项还没完,点击到进程中,此处是配置获取第几位的数值,有没有倍率关系,倍率关系看说明书JSONPath = $[17] 自定义倍数 = 0.14、制作zabbix报警项添加触发器last(/donghuan/ups1yunxingzhuangtai)=5当ups1yunxingzhuangtai值为5时报警,5的值在说明书中为市电中断拉闸测试,5s内收到微信告警添加监控数据获取失败报警表达式: nodata(/donghuan/modbus.get[tcp://172.16.1.201:9000,7,4,30000,81],30)=1 30秒后无数据进行报警四、配置大屏 Grafana正常接入Zabbix添加一项,一看就懂按自己的喜好风格制作大屏即可五、温湿度、烟雾传感器协议解析 新增内容:温湿度采集修改设备地址烟雾采集手动触发烟雾告警读取烟雾信号万图思睿的产品修改设备地址方式相同六、施耐德APC Smart-UPS RS232采集 1、连接信息默认波特率为24002、查询字符Y 让设备进入查询模式 j 续航时间 L 输入电压 O 输出电压 C 当前温度 Q 电池状态 f 电容容量 \ 当前负载3、发送数据编写python程序形成UPSdata数据,格式建议为[x,y,z],便于zabbix解析服务器安装有人vcom软件,将串口连接到服务器zabbix_sender.exe -c zabbix_agent2.conf -k 键值 -o "发送的数据"4、zabbix接收创建 zabbix采集器 键值与zabbix_sender发送的键值对应BUG处理,如遇到字符串错误1. Failed: cannot extract value from json by path "$[3]": invalid JSON object value starting character at: '.00]'添加一个javascript预处理修复字符串// 修复以点号开头的数字 try { // 先尝试解析 JSON.parse(value); return value; } catch (e) { // 修复 .xx 为 0.xx var fixed = value.replace(/([\[:,]\s*)\.(\d+)/g, '$10.$2'); return fixed; }5、查看接收的数据6、python采集程序示例import serial,time,os def main(): # 配置串口参数 ser = serial.Serial( port='COM11', # 根据实际情况修改串口号,例如 Windows 上可能是 'COM3' baudrate=2400, # 设置波特率,根据实际情况修改 timeout=1 # 设置读取超时时间 ) if ser.is_open: print(f"串口 {ser.port} 已打开,查询 施耐德UPS 信息") else: print(f"无法打开串口 {ser.port}") return try: # 发送字符 'Y' ser.write(b'Y') # 等待一段时间让设备响应 time.sleep(0.1) # 读取返回的数据 response = ser.read(ser.in_waiting ) # 读取所有等待数据或至少1字节 if response: UPS1_list = response.decode('utf-8', errors='ignore').splitlines() if UPS1_list[0] == "SM": try: ser.write(b'jLOCQf\\Y') # 等待一段时间让设备响应 time.sleep(0.1) # 读取返回的数据 response = ser.read(ser.in_waiting or 100) # 读取所有等待数据或至少1字节 if response: UPS2_list = response.decode('utf-8', errors='ignore').splitlines() if UPS2_list[7] == "SM": print("续航时间"+UPS2_list[0].lstrip('0').replace(':','')+"分钟 输入电压"+UPS2_list[1]+"V 输出电压"+UPS2_list[2]+"V 当前温度"+UPS2_list[3].lstrip('0')+"摄氏度 电池容量"+UPS2_list[5]+"% 当前负载"+UPS2_list[6].lstrip('0')+"%") UPS3_list = str("["+UPS2_list[0].lstrip('0').replace(':','')+","+UPS2_list[1]+","+UPS2_list[2]+","+UPS2_list[3].lstrip('0')+","+UPS2_list[5]+","+UPS2_list[6].lstrip('0')+"]") command_array = ['zabbix_sender.exe','-c','zabbix_agent2.conf','-k','upsrs232','-o',UPSdata] command_str = ' '.join(command_array) print(command_array) print(command_str) result = os.popen(command_str) print(result.read()) else: print("没有接收到返回数据,连接错误") except Exception as e: print(f"通信过程中发生错误: {e}") else: print("UPS连接错误") else: print("没有接收到返回数据,连接错误") except Exception as e: print(f"通信过程中发生错误: {e}") finally: # 关闭串口 ser.close() print(f"串口 {ser.port} 已关闭") if __name__ == "__main__": main() 七、小结 文章很流畅,但现实并不会如此顺利。第一次,使用的串口线有问题,导致无法连接UPS第二次,厂家给我发错了文档,连续一星期无法测试成功第三次,厂家发对了文档,但是文档的内容错误,导致获取的数据不正确半个月时间分析协议,最后接入Zabbix制作大屏仅用了半天而已最后,Zabbix无比强大,值得深入学习!时隔两年,增加了RS232采集Zabbix真的太强大了
 -
快速部署OceanBase 集群 1ZONE 6节点,使用SysBench对比测试mysql8.4单节点 一、环境准备 1、安装规划使用anolis8.9系统,1个zone,6台主机,1为rootserver,2 3安装obproxy 4安装ocp exp关闭防火墙,避免影响实验 systemctl stop firewalld && systemctl disable firewalld2、使用obd在线部署当您选择在线部署时,可以参考本节命令在中控机上安装 obd。sudo yum install -y yum-utils sudo yum-config-manager --add-repo https://mirrors.aliyun.com/oceanbase/OceanBase.repo sudo yum install -y ob-deploy source /etc/profile.d/obd.sh3、安装java环境,OCP Express要求java1.8https://www.java.com/en/download/manual.jsp下载 Linux x64 RPM filesize: 104.47 安装[root@ob2 ~]# rpm -ivh jre-8u431-linux-x64.rpm 警告:jre-8u431-linux-x64.rpm: 头V3 RSA/SHA256 Signature, 密钥 ID ad986da3: NOKEY Verifying... ################################# [100%] 准备中... ################################# [100%] 正在升级/安装... 1:jre-1.8-1.8.0_431-10 ################################# [100%] [root@ob2 ~]# java -version java version "1.8.0_431" Java(TM) SE Runtime Environment (build 1.8.0_431-b10) Java HotSpot(TM) 64-Bit Server VM (build 25.431-b10, mixed mode) 4、配置优化每台主机执行echo -e "* soft nofile 655350\n* hard nofile 655350" >> /etc/security/limits.d/nofile.conf echo "vm.max_map_count=655360" >> /etc/sysctl.conf; sysctl -p echo "fs.file-max=6573688" >> /etc/sysctl.conf; sysctl -p5、启动白屏安装 注意,命令需要在本地终端执行,不可以远程ssh执行 obd web如果ssh远程执行obd web,会报ceanbase-ce:ssh 原因:OBD-1013 : root@x.x.x.x connect failed: could not get keys from ssh-agent 建议:手动修复 Please check user config and network二、安装环境 我这里安装OCP Express我这里rootserver、ocpEXP、obproxy分散在各个主机上等待部署完成安装完成,记好密码三、配置使用 登录ocp exphttp://IP:8180/配置租户等待租户创建完成后,创建数据库和用户连接测试可通过rootserver2881端口连接也可通过obproxy 2883端口连接四、性能测试 均在同一个超融合集群中 MYSQL8.4.3单机 32C64GOB集群 1zone6主机 8Cx6 16Gx6table_size=1000000 tables=350 threads=80 数据量大约140G安装SysBench配置epel源yum install -y https://mirrors.aliyun.com/epel/epel-release-latest-8.noarch.rpm sed -i 's|^#baseurl=https://download.example/pub|baseurl=https://mirrors.aliyun.com|' /etc/yum.repos.d/epel* sed -i 's|^metalink|#metalink|' /etc/yum.repos.d/epel*安装SysBenchyum install sysbenchOB集群OLTP读写混合场景 清除数据sysbench /usr/share/sysbench/oltp_read_write.lua --mysql-host=IP地址 --mysql-port=端口 --mysql-db=数据库名 --mysql-user=用户名 --mysql-password=密码 --table_size=1000000 --tables=350 --threads=80 --report-interval=10 --rand-type=uniform --time=60 cleanup初始化测试数据sysbench /usr/share/sysbench/oltp_read_write.lua --mysql-host=IP地址 --mysql-port=端口 --mysql-db=数据库名 --mysql-user=用户名 --mysql-password=密码 --table_size=1000000 --tables=350 --threads=80 --report-interval=10 --rand-type=uniform --time=60 prepare执行测试sysbench /usr/share/sysbench/oltp_read_write.lua --mysql-host=IP地址 --mysql-port=端口 --mysql-db=数据库名 --mysql-user=用户名 --mysql-password=密码 --table_size=1000000 --tables=350 --threads=80 --report-interval=10 --time=60 --rand-type=uniform --db-ps-mode=disable runOB集群OLTP只读场景压测 准备数据sysbench --db-driver=mysql --mysql-host=IP地址 --mysql-port=端口 --mysql-user=用户名 --mysql-password=密码 --mysql-db=数据库名 --table_size=1000000 --tables=350 --events=0 --time=300 --threads=80 oltp_read_only prepare运行压测sysbench --db-driver=mysql --mysql-host=IP地址 --mysql-port=端口 --mysql-user=用户名 --mysql-password=密码 --mysql-db=数据库名 --table_size=1000000 --tables=350 --events=0 --time=300 --threads=80 --percentile=95 --report-interval=1 oltp_read_only run清理数据sysbench --db-driver=mysql --mysql-host=IP地址 --mysql-port=端口 --mysql-user=用户名 --mysql-password=密码 --mysql-db=数据库名 --table_size=1000000 --tables=350 --events=0 --time=300 --threads=80 --percentile=95 oltp_read_only cleanupMYSQL单机OLTP读写混合场景 清除数据sysbench /usr/share/sysbench/oltp_read_write.lua --mysql-host=IP地址 --mysql-port=端口 --mysql-db=数据库名 --mysql-user=用户名 --mysql-password=密码 --table_size=1000000 --tables=350 --threads=80 --report-interval=10 --rand-type=uniform --time=60 cleanup初始化测试数据sysbench /usr/share/sysbench/oltp_read_write.lua --mysql-host=IP地址 --mysql-port=端口 --mysql-db=数据库名 --mysql-user=用户名 --mysql-password=密码 --table_size=1000000 --tables=350 --threads=80 --report-interval=10 --rand-type=uniform --time=60 prepare执行测试sysbench /usr/share/sysbench/oltp_read_write.lua --mysql-host=IP地址 --mysql-port=端口 --mysql-db=数据库名 --mysql-user=用户名 --mysql-password=密码 --table_size=1000000 --tables=350 --threads=80 --report-interval=10 --time=60 --rand-type=uniform --db-ps-mode=disable runMYSQL单机OLTP只读场景压测 准备数据sysbench --db-driver=mysql --mysql-host=IP地址 --mysql-port=端口 --mysql-user=用户名 --mysql-password=密码 --mysql-db=数据库名 --table_size=1000000 --tables=350 --events=0 --time=300 --threads=80 oltp_read_only prepare运行压测sysbench --db-driver=mysql --mysql-host=IP地址 --mysql-port=端口 --mysql-user=用户名 --mysql-password=密码 --mysql-db=数据库名 --table_size=1000000 --tables=350 --events=0 --time=300 --threads=80 --percentile=95 --report-interval=1 oltp_read_only run清理数据sysbench --db-driver=mysql --mysql-host=IP地址 --mysql-port=端口 --mysql-user=用户名 --mysql-password=密码 --mysql-db=数据库名 --table_size=1000000 --tables=350 --events=0 --time=300 --threads=80 --percentile=95 oltp_read_only cleanup测试结果 MYSQL单机OLTP读写混合场景[ 10s ] thds: 80 tps: 279.82 qps: 5649.14 (r/w/o: 3961.11/1120.39/567.64) lat (ms,95%): 467.30 err/s: 0.00 reconn/s: 0.00[ 20s ] thds: 80 tps: 336.51 qps: 6786.91 (r/w/o: 4759.38/1354.52/673.01) lat (ms,95%): 390.30 err/s: 0.00 reconn/s: 0.00[ 30s ] thds: 80 tps: 246.00 qps: 4918.91 (r/w/o: 3441.11/985.80/492.00) lat (ms,95%): 520.62 err/s: 0.00 reconn/s: 0.00[ 40s ] thds: 80 tps: 306.70 qps: 6129.61 (r/w/o: 4290.91/1225.30/613.40) lat (ms,95%): 434.83 err/s: 0.00 reconn/s: 0.00[ 50s ] thds: 80 tps: 354.50 qps: 7104.99 (r/w/o: 4974.69/1421.30/709.00) lat (ms,95%): 369.77 err/s: 0.00 reconn/s: 0.00[ 60s ] thds: 80 tps: 339.50 qps: 6785.12 (r/w/o: 4741.72/1364.40/679.00) lat (ms,95%): 376.49 err/s: 0.00 reconn/s: 0.00MYSQL单机OLTP只读场景压测[ 1s ] thds: 80 tps: 2322.83 qps: 37870.75 (r/w/o: 33145.27/0.00/4725.49) lat (ms,95%): 51.02 err/s: 0.00 reconn/s: 0.00[ 2s ] thds: 80 tps: 2927.99 qps: 46815.91 (r/w/o: 40960.92/0.00/5854.99) lat (ms,95%): 35.59 err/s: 0.00 reconn/s: 0.00[ 3s ] thds: 80 tps: 3440.21 qps: 55064.31 (r/w/o: 48183.89/0.00/6880.41) lat (ms,95%): 31.94 err/s: 0.00 reconn/s: 0.00[ 4s ] thds: 80 tps: 3973.17 qps: 63529.73 (r/w/o: 55585.39/0.00/7944.34) lat (ms,95%): 27.17 err/s: 0.00 reconn/s: 0.00[ 5s ] thds: 80 tps: 4175.91 qps: 66879.59 (r/w/o: 58526.76/0.00/8352.82) lat (ms,95%): 26.20 err/s: 0.00 reconn/s: 0.00[ 76s ] thds: 80 tps: 4714.21 qps: 75534.39 (r/w/o: 66105.97/0.00/9428.42) lat (ms,95%): 22.69 err/s: 0.00 reconn/s: 0.00[ 77s ] thds: 80 tps: 4679.42 qps: 74748.76 (r/w/o: 65388.92/0.00/9359.85) lat (ms,95%): 23.10 err/s: 0.00 reconn/s: 0.00[ 78s ] thds: 80 tps: 4737.18 qps: 75766.94 (r/w/o: 66295.57/0.00/9471.37) lat (ms,95%): 22.28 err/s: 0.00 reconn/s: 0.00[ 79s ] thds: 80 tps: 4650.49 qps: 74527.85 (r/w/o: 65222.87/0.00/9304.98) lat (ms,95%): 23.10 err/s: 0.00 reconn/s: 0.00[ 80s ] thds: 80 tps: 4664.70 qps: 74592.18 (r/w/o: 65266.78/0.00/9325.40) lat (ms,95%): 22.69 err/s: 0.00 reconn/s: 0.00OB集群 1zone6主机OLTP读写混合场景[ 10s ] thds: 80 tps: 194.03 qps: 3980.77 (r/w/o: 2799.12/785.60/396.05) lat (ms,95%): 960.30 err/s: 0.00 reconn/s: 0.00[ 20s ] thds: 80 tps: 585.61 qps: 11728.84 (r/w/o: 8211.80/2345.83/1171.21) lat (ms,95%): 267.41 err/s: 0.00 reconn/s: 0.00[ 30s ] thds: 80 tps: 1159.31 qps: 23173.24 (r/w/o: 16218.30/4636.33/2318.61) lat (ms,95%): 104.84 err/s: 0.00 reconn/s: 0.00[ 40s ] thds: 80 tps: 1573.49 qps: 31474.50 (r/w/o: 22032.76/6294.86/3146.88) lat (ms,95%): 70.55 err/s: 0.00 reconn/s: 0.00[ 50s ] thds: 80 tps: 1568.68 qps: 31364.68 (r/w/o: 21954.30/6272.92/3137.46) lat (ms,95%): 89.16 err/s: 0.00 reconn/s: 0.00[ 60s ] thds: 80 tps: 1876.77 qps: 37543.14 (r/w/o: 26280.21/7509.89/3753.04) lat (ms,95%): 55.82 err/s: 0.00 reconn/s: 0.00OB集群 1zone6主机OLTP只读场景压测[ 1s ] thds: 80 tps: 258.36 qps: 4791.07 (r/w/o: 4194.56/0.00/596.51) lat (ms,95%): 646.19 err/s: 0.00 reconn/s: 0.00[ 2s ] thds: 80 tps: 523.06 qps: 8405.99 (r/w/o: 7359.87/0.00/1046.12) lat (ms,95%): 601.29 err/s: 0.00 reconn/s: 0.00[ 3s ] thds: 80 tps: 678.97 qps: 10798.50 (r/w/o: 9440.56/0.00/1357.94) lat (ms,95%): 376.49 err/s: 0.00 reconn/s: 0.00[ 4s ] thds: 80 tps: 974.06 qps: 15628.02 (r/w/o: 13679.90/0.00/1948.13) lat (ms,95%): 277.21 err/s: 0.00 reconn/s: 0.00[ 5s ] thds: 80 tps: 1244.00 qps: 19876.04 (r/w/o: 17388.04/0.00/2488.01) lat (ms,95%): 207.82 err/s: 0.00 [ 76s ] thds: 80 tps: 5320.92 qps: 85129.68 (r/w/o: 74486.85/0.00/10642.83) lat (ms,95%): 19.29 err/s: 0.00 reconn/s: 0.00[ 77s ] thds: 80 tps: 5331.83 qps: 85282.34 (r/w/o: 74620.67/0.00/10661.67) lat (ms,95%): 18.95 err/s: 0.00 reconn/s: 0.00[ 78s ] thds: 80 tps: 5279.20 qps: 84432.24 (r/w/o: 73874.84/0.00/10557.41) lat (ms,95%): 19.29 err/s: 0.00 reconn/s: 0.00[ 79s ] thds: 80 tps: 5431.77 qps: 86835.31 (r/w/o: 75971.77/0.00/10863.54) lat (ms,95%): 18.61 err/s: 0.00 reconn/s: 0.00[ 80s ] thds: 80 tps: 5411.58 qps: 86724.27 (r/w/o: 75901.11/0.00/10823.16) lat (ms,95%): 18.61 err/s: 0.00 reconn/s: 0.00总结在只读场景下,OB集群性能领先约15%左右在读写混合场景下,OB集群性能领先约6倍左右
-
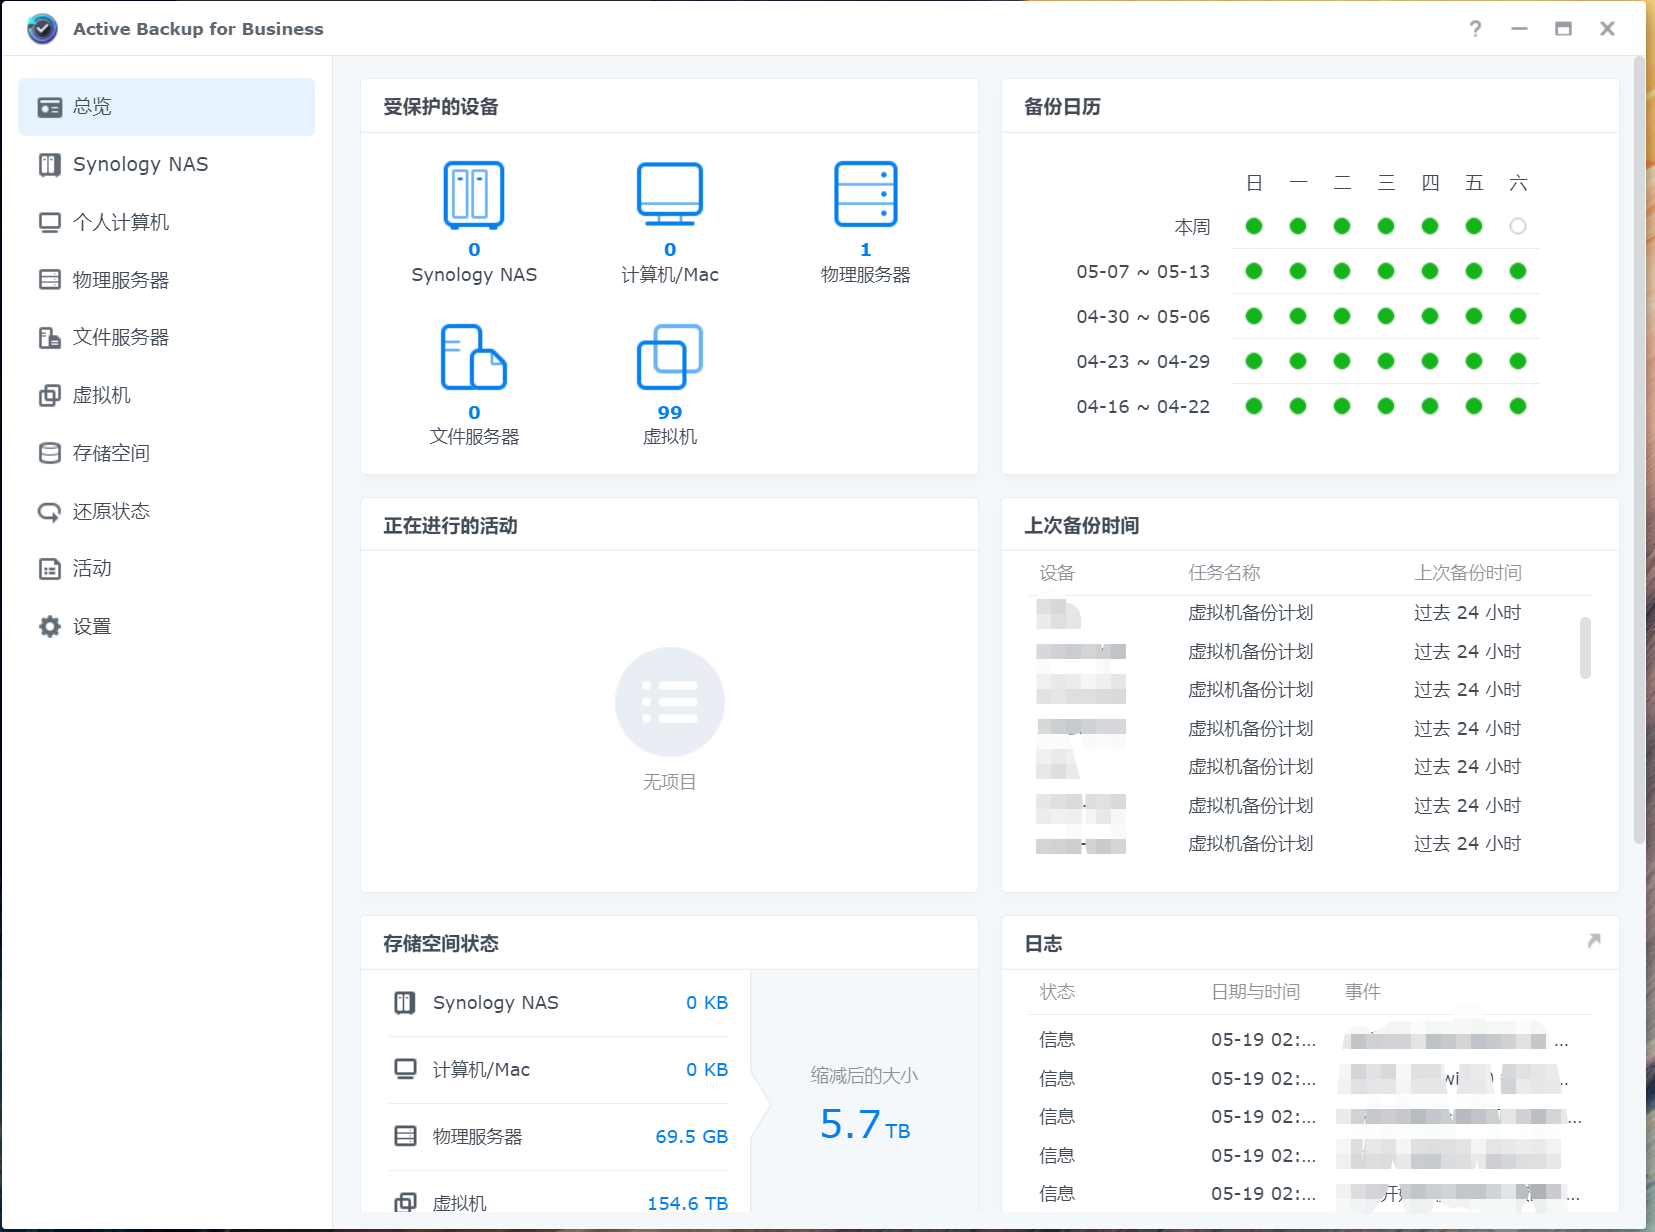
群晖ABB(Active Backup for Business) vSphere、物理机备份恢复实验 群晖ABB是由群晖提供的企业级数据备份工具,无授权数量限制,具有去重、差异备份等功能,几乎可以满足中小企业和家庭用户的所有备份需求,本文重点介绍vSphere虚拟机备份恢复功能。群晖ABB官方介绍页面https://www.synology.cn/zh-cn/dsm/feature/active_backup_business一、安装ABB套件 二、虚拟机vSphere备份还原 1、配置备份计划进入ABB,虚拟机页面接入vCenter配置备份任务为减轻设备压力和对网络的影响,可以开启数据压缩并限制并发任务数配置任务执行时间配置任务保留计划配置管理2、监控备份任务3、基于ABB进行即时还原选择要恢复的虚拟机、时间点可以跨平台还原可以先即时还原,然后再同步数据还原位置,我这里实验选择还原到其他位置选择文件夹选择虚拟化主机选择网络确认还原参数,建议不要勾选开机即时还原完成vSphere中可以看到虚拟机准备就绪,我们可以将这个虚拟机的网络关闭再开机,防止IP冲突系统启动成功4、虚拟机数据同步迁移 将即时还原迁移为永久数据迁移中,不影响虚拟机运行迁移完成三、物理机备份还原 1、准备一台windows服务器2、配置备份任务备份模板,可选备份所有硬盘、所有硬盘+外接硬盘、系统盘三种方式下载备份代理3、目标主机运行代理程序在代理程序中登录群晖登陆成功4、进行备份操作登录群晖ABB,已经发现了物理机执行备份任务5、制作还原映像恢复介质创建https://kb.synology.cn/zh-cn/DSM/help/ActiveBackupRecoveryMediaCreator/activebackuprecoverymediacreator?version=7#ISO可创建ISO文件或直接写入到U盘中制作启动盘6、执行还原操作通过ISO或U盘启动进入群晖恢复模式配置IP地址选择备份的主机选择分区还原等待还原结束即可 四、小结 666
-
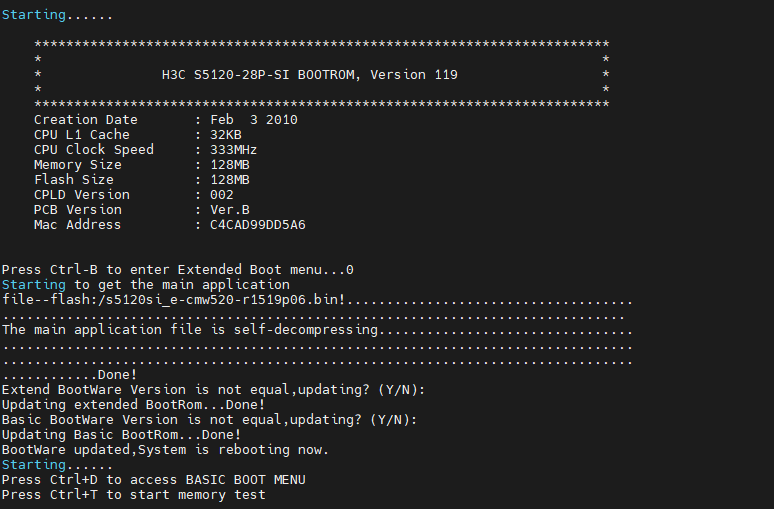
实战H3C交换机升级固件 一、前言 通常情况下,交换机是非常稳定的,但只要是软件就会有bug,所以设备厂家都会提供固件的更新,比如我使用的华三交换机,就出现了一些奇奇怪怪的问题,随即想到升级固件试一下。二、固件下载 华三交换机固件下载地址在华三官网 首页-支持-文档与软件-软件下载-交换机https://www.h3c.com/cn/Service/Document_Software/Software_Download/Switches/当前H3C官方关闭了公共下载账号,请自行注册账号,绑定SN码下载固件https://www.h3c.com/cn/BizPortal/OnlineSurvey/UserSNBind.aspx注意:华三交换机的系统固件和BootRom已经放在一块了,一次升级即可全部升级。注意:不同固件的华三命令稍有不同,若命令无法执行,用问号?可查看详细提示。我的交换机型号为H3C S5120-28P-SI,能够选择的最新的固件为H3C S5120SI_E-CMW520-R1519P06,下载该型号并解压出S5120SI_E-CMW520-R1519P06.bin三、通过USB升级固件copy usba0:/S6520X-CMW710-R6628P40.ipe S6520X-CMW710-R6628P40.ipe boot-loader file flash:/S6520X-CMW710-R6628P40.ipe all main reboot dis version四、通过网络升级固件 下载3CDaemon汉化版,并配置TFTP服务配置服务目录注意:关闭系统防火墙或添加端口 交换机清空配置并直连电脑清空的目的是为了防止有配置兼容问题<H3C>reset saved-configuration The saved configuration file will be erased. Are you sure? [Y/N]:y Configuration file in flash is being cleared. Please wait ... Configuration file is cleared. <H3C>reboot Start to check configuration with next startup configuration file, please wait.........DONE! This command will reboot the device. Current configuration may be lost in next startup if you continue. Continue? [Y/N]:y System is rebooting now.为交换机配置vlanip与电脑互联,电脑IP为192.168.18.2<H3C>sys System View: return to User View with Ctrl+Z. [H3C]int vlan 1 [H3C-Vlan-interface1]ip add 192.168.18.1 24 [H3C-Vlan-interface1]ping 192.168.18.2 PING 192.168.18.2: 56 data bytes, press CTRL_C to break Reply from 192.168.18.2: bytes=56 Sequence=1 ttl=64 time=7 ms Reply from 192.168.18.2: bytes=56 Sequence=2 ttl=64 time=3 ms Reply from 192.168.18.2: bytes=56 Sequence=3 ttl=64 time=3 ms Reply from 192.168.18.2: bytes=56 Sequence=4 ttl=64 time=3 ms --- 192.168.18.2 ping statistics --- 4 packet(s) transmitted 4 packet(s) received 0.00% packet loss round-trip min/avg/max = 3/4/7 ms 上传固件空间充裕[H3C-Vlan-interface1]quit [H3C]quit <H3C>dir Directory of flash:/ 0 -rw- 341 Apr 26 2000 12:10:45 system.xml 1 -rw- 10184320 Jun 29 2010 14:14:25 s5120si-cmw520-r1101p10.bin 2 drw- - Apr 26 2000 12:00:02 logfile 97920 KB total (81690 KB free)上传固件<H3C>tftp 192.168.18.2 get S5120SI_E-CMW520-R1519P06.bin File will be transferred in binary mode Downloading file from remote TFTP server, please wait.../ TFTP: 14877696 bytes received in 118 second(s) File downloaded successfully. <H3C>dir Directory of flash:/ 0 -rw- 14877696 Apr 26 2000 12:19:55 s5120si_e-cmw520-r1519p06.bin 1 -rw- 341 Apr 26 2000 12:10:45 system.xml 2 -rw- 10184320 Jun 29 2010 14:14:25 s5120si-cmw520-r1101p10.bin 3 drw- - Apr 26 2000 12:00:02 logfile 97920 KB total (67158 KB free)安装固件配置新固件为第一启动项新版固件<H3C>boot-loader file flash:/S6805-CMW710-R6715P01.ipe all main 旧版固件<H3C>boot-loader file flash:/s5120si_e-cmw520-r1519p06.bin main This command will set the boot file. Continue? [Y/N]:y The specified file will be used as the main boot file at the next reboot on slot 1! <H3C>reboot Start to check configuration with next startup configuration file, please wait.........DONE! This command will reboot the device. Current configuration may be lost in next startup if you continue. Continue? [Y/N]:y Reboot device by command. System is rebooting now.自动安装固件,全程等待,直至自动进入系统Starting...... ************************************************************************ * * * H3C S5120-28P-SI BOOTROM, Version 119 * * * ************************************************************************ Creation Date : Feb 3 2010 CPU L1 Cache : 32KB CPU Clock Speed : 333MHz Memory Size : 128MB Flash Size : 128MB CPLD Version : 002 PCB Version : Ver.B Mac Address : C4CAD99DD5A6 Press Ctrl-B to enter Extended Boot menu...0 Starting to get the main application file--flash:/s5120si_e-cmw520-r1519p06.bin!.................................... .............................................................................. The main application file is self-decompressing................................ ............................................................................... ............................................................................... ............Done! Extend BootWare Version is not equal,updating? (Y/N): Updating extended BootRom...Done! Basic BootWare Version is not equal,updating? (Y/N): Updating Basic BootRom...Done! BootWare updated,System is rebooting now. Starting...... Press Ctrl+D to access BASIC BOOT MENU Press Ctrl+T to start memory test ******************************************************************************** * * * H3C S5120-28P-SI BOOTROM, Version 180 * * * ******************************************************************************** Copyright (c) 2004-2017 New H3C Technologies Co., Ltd. Creation Date : Aug 9 2017 CPU L1 Cache : 32KB CPU Clock Speed : 333MHz Memory Size : 128MB Flash Size : 128MB CPLD Version : 002 PCB Version : Ver.B Mac Address : C4CAD99DD5A6 the normal and back basic is not equal, update back basic.... the normal and back extend is not equal, update back extend.... Press Ctrl-B to enter Extended Boot menu...0 Starting to get the main application file--flash:/s5120si_e-cmw520-r1519p06.bin! ................................................................................ .................................. The main application file is self-decompressing................................. ................................................................................ ................................................................................ .........Done! System is starting... Startup configuration file does not exist. It will take a long time to get configuration file, please wait... Press CTRL_C to break Retrieving configuration file failed! User interface aux0 is available. Press ENTER to get started. <H3C> 删除多余固件<H3C>del s5120si-cmw520-r1101p10.bin Delete flash:/s5120si-cmw520-r1101p10.bin?[Y/N]:y %Delete file flash:/s5120si-cmw520-r1101p10.bin...Done. <H3C>dir Directory of flash:/ 0 -rw- 1617 Apr 26 2000 12:01:22 startup.cfg 1 -rw- 341 Apr 26 2000 12:10:45 systembak.xml 2 -rw- 7655 Apr 26 2000 12:01:20 config.cwmp 3 -rw- 14877696 Apr 26 2000 12:19:55 s5120si_e-cmw520-r1519p06.bin 4 drw- - Apr 26 2000 12:00:02 logfile 97920 KB total (67142 KB free)清空回收站reset recycle-bin五、升级完成 如果升级完成后交换机仍有问题,那就扔了吧
-
H3C华三交换机学习笔记 软件名称:HCL_Setup_V5.9.0发布日期:2023/7/13 9:29:22{anote icon="" href="https://www.h3c.com/cn/Service/Document_Software/Software_Download/Other_Product/H3C_Cloud_Lab/Catalog/HCL/" type="secondary" content="下载地址"/} 模拟器bug注意!注意!不要调整模拟器内设备的内存,极易造成设备出bug,比如路由器内存调小后,自己ping自己都不通!https://zhiliao.h3c.com/questions/dispcont/8085“配置没问题,端口也up了,也ping不通自己,是因为hcl路由器或交换机的内存不能人为的调小于520M,调成350M就容易出问题”{dotted startColor="#ff6c6c" endColor="#1989fa"/}基础命令:进入系统视图<H3C>system-view 路由追踪[H3C]tracert 更改主机名[H3C]hostname Switch1 显示详细路由追踪信息 [H3C]ip ttl-expires enable [H3C]ip unreachables enable 保存[H3C]save 重启<H3C>reboot 查看接口信息[H3C]display interface brief 查看详细配置文件[H3c]display current-cohnfiguration 查看OSPF信息[SwitchA]display ospf peer verbose 查看SN序列号display device manuinfo display counters inbound interface display counters outbound interface 查询所有接口包速率 开启NTP时间同步,同步需要几分钟 [H3C]dis clock 04:06:38.180 UTC Sat 01/05/2013 [H3C]sntp enable [H3C]sntp unicast-server 172.16.21.246 [H3C]display sntp sessions SNTP server Stratum Version Last receive time 11.22.33.44 4 4 Sat, Jan 5 2013 4:07:40.856 查看交换机时间 [H3C]dis clock 08:11:36.223 UTC Mon 04/25/2022 关闭LLDP PVID检查 lldp ignore-pvid-inconsistency 打开LLDP PVID检查 undo lldp ignore-pvid-inconsistency 通过IP和MAC地址查找所在交换机1、查看本机IP和MAC地址以太网适配器 以太网: 描述. . . . . . . . . . . . . . . : Realtek PCIe GbE Family Controller 物理地址. . . . . . . . . . . . . : XX-XX-XX-XX-XX-XX IPv4 地址 . . . . . . . . . . . . : 172.XX.X.XXX(首选)2、登录VLAN网关,查看IP和MAC地址查看IP MAC对应关系dis arp | include 172.XX.X.XXX 172.XX.X.XXX xxxx-xxxx-xxxx 18 BAGG1 852 D查看MAC所在接口dis mac-addr | include xxxx-xxxx-xxxx xxxx-xxxx-xxxx 18 Learned BAGG1 Y3、查看接口下联交换机IP查看接口与端口绑定关系dis cu查看接口下lldp信息dis lldp n v4、依次登录下层交换机,最终确定接口所在交换机dis mac-addr | include xxxx-xxxx-xxxx xxxx-xxxx-xxxx 18 Learned GE1/0/43 Y 查看接口STP报文数量,其中G1/0/5口异常 <H3C>display stp tc -------------- STP slot 1 TC or TCN count ------------- MST ID Port Receive Send 0 Bridge-Aggregation1 1 34537 0 Bridge-Aggregation2 109 9708 0 GigabitEthernet1/0/1 10 458 0 GigabitEthernet1/0/2 29 1580 0 GigabitEthernet1/0/3 0 18213 0 GigabitEthernet1/0/4 0 18243 0 GigabitEthernet1/0/5 1496 8417 0 GigabitEthernet1/0/6 0 18225 0 GigabitEthernet1/0/7 423 17148 0 GigabitEthernet1/0/8 3 3856 0 GigabitEthernet1/0/9 36 18298 0 GigabitEthernet1/0/10 0 18277 0 GigabitEthernet1/0/17 185 34206 0 GigabitEthernet1/0/18 0 34535 0 GigabitEthernet1/0/20 0 206 0 GigabitEthernet1/0/21 0 34535 0 GigabitEthernet1/0/23 0 34536 0 GigabitEthernet1/0/24 0 3306 查看交换机日志 <H3C>dis logbuffer 查看邻居信息 <H3C>dis lldp neighbor-information list Chassis ID : * -- -- Nearest nontpmr bridge neighbor # -- -- Nearest customer bridge neighbor Default -- -- Nearest bridge neighbor System Name Local Interface Chassis ID Port ID XX GE1/0/1 70c6-ddb5-905e 70c6-ddb5-9087 XX GE1/0/2 6ce5-f71b-0754 GigabitEthernet1/0/28 XX GE1/0/3 9ce8-955a-b540 GigabitEthernet1/0/28 XX GE1/0/4 1cab-3479-2220 1cab-3479-2220 XX GE1/0/5 6ce5-f71b-904c GigabitEthernet1/0/28 H3C GE1/0/6 3c8c-4010-1f3e GigabitEthernet1/0/26 查看邻居详细信息 <S-151-04>dis lldp neighbor-information verbose LLDP neighbor-information of port 1[GigabitEthernet1/0/1]: LLDP agent nearest-bridge: LLDP neighbor index : 1 Update time : 46 days, 6 hours, 59 minutes, 31 seconds Chassis type : MAC address Chassis ID : 70c6-ddb5-905e Port ID type : MAC address Port ID : 70c6-ddb5-9087 Time to live : 121 Port description : GigabitEthernet1/0/28 Interface System name : S-178-01 System description : H3C Comware Platform Software, Software Version 7.1.070, Release 6328P03 H3C S5130S-28P-HPWR-EI Copyright (c) 2004-2021 New H3C Technologies Co., Ltd. Al l rights reserved. System capabilities supported : Bridge, Router, Customer Bridge, Service Bridge System capabilities enabled : Bridge, Router, Customer Bridge Management address type : IPv4 Management address : 169.254.144.94 Management address interface type : IfIndex Management address interface ID : 635 Management address OID : 0 dis process cpu 查看进程对于CPU的使用率。 dis process memory 查看进程对于内存使用率 dis cpu-usage 查看CPU使用率。 dis memory 查询内存使用率。 display fan 查看风扇 display power 查看电源 dis device 查看板卡状态 display logbuffer 查看设备日志 display environment 查看温度 dis counter rate inbound interface 查看接口进方向的使用率 dis counter rate outbound interface 查看接口出方向的使用率 dis int | inc rate 查看接口历史使用率 dis int | inc sec 查看接口历史使用率及出入方向的字节 dis int gi 1/0/1 查看接口最近300秒使用率 子接口配置,一个VLAN配置多个IP interface Vlan-interface X ip address 172.16.1.1 255.255.252.0 ip address 172.16.2.1 255.255.252.0 sub ip address 172.16.3.1 255.255.252.0 sub 包转发利用率 1.查看接口进方向的使用率:dis counter rate inbound interface 2.查看接口出方向的使用率:dis counter rate outbound interface 3.查看接口历史使用率:dis int | inc rate 4.查看接口历史使用率及出入方向的字节:dis int | inc sec 5、查看接口最近300秒使用率:dis int gi 1/0/1 修改风扇旋转反向 fan prefer-direction slot 1 port-to-power 查看风扇状态 dis fan 查看MAC地址震荡、环路排查 dis mac-address mac-move 典型环路状态 dis mac-address mac-move MAC address VLAN Current port Source port Last time Times f6f6-0002-17d7 19 GE1/0/5 GE1/0/2 2024-01-02 17:00:33 922161 f6f6-0004-1d53 19 GE1/0/7 GE1/0/3 2024-01-02 17:00:39 941803 f6f6-0002-17d7 19 GE1/0/2 GE1/0/5 2024-01-02 17:00:34 922342 f6f6-0004-1d53 19 GE1/0/3 GE1/0/7 2024-01-02 17:00:38 941803 查看STP接口状态 dis stp brief 配置STP边缘节点,只适用于三层接口,稳定STP网络 interface GigabitEthernet1/0/5 port access vlan 19 stp edged-port 配置STP主根桥,减少网STP收敛络震荡 stp instance 0 root primary 配置端口速率 interface GigabitEthernet1/0/13 port access vlan 21 speed 100 清除配置,恢复出厂 <H3C>reset saved-configuration The saved configuration file will be erased. Are you sure? [Y/N]:y #选择Y确认 <H3C>reboot Start to check configuration with next startup configuration file, please wait.........DONE! Current configuration may be lost after the reboot, save current configuration? [Y/N]:n #N选择不保存 This command will reboot the device. Continue? [Y/N]:y #Y确认重启 关闭日志 关闭终端上下线日志分为以下几种情况 (1)通过console的方式登录时 info-center source STAMGR console deny info-center source WLANAUD console deny (2)通过telnet的方式登录时 info-center source STAMGR monitor deny info-center source WLANAUD monitor deny 以上两种情况互不影响。这两种方式只是在总控制台不显示用户上下线的日志信息,但设备的logbuffer里还是记录的,如果想要在logbuffer也不记录日志,需采取以下两种命令关闭: info-center source STAMGR logbuffer deny info-center source WLANAUD logbuffer deny 如关闭DHCP日志 info-center source DHCPS logbuffer deny 配置日志服务器 info-center loghost 172.16.21.111 POE功率、功耗查询 <SW>dis poe pse PSE ID : 4 Slot No. : 1 SSlot No. : 0 PSE Model : LSPPSE24B PSE Status : Enabled PSE Fast Power Supply : Disabled Power Priority : Low Current Power : 36.2 W Average Power : 35.9 W Peak Power : 44.5 W Max Power : 370.0 W Max Allocable Power : 370.0 W Remaining Guaranteed Power : 370.0 W PSE CPLD Version : - PSE Software Version : 510 PSE Hardware Version : 57855 PSE Legacy PD Detection : Disabled Power Utilization Threshold : 80 PD Power Policy : Disabled PD Disconnect-Detection Mode : AC PD High Inrush : Disabled <SW>dis poe interface Interface PoE Priority CurPower Oper IEEE Detection (W) Class Status GE1/0/1 Enabled Low 2.2 On 0 Delivering Power GE1/0/2 Enabled Low 0.0 Off 0 Searching GE1/0/3 Enabled Low 2.9 On 0 Delivering Power GE1/0/4 Enabled Low 0.0 Off 0 Searching GE1/0/5 Enabled Low 2.6 On 0 Delivering Power GE1/0/6 Enabled Low 2.5 On 0 Delivering Power GE1/0/7 Enabled Low 2.3 On 0 Delivering Power GE1/0/8 Enabled Low 2.7 On 0 Delivering Power GE1/0/9 Enabled Low 2.5 On 0 Delivering Power GE1/0/10 Enabled Low 2.6 On 0 Delivering Power GE1/0/11 Enabled Low 2.6 On 0 Delivering Power GE1/0/12 Enabled Low 2.4 On 0 Delivering Power GE1/0/13 Enabled Low 2.5 On 0 Delivering Power GE1/0/14 Enabled Low 2.6 On 0 Delivering Power GE1/0/15 Enabled Low 2.8 On 0 Delivering Power GE1/0/16 Enabled Low 0.0 Off 0 Searching GE1/0/17 Enabled Low 2.4 On 0 Delivering Power GE1/0/18 Enabled Low 0.0 Off 0 Searching GE1/0/19 Enabled Low 0.0 Off 0 Searching GE1/0/20 Enabled Low 0.0 Off 0 Searching GE1/0/21 Enabled Low 0.0 Off 0 Searching GE1/0/22 Enabled Low 0.0 Off 0 Searching GE1/0/23 Enabled Low 0.0 Off 0 Searching GE1/0/24 Enabled Low 0.0 Off 0 Searching --- On State Ports: 14; Used: 35.6(W); Remaining: 334.4(W) --- {dotted startColor="#ff6c6c" endColor="#1989fa"/}环路检测排查 查看CPU使用率dis cpu查看MAC漂移dis mac-address mac-move查看STP接口状态dis stp brief查看lldp状态dis lldp neighbor-information list dis lldp neighbor-information verbose环路检测配置 https://www.h3c.com/cn/d_202308/1905729_30005_0.htm#_Ref470192304loopback-detection global enable vlan { vlan-id-list | all } 全局开启环路检测 interface interface-type interface-number 进入二层以太网接口/二层聚合接口视图 loopback-detection enable vlan { vlan-id-list | all } 在端口上开启环路检测功能 loopback-detection global action shutdown 全局配置环路检测的处理模式 interface interface-type interface-number 进入接口视图 loopback-detection action { block | no-learning | shutdown } 在端口上配置环路检测的处理模式 loopback-detection interval-time interval 配置检测间隔时间 display loopback-detection 显示环路检测的配置和运行情况查询AP上线离线掉线时间 网络-操作-无线配置-AP管理-详情基础配置-上线/离线/版本下载时间2023-07-15 13:23:29二层端口模式 参考链接:https://blog.51cto.com/shyln/2087240 a)access端口 发送(从交换机内部往外发送): 带有vlan tag:删除tag后,发送 不带vlan tag:不可能出现 接收: 带有vlan tag:若该tag等于该access端口的pvid,则可以接收,进入交换机内部 不带vlan tag:添加该access端口的pvid,进入交换机内部 b)trunk端口(允许发送native VLAN数据的时候,可以不加tag) 发送(从交换机内部往外发送): 带有vlan tag:若tag等于该trunk端口的pvid,则删除tag后发送;否则保留tag直接发送 不带vlan tag:不可能出现 接收: 带有vlan tag:保留该tag,进入交换机内部 不带vlan tag:添加该trunk端口的pvid,进入交换机内部 c)hybrid端口(允许发送多个VLAN数据的时候,可以不加tag) 发送(从交换机内部往外发送): 带有vlan tag: 是否带tag进行发送,取决于用户配置(用户可以配置tagged list,untagged list) 不带vlan tag:不可能出现 接收: 带有vlan tag:保留该tag,进入交换机内部 不带vlan tag:添加该hybrid端口的pvid,进入交换机内部{dotted startColor="#ff6c6c" endColor="#1989fa"/}模拟傻瓜交换机 思路,创建全部vlan,端口启用untag。vlan 2 to 4000 #批量创建vlan interface GigabitEthernet1/0/1 #进入接口 port link-type hybrid #接口类型hybrid port hybrid vlan 1 to 4000 untagged #撕掉vlan标签{dotted startColor="#ff6c6c" endColor="#1989fa"/}配置telnet参考链接https://jingyan.baidu.com/article/1876c852517425890b1376d2.html给VLAN1配置IP[H3C-Vlan-interface1]ip address 192.168.56.254 255.255.255.0 [H3C-Vlan-interface1]quit配置VTY(Virtual Teletype Terminal)虚拟终端接口的认证方式 [H3C]user-interface vty 0 4 [H3C-line-vty0-4]authentication-mode scheme //进行本地或远端用户名和口令认证。即AAA认证 //关于认证,一共有三种认证方式 //password 本地口令认证; //scheme 本地或远端用户名和口令认证; //none 不认证; [H3C-line-vty0-4]quit 本地用户的创建与配置 [H3C]local-user admin //设置创建本地认证的用户名 [H3C-luser-manage-admin]password simple 123456 //设置明文密码,使用命令查看当前配置时 //密码会以哈希加密后显示 图3 [H3C-luser-manage-admin]authorization-attribute user-role level-15 #开启最高权限或authorization-attribute user-role network-admin [H3C-luser-manage-admin]service-type telnet //用户作用于telnet服务 [H3C-luser-manage-admin]quit [H3C]telnet server enable //开启telnet 服务 [H3C]save //保存配置 {dotted startColor="#ff6c6c" endColor="#1989fa"/}静态路由[R1]int g0/0 #进入接口或者vlan [R1-GigabitEthernet0/0]ip add 192.168.1.1 24 #设置接口IP [R1]ip route-static 192.168.2.0 24 192.168.1.2 #为目标网段设置网关{dotted startColor="#ff6c6c" endColor="#1989fa"/}普通DHCP配置路由1<H3C>sys #系统视图 [H3C]int g0/0 #进入接口 [H3C-GigabitEthernet0/0]ip add 192.168.1.1 24 #配置IP [H3C-GigabitEthernet0/1]int g0/1 [H3C-GigabitEthernet0/1]ip add 192.168.2.1 24路由2<H3C>sys [H3C]int g0/0 [H3C-GigabitEthernet0/0]ip add 192.168.2.2 24路由1[route1]dhcp server ip-pool 1 #设置DHCP地址池 [route1-dhcp-pool-1]network 192.168.0.1 mask 255.255.255.0 #地址范围为192.168.0.0/24网段的ip地址 [route1-dhcp-pool-1]gateway-list 192.168.0.1 #网关地址为192.168.0.1 [route1-dhcp-pool-1]dns-list 192.168.0.1 #DNS服务器地址也为192.168.0.1 注意:这里设置的是一个网段的范围,在这个地址范围里可能这里面的某些地址不能够被分配出去。比如说网关的地址和一些指定的设备的ip地址。 [route1]dhcp server forbidden-ip 192.168.0.1 192.168.0.2 #不允许网关地址和DNS地址192.168.0.1分配被出去 [route1]dhcp enable #启动DHCP服务{dotted startColor="#ff6c6c" endColor="#1989fa"/}ospf配置:参考:https://blog.51cto.com/14219797/2402420配置接口IP:SwitchB<H3C>sys #进入系统视图 [H3C]hostname SwitchB #主机名重命名 [SwitchB]vlan 200 进入vlan200 [SwitchB-vlan100]port g 1/0/1 #指定vlan200端口 [SwitchB-vlan100]quit [SwitchB]vlan 300 进入vlan300 [SwitchB-vlan200]port g 1/0/2 #指定vlan300端口 [SwitchB-vlan200]quit [SwitchB]inter vlan 200 #进入vlan200 [SwitchB-Vlan-interface100]ip add 10.1.1.2 24 #设定IP [SwitchB-Vlan-interface100]quit [SwitchB]inter vlan 300 #进入vlan300 [SwitchB-Vlan-interface200]ip add 10.2.1.1 24 #设定IP [SwitchB-Vlan-interface200]quit配置OSPF协议:<SwitchB> system-view #进入系统视图 [SwitchB] router id 10.2.1.1 #设定唯一标识 [SwitchB] ospf #进入ospf设置 [SwitchB-ospf-1] area 0 #配置区域0 [SwitchB-ospf-1-area-0.0.0.0] network 10.1.1.0 0.0.0.255 #通告网络,子网掩码为反码 [SwitchB-ospf-1-area-0.0.0.0] quit [SwitchB-ospf-1] area 2 #配置区域 [SwitchB-ospf-1-area-0.0.0.2] network 10.2.1.0 0.0.0.255 #通告网络 [SwitchB-ospf-1-area-0.0.0.2] quit [SwitchB-ospf-1] quitSwitchA 的 OSPF 邻居:[SwitchA]display ospf peer verbose OSPF Process 1 with Router ID 10.1.1.1 Neighbors Area 0.0.0.0 interface 10.1.1.1(Vlan-interface200)'s neighbors Router ID: 10.2.1.1 Address: 10.1.1.2 GR state: Normal State: Full Mode: Nbr is master Priority: 1 DR: 10.1.1.2 BDR: 10.1.1.1 MTU: 0 Options is 0x42 (-|O|-|-|-|-|E|-) Dead timer due in 31 sec Neighbor is up for 00:37:39 Authentication sequence: [ 0 ] Neighbor state change count: 6 BFD status: Disabled Area 0.0.0.1 interface 10.3.1.1(Vlan-interface100)'s neighbors Router ID: 10.3.1.2 Address: 10.3.1.2 GR state: Normal State: Full Mode: Nbr is master Priority: 1 DR: 10.3.1.1 BDR: 10.3.1.2 MTU: 0 Options is 0x42 (-|O|-|-|-|-|E|-) Dead timer due in 39 sec Neighbor is up for 00:36:50 Authentication sequence: [ 0 ] Neighbor state change count: 5 BFD status: DisabledSwitchA 的 OSPF 路由信息:[SwitchA]display ospf routing OSPF Process 1 with Router ID 10.1.1.1 Routing Table Topology base (MTID 0) Routing for network Destination Cost Type NextHop AdvRouter Area 10.2.1.0/24 2 Inter 10.1.1.2 10.2.1.1 0.0.0.0 10.3.1.0/24 1 Transit 0.0.0.0 10.1.1.1 0.0.0.1 10.1.1.0/24 1 Transit 0.0.0.0 10.2.1.1 0.0.0.0 Total nets: 3 Intra area: 2 Inter area: 1 ASE: 0 NSSA: 0SwitchC到SwitchD进行测试连通性:[SwitchC]ping 10.2.1.2 Ping 10.2.1.2 (10.2.1.2): 56 data bytes, press CTRL_C to break 56 bytes from 10.2.1.2: icmp_seq=0 ttl=253 time=1.651 ms 56 bytes from 10.2.1.2: icmp_seq=1 ttl=253 time=1.567 ms 56 bytes from 10.2.1.2: icmp_seq=2 ttl=253 time=1.465 ms 56 bytes from 10.2.1.2: icmp_seq=3 ttl=253 time=1.431 ms 56 bytes from 10.2.1.2: icmp_seq=4 ttl=253 time=2.635 msSwitchC到SwitchD进行路由追踪:[SwitchC]tracert 10.2.1.2 traceroute to 10.2.1.2 (10.2.1.2), 30 hops at most, 40 bytes each packet, press CTRL_C to break 1 10.3.1.1 (10.3.1.1) 1.438 ms 0.424 ms 0.418 ms 2 10.1.1.2 (10.1.1.2) 1.481 ms 1.221 ms 0.695 ms 3 10.2.1.2 (10.2.1.2) 1.073 ms 1.087 ms 0.923 ms{dotted startColor="#ff6c6c" endColor="#1989fa"/}VLAN隔离:参考链接:https://blog.51cto.com/14220513/2367688http://www.023wg.com/vlan/132.htmlhttp://www.h3c.com/cn/d_200809/615974_30005_0.htm配置SwitchA:<SwitchA> system-view #系统视图 [SwitchA] vlan 100 [SwitchA-vlan100] port ge1/0/2 #添加端口 [SwitchA-vlan100] quit [SwitchA] vlan 200 [SwitchA-vlan100] port ge1/0/3 #添加端口 [SwitchA-vlan100] quit [SwitchA] interface ge1/0/1 #进入端口 [SwitchA-GigabitEthernet1/0/1] port link-type trunk #设置trunk模式 [SwitchA-GigabitEthernet1/0/1] port trunk permit vlan 100 200 #允许VLAN100 200通过输入display vlan 100 和display vlan200 查看配置:[SwtichA]display vlan 100 VLAN ID: 100 VLAN type: Static Route interface: Not configured Description: VLAN 0100 Name: VLAN 0100 Tagged ports: GigabitEthernet1/0/1 Untagged ports: GigabitEthernet1/0/2 [SwtichA]display vlan 200 VLAN ID: 200 VLAN type: Static Route interface: Not configured Description: VLAN 0200 Name: VLAN 0200 Tagged ports: GigabitEthernet1/0/1 Untagged ports: GigabitEthernet1/0/3{dotted startColor="#ff6c6c" endColor="#1989fa"/}MSTP多生成树MSTP默认开启,可手动配置最佳路径参考链接:https://www.cnblogs.com/aqicheng/p/13824682.html每个交换机创建vlan10 vlan20[H3C]vlan 10 [H3C-vlan10]vlan 20 [H3C-vlan20]int g1/0/1 [H3C-GigabitEthernet1/0/1]port link-type trunk #所有接口设置trunk模式 [H3C-GigabitEthernet1/0/1]port trunk permit vlan all #允许所有vlan通过 [H3C-GigabitEthernet1/0/1]int g 1/0/2 [H3C-GigabitEthernet1/0/2]port link-type trunk [H3C-GigabitEthernet1/0/2]port trunk permit vlan all [H3C-GigabitEthernet1/0/2]quit [H3C]hostname sw3设置区域[sw3]stp region-configuration [sw3-mst-region]region-name h3c #区域命名 [sw3-mst-region]instance 1 vlan 10 #vlan10划入1组 [sw3-mst-region]instance 2 vlan 20 #vlan20划入2组 [sw3-mst-region]active region-configuration #激活配置 [sw3-mst-region]display this #查看以上配置 # stp region-configuration region-name h3c instance 1 vlan 10 instance 2 vlan 20 active region-configuration # return调整根桥[sw1]stp instance 1 root primary #sw1设置为组1的根桥 [sw2]stp instance 2 root primary #sw2设置为组2的根桥查看结果<sw1>display stp brief MST ID Port Role STP State Protection 0 GigabitEthernet1/0/1 DESI FORWARDING NONE 0 GigabitEthernet1/0/2 DESI FORWARDING NONE 0 GigabitEthernet1/0/3 DESI FORWARDING NONE 1 GigabitEthernet1/0/1 DESI FORWARDING NONE 1 GigabitEthernet1/0/2 DESI FORWARDING NONE 1 GigabitEthernet1/0/3 DESI FORWARDING NONE 2 GigabitEthernet1/0/1 ROOT FORWARDING NONE 2 GigabitEthernet1/0/2 DESI FORWARDING NONE 2 GigabitEthernet1/0/3 DESI FORWARDING NONE [sw2]display stp brief MST ID Port Role STP State Protection 0 GigabitEthernet1/0/1 ROOT FORWARDING NONE 0 GigabitEthernet1/0/2 DESI FORWARDING NONE 1 GigabitEthernet1/0/1 ROOT FORWARDING NONE 1 GigabitEthernet1/0/2 DESI FORWARDING NONE 2 GigabitEthernet1/0/1 DESI FORWARDING NONE 2 GigabitEthernet1/0/2 DESI FORWARDING NONE{dotted startColor="#ff6c6c" endColor="#1989fa"/}VRRP虚拟路由冗余协议参考链接:https://www.cnblogs.com/hukey/p/13071447.html配置心跳线双线冗余[SW1]int Bridge-Aggregation 1 #创建接口聚合 [SW1]int g1/0/2 [SW1-GigabitEthernet1/0/2]port link-aggregation group 1 #端口加入链路聚合 [SW1-GigabitEthernet1/0/2]int g1/0/3 [SW1-GigabitEthernet1/0/3]port link-aggregation group 1 [SW1]int Bridge-Aggregation 1 [SW1-Bridge-Aggregation1]port link-type trunk #端口允许所有vlan通过 [SW1-Bridge-Aggregation1]port trunk permit vlan all [SW2]int Bridge-Aggregation 1 #创建链路聚合 [SW2]int g1/0/2 [SW2-GigabitEthernet1/0/2]port link-aggregation group 1 #端口加入链路聚合 [SW2-GigabitEthernet1/0/2]int g1/0/3 [SW2-GigabitEthernet1/0/3]port link-aggregation group 1 [SW2]int Bridge-Aggregation 1 [SW2-Bridge-Aggregation1]port link-type trunk #端口允许所有vlan通过 [SW2-Bridge-Aggregation1]port trunk permit vlan all查看绑定状态[sw1]dis int Bridge-Aggregation bri Brief information on interfaces in bridge mode: Link: ADM - administratively down; Stby - standby Speed: (a) - auto Duplex: (a)/A - auto; H - half; F - full Type: A - access; T - trunk; H - hybrid Interface Link Speed Duplex Type PVID Description BAGG1 UP 2G(a) F(a) T 1配置vlanSW3对应SW2和SW1的两个端口配置trunk,对应客户机的端口配置vlan [SW3]vlan 10 [SW3-vlan10]port g1/0/1 [SW3]int range g1/0/2 to g1/0/3 [SW3-if-range]port link-type trunk [SW3-if-range]port trunk permit vlan 10 20 [SW1]vlan 10 #创建vlan [SW1-vlan10]vlan 20 #创建vlan [SW1-vlan0]int g1/0/1 [SW1-GigabitEthernet1/0/1]port link-type trunk [SW1-GigabitEthernet1/0/1]port trunk permit vlan 10 20 [SW1-GigabitEthernet1/0/1]int vlan 10 #进入vlan10 [SW1-Vlan-interface10]ip add 10.0.10.253 24 #设置IP [SW1-Vlan-interface10]int v20 #进入vlan20 [SW1-Vlan-interface20]ip add 10.0.20.253 24 #设置IP [SW1]dis ip int bri [sw1]dis ip int bri *down: administratively down (s): spoofing (l): loopback Interface Physical Protocol IP Address Description MGE0/0/0 down down -- -- Vlan10 up up 10.0.10.253 -- Vlan20 up up 10.0.20.253 -- [SW2]vlan 10 [SW2-vlan10]vlan 20 [SW2-vlan20]int g1/0/1 [SW2-GigabitEthernet1/0/1]port link-type trunk [SW2-GigabitEthernet1/0/1]port trunk permit vlan 10 20 [SW2-GigabitEthernet1/0/1]int v10 [SW2-Vlan-interface10]ip add 10.0.10.252 24 [SW2-Vlan-interface10]int v20 [SW2-Vlan-interface20]ip add 10.0.20.252 24 [SW2]dis ip int bri *down: administratively down (s): spoofing (l): loopback Interface Physical Protocol IP Address Description MGE0/0/0 down down -- -- Vlan10 up up 10.0.10.252 -- Vlan20 up up 10.0.20.252 --配置VRRP配置vlan10的vrrp [SW1]int v10 #进入vlan10 [SW1-Vlan-interface10]vrrp vrid 10 virtual-ip 10.0.10.254 #配置虚拟地址 [SW1-Vlan-interface10]vrrp vrid 10 priority 105 # 配置vrrp权重,默认为100 如果要设置master则大于100即 [SW1]track 10 int Bridge-Aggregation 1 # 配置心跳线为聚合链路 [SW2]int v10 [SW2-Vlan-interface10]vrrp vrid 10 virtual-ip 10.0.10.254 [SW2]track 10 int Bridge-Aggregation 1 配置vlan20的vrrp [SW1]int v20 [SW1-Vlan-interface20]vrrp vrid 20 virtual-ip 10.0.20.254 [SW1]track 20 int Bridge-Aggregation 1 #配置心跳线为聚合链路 [SW2]int v20 [SW2-Vlan-interface20]vrrp vrid 20 virtual-ip 10.0.20.254 [SW2-Vlan-interface20]vrrp vrid 20 priority 105 #设置为vlan20的master [SW2]track 20 int Bridge-Aggregation 1 #配置心跳线为聚合链路 [sw1]dis vrrp IPv4 virtual router information: Running mode : Standard Total number of virtual routers : 2 Interface VRID State Running Adver Auth Virtual pri timer(cs) type IP --------------------------------------------------------------------- Vlan10 10 Master 105 100 None 10.0.10.254 Vlan20 20 Backup 100 100 None 10.0.20.254 [sw2]dis vrrp IPv4 virtual router information: Running mode : Standard Total number of virtual routers : 2 Interface VRID State Running Adver Auth Virtual pri timer(cs) type IP --------------------------------------------------------------------- Vlan10 10 Backup 100 100 None 10.0.10.254 Vlan20 20 Master 105 100 None 10.0.20.254{dotted startColor="#ff6c6c" endColor="#1989fa"/}堆叠参考链接:CSDN博主「猫先生的早茶」的原创文章https://blog.csdn.net/qq_43017750/article/details/89323450注意!1、配置前必须移除两路由间连接线2、全部配置完成后,连线,次路由会自动重启master交换机#sys #interface range Ten-GigabitEthernet 1/0/49 to Ten-GigabitEthernet 1/0/52 #批量管理端口 #shutdown #关闭端口 #quit #irf member 1 priority 32 #配置irf成员优先级,32为最高,默认是1 #irf-port 1/1 #进入irf端口1/1 #port group interface Ten-GigabitEthernet 1/0/49 #加入当前irf端口 #port group interface Ten-GigabitEthernet 1/0/50 #port group interface Ten-GigabitEthernet 1/0/51 #port group interface Ten-GigabitEthernet 1/0/52 #quit #irf-port-configuration active #激活irf配置 #interface range Ten-GigabitEthernet 1/0/49 to Ten-GigabitEthernet 1/0/52 #批量管理端口 #undo shutdown #启动端口 #save #保存standby交换机的命令#sys #irf member 1 renumber 2 #当前irf成员id重命名为2 #quit #reboot #sys #interface range Ten-GigabitEthernet 2/0/49 to Ten-GigabitEthernet 2/0/52 #批量管理端口 #shutdown #关闭端口 #quit #irf member 2 priority 1 #配置当前irf成员id2的优先级为1 #irf-port 2/2 #进入irf端口2/2 #port group interface Ten-GigabitEthernet 2/0/49 #加入当前irf #port group interface Ten-GigabitEthernet 2/0/50 #port group interface Ten-GigabitEthernet 2/0/51 #port group interface Ten-GigabitEthernet 2/0/52 #quit #irf-port-configuration active #激活irf #interface range Ten-GigabitEthernet 2/0/49 to Ten-GigabitEthernet 2/0/52 #批量管理端口 #undo shutdown #启动端口 #quit #save验证:[sw1]dis irf MemberID Role Priority CPU-Mac Description *+1 Master 32 30e7-b21f-0104 --- 2 Standby 1 30e7-bae6-0204 ---{dotted startColor="#ff6c6c" endColor="#1989fa"/}两台三层交换机快速IRF配置 member 1编号renumber 2重写编号domain 0主机名priority 18优先级,大的为主irf-port2 irf组,主为1则从为2,1接2 easy-irf member 1 domain 0 priority 24 irf-port1 FortyGigE 1/0/53 FortyGigE 1/0/54 ***************************************************************************** Configuration summary for member 1 IRF new member ID: 1 IRF domain ID : 0 IRF priority : 24 IRF-port 1 : FortyGigE1/0/53, FortyGigE1/0/54 IRF-port 2 : Disabled ***************************************************************************** easy-irf member 1 renumber 2 domain 0 priority 18 irf-port2 FortyGigE 1/0/53 FortyGigE 1/0/54 ***************************************************************************** Configuration summary for member 1 IRF new member ID: 2 IRF domain ID : 0 IRF priority : 18 IRF-port 1 : Disabled IRF-port 2 : FortyGigE1/0/53, FortyGigE1/0/54 ***************************************************************************** IRF保留接口(上行三层互联口) IRF分裂后,保持三层接口通讯mad exclude interface Ten-GigabitEthernet 2/0/50删除IRF 删除irf-port接口un irf-port xx重置编号irf member 2 renumber 1OSPF配置 在接口使能ospfint xx ospf 1 area 0接口配置为p2p模式ospf network-type p2p在vlan使能ospfint vlan xx ospf 1 area 1在loopback 0使能ospfint loopback 0 ospf 1 area 0堆叠心跳检测BFD MAD 新建用于irf检测的vlanvlan 4094 description irf-mad qu创建VPN实例,用于隔离路由路由表ip vpn-instance mgmt route-distinguisher 1:1 qu配置虚接口,配置心跳检测IP,绑定VPN实例int vlan4094 description irf-mad ip binding vpn-instance mgmt mad bfd enable mad ip address 1.0.0.1 255.255.255.252 member 1 mad ip address 1.0.0.2 255.255.255.252 member 2 qu心跳接口配置interface GigabitEthernet 1/0/48 description irf-mad port access vlan 4094 undo stp enable interface GigabitEthernet 2/0/48 description irf-mad port access vlan 4094 undo stp enableOSPF优化 配置OSPF IDint LoopBack 0 ip add 10.100.0.1 32 qu配置指定接口收发OSPF报文ospf 1 silent-interface all #关闭全部接口的OSPF报文收发 undo silent-interface Ten-GigabitEthernet 1/0/49{lamp/}链路聚合原文链接:https://blog.csdn.net/VictoryKingLIU/article/details/79560157二层端口静态聚合模式<H3C>system-view [H3C]int Bridge-Aggregation 1 [H3C-Bridge-Aggregation1]quit [H3C]int GigabitEthernet 1/0/1 [H3C-GigabitEthernet1/0/1]port link-aggregation group 1 [H3C-GigabitEthernet1/0/1]int GigabitEthernet 1/0/2 [H3C-GigabitEthernet1/0/2]port link-aggregation group 1 [H3C-GigabitEthernet1/0/2]int GigabitEthernet 1/0/3 [H3C-GigabitEthernet1/0/3]port link-aggregation group 1 [H3C]dis link-aggregation verbose二层端口动态聚合模式<H3C>system-view [H3C]int Bridge-Aggregation 1 [H3C-Bridge-Aggregation1]link-aggregation mode dynamic [H3C-Bridge-Aggregation1]quit [H3C]int GigabitEthernet 1/0/1 [H3C-GigabitEthernet1/0/1]port link-aggregation group 1 [H3C-GigabitEthernet1/0/1]int GigabitEthernet 1/0/2 [H3C-GigabitEthernet1/0/2]port link-aggregation group 1 [H3C-GigabitEthernet1/0/2]int GigabitEthernet 1/0/3 [H3C-GigabitEthernet1/0/3]port link-aggregation group 1 [H3C]dis link-aggregation verbose三层端口静态聚合创建端口三层聚合口 [SW1]interface Route-Aggregation 1 分别把GE1/0/11,GE1/0/12加入到聚合组1 [SW1]interface GigabitEthernet 1/0/11 [SW1-GigabitEthernet1/0/11]port link-mode route [SW1-GigabitEthernet1/0/11]port link-aggregation group 1 [SW1]interface GigabitEthernet 1/0/12 [SW1-GigabitEthernet1/0/12]port link-mode route [SW1-GigabitEthernet1/0/12]port link-aggregation group 1{dotted startColor="#ff6c6c" endColor="#1989fa"/}pvid 不同VLAN间通讯SW1: interface GigabitEthernet1/0/1 port link-mode bridge port access vlan 100 combo enable fiber # interface GigabitEthernet1/0/2 port link-mode bridge port link-type trunk port trunk permit vlan 1 100 port trunk pvid vlan 100 combo enable fiber # SW2: interface GigabitEthernet1/0/1 port link-mode bridge port access vlan 200 combo enable fiber # interface GigabitEthernet1/0/2 port link-mode bridge port link-type trunk port trunk permit vlan 1 200 port trunk pvid vlan 200 combo enable fiber # {dotted startColor="#ff6c6c" endColor="#1989fa"/}ACL控制规则[H3C]acl basic 2000 #创建基础规则 [H3C-acl-ipv4-basic-2000]rule deny source 192.168.1.2 0 #编写规则内容,阻止来自192.168.1.2的包 [H3C-acl-ipv4-basic-2000]int g1/0/1 #进入接口 [H3C-GigabitEthernet1/0/1]packet-filter 2000 inbound #应用规则 inbound入站 outbound出站在本案例中,若要禁止192.168.1.1访问2,需要在G1/0/1应用 outbound出站规则,这样数据包在抵达2并返回到接口时会被阻止;要禁止全体访问2,则需要在G1/0/2应用inbound入站规则,这样数据包从2出发并经过接口时会被阻止。端口控制若要阻止vlan1所有telnet访问,则可以在vlan1中设置出站规则[H3C]acl advanced 3001 [H3C-acl-ipv4-adv-3001]rule 1 deny tcp source-port eq 23 [H3C-acl-ipv4-adv-3001]int vlan1 [H3C-Vlan-interface1]packet-filter 3001 outbound若仅要阻止1.5或网段的telnet访问,则可以设置入站规则[H3C-acl-ipv4-adv-3002]rule 1 deny tcp source 192.168.1.5 0 destination-port eq 23 [H3C-Vlan-interface1]packet-filter 3002 inbound{dotted startColor="#ff6c6c" endColor="#1989fa"/}端口隔离参考连接:https://blog.csdn.net/weixin_34110749/article/details/92738677(特别注明:模拟器中端口隔离功能不起作用)[H3C]port-isolate group 2 [H3C]int g1/0/1 [H3C-GigabitEthernet1/0/1]port-isolate enable group 2 [H3C-GigabitEthernet1/0/1]int g1/0/2 [H3C-GigabitEthernet1/0/2]port-isolate enable group 2 [H3C-GigabitEthernet1/0/2]quit [H3C]dis port-isolate group 2 Port isolation group information: Group ID: 2 Group members: GigabitEthernet1/0/1 GigabitEthernet1/0/2{dotted startColor="#ff6c6c" endColor="#1989fa"/}IRF堆叠LACP-MAD检测参考链接:https://blog.csdn.net/qq_45662411/article/details/105983636开启前,堆叠线断开后两设备都成为master在线,影响网络运行;开启后,LACP-MAD协议会控制在线的成员关闭端口,只保留一个master,防止网络冲突。IRF设备配置: [master]int Bridge-Aggregation 2 #创建一个名为2的聚合端口组 [master-Bridge-Aggregation2]link-aggregation mode dynamic #将此端口组的模式改为动态 [master-Bridge-Aggregation2]mad enable #开启mad检测 [master-Bridge-Aggregation2]quit #退出接口视图 [master]int range g1/0/1 g2/0/1 #同时进入这两个接口 [master-if-range]port link-aggregation group 2 #将他们加入到这个接口组2中 下层配置: [H3C]int Bridge-Aggregation 2 #创建一个名为2的聚合端口组 [H3C-Bridge-Aggregation2]link-aggregation mode dynamic #将此端口组的模式改为动态 [H3C-Bridge-Aggregation2]quit #退出接口视图 [H3C]int range g1/0/1 g1/0/2 #进入到这两个接口 [H3C-if-range]port link-aggregation group 2 #将这两个端口组加入到接口组2中{dotted startColor="#ff6c6c" endColor="#1989fa"/}AP三层上线所属VLAN配置DHCP Option43option43格式简要说明: 80 07 00 00 01 02 02 02 02 80:固定值,不用改变; 07:长度字段,其后面所跟数据的字节长度; 00 00:固定值,不用改变; 01:表示后面的IP地址的个数,此处为一个IP地址; 02 02 02 02:IP地址转换工具https://tool.520101.com/wangluo/jinzhizhuanhuan/dhcp server ip-pool vlan5 gateway-list 192.168.1.1 network 192.168.1.0 mask 255.255.255.0 dns-list 114.114.114.114 option 43 hex 800700000103030302本地转发性能更高更灵活,通过AC管理。AP接口如果是access,则ap和客户端在同一个VLAN。AP接口如果是trunk,则可以分别配置VLAN。{dotted startColor="#ff6c6c" endColor="#1989fa"/}UEFI PXE网络启动dhcp server ip-pool test gateway-list 192.168.1.254 network 192.168.1.0 mask 255.255.255.0 bootfile-name \\Boot\\x64\\wdsmgfw.efi #传统引导为\\Boot\\x64\\wdsnbp.com dns-list 114.114.114.114 next-server 192.168.100.100 #WDS服务器学习实验 acl策略PVID路由口端口汇聚堆叠、汇聚、ospf静态路五机堆叠三机堆叠
-
中型企业网络思路规划配置分享,H3C HCL模拟器,easy-irf堆叠 OSPF优化 整体规划 本架构是在小型企业网络思路上进行增强https://90apt.com/2449功能实现 1、easy-irf快速堆叠,配置心跳检测2、OSPF分区域、双线配置双路由、配置p2p模式、限制收发OSPF报文端口模拟器实验 线缆全部链接完成IP规划网段划分 loopback 0 网络核心 10.100.0.1 监控核心 10.100.0.2 网络汇聚 10.100.0.3 监控汇聚 10.100.0.4 网络核心1/0/49to监控核心1/0/49 10.100.1.1/30 10.100.1.2/30 网络核心2/0/49to监控核心1/0/50 10.100.1.5/30 10.100.1.6/30 网络核心1/0/50to网络汇聚1/0/50 10.100.1.9/30 10.100.1.10/30 网络核心2/0/50to网络汇聚1/0/49 10.100.1.13/30 10.100.1.14/30 监控核心1/0/51to监控汇聚1/0/49 10.100.1.17/30 10.100.1.18/30 网络配置 网络核心 堆叠 1/0/53 to 2/0/53 1/0/54 to 2/0/54 心跳 1/0/48 to 2/0/48 模拟器限制,连接会死机,不进行连接 IP地址 网络汇聚 vlan102 10.100.102.1/24 监控汇聚 vlan103 10.100.103.1/24 网络主机 10.100.102.2/24 监控主机 10.100.103.2/24 ospf区域 网络核心 area0 10.100.1.0 0.0.0.3 10.100.1.4 0.0.0.3 10.100.1.8 0.0.0.3 10.100.1.12 0.0.0.3 监控核心 area0 10.100.1.0 0.0.0.3 10.100.1.4 0.0.0.3 10.100.1.16 0.0.0.3 网络汇聚 area0 10.100.1.8 0.0.0.3 10.100.1.12 0.0.0.3 area1 10.100.102.0 0.0.0.255 监控汇聚 area0 10.100.1.16 0.0.0.3 area1 10.100.103.0 0.0.0.255 一、进行核心堆叠 1、配置交换机名hostname wangluo hexin2、核心1配置easy-irf member 1 domain 0 priority 24 irf-port1 FortyGigE 1/0/53 FortyGigE 1/0/54a 保存配置 save3、核心2配置第二台核心编号重命名为2,优先级18,低于第一台24easy-irf member 1 renumber 2 domain 0 priority 18 irf-port2 FortyGigE 1/0/5 3 FortyGigE 1/0/54按提示,输入Y重启4、配置堆叠心跳检测BFD MAD由于模拟器限制,配置完后心跳线连接会死机,因此心跳线不连接堆叠心跳检测BFD MAD新建用于irf检测的vlan,注意,后续trunk接口要阻止此VLAN通过vlan 4094 description irf-mad qu创建VPN实例,用于隔离路由路由表ip vpn-instance mgmt route-distinguisher 1:1 qu配置虚接口,配置心跳检测IP,绑定VPN实例int vlan4094 description irf-mad ip binding vpn-instance mgmt mad bfd enable mad ip address 1.0.0.1 255.255.255.252 member 1 mad ip address 1.0.0.2 255.255.255.252 member 2 qu心跳接口配置interface GigabitEthernet 1/0/48 description irf-mad port access vlan 4094 undo stp enable interface GigabitEthernet 2/0/48 description irf-mad port access vlan 4094 undo stp enable5、IRF保留接口,一般用于上行三层接口,设备分裂后保持通讯mad exclude interface Ten-GigabitEthernet 2/0/50二、配置所有IP地址 三层交换机改名、配置loopback地址、配置IP地址、PC配置IP地址interface Ten-GigabitEthernet1/0/49 port link-mode route combo enable fiber ip address 10.100.1.1 255.255.255.252 interface LoopBack0 ip address 10.100.0.3 255.255.255.255 [wangluo huiju-GigabitEthernet1/0/1]ping 10.100.102.2 Ping 10.100.102.2 (10.100.102.2): 56 data bytes, press CTRL_C to break 56 bytes from 10.100.102.2: icmp_seq=0 ttl=255 time=6.212 ms 56 bytes from 10.100.102.2: icmp_seq=1 ttl=255 time=3.258 ms 56 bytes from 10.100.102.2: icmp_seq=2 ttl=255 time=3.670 ms 56 bytes from 10.100.102.2: icmp_seq=3 ttl=255 time=2.772 ms 56 bytes from 10.100.102.2: icmp_seq=4 ttl=255 time=4.012 ms三、配置OSPF 配置OSPF之前先配置loopback地址三层接口使能OSPF,配置为P2P模式,放在区域0[wangluo hexin-Ten-GigabitEthernet1/0/49]dis th # interface Ten-GigabitEthernet1/0/49 port link-mode route combo enable fiber ip address 10.100.1.1 255.255.255.252 ospf network-type p2p ospf 1 area 0.0.0.0loopback使能OSPF,放在区域0interface LoopBack0 ip address 10.100.0.3 255.255.255.255 ospf 1 area 0.0.0.0VLAN使能OSPF,业务网段放在区域1[wangluo huiju-Vlan-interface102]dis th # interface Vlan-interface102 ip address 10.100.102.1 255.255.255.0 ospf 1 area 0.0.0.1 #全部配置完成后,网络主机可ping通监控主机<H3C>ping 10.100.103.2 Ping 10.100.103.2 (10.100.103.2): 56 data bytes, press CTRL_C to break 56 bytes from 10.100.103.2: icmp_seq=0 ttl=251 time=18.180 ms 56 bytes from 10.100.103.2: icmp_seq=1 ttl=251 time=9.608 ms 56 bytes from 10.100.103.2: icmp_seq=2 ttl=251 time=14.053 ms 56 bytes from 10.100.103.2: icmp_seq=3 ttl=251 time=13.112 ms 56 bytes from 10.100.103.2: icmp_seq=4 ttl=251 time=12.268 ms四、OSPF优化 限制OSPF收发报文的端口[wangluo hexin-ospf-1]dis th # ospf 1 silent-interface all undo silent-interface Ten-GigabitEthernet1/0/49 undo silent-interface Ten-GigabitEthernet1/0/50 undo silent-interface Ten-GigabitEthernet2/0/49 undo silent-interface Ten-GigabitEthernet2/0/50 area 0.0.0.0五、测试 网络主机ping监控主机,在ping过程中断掉双线中的一条,会丢包一个,删除多个双线中的一条,最多会丢包4个56 bytes from 10.100.103.2: icmp_seq=519 ttl=251 time=16.112 ms 56 bytes from 10.100.103.2: icmp_seq=520 ttl=251 time=20.881 ms 56 bytes from 10.100.103.2: icmp_seq=521 ttl=251 time=15.032 ms Request time out 56 bytes from 10.100.103.2: icmp_seq=523 ttl=251 time=36.649 ms 56 bytes from 10.100.103.2: icmp_seq=524 ttl=251 time=16.727 ms 56 bytes from 10.100.103.2: icmp_seq=525 ttl=251 time=15.137 ms 56 bytes from 10.100.103.2: icmp_seq=526 ttl=251 time=17.651 ms Request time out Request time out Request time out Request time out Request time out 56 bytes from 10.100.103.2: icmp_seq=532 ttl=251 time=13.904 ms 56 bytes from 10.100.103.2: icmp_seq=533 ttl=251 time=42.994 ms 56 bytes from 10.100.103.2: icmp_seq=534 ttl=251 time=27.916 ms 56 bytes from 10.100.103.2: icmp_seq=535 ttl=251 time=14.782 ms六、实机测试 1、实际测试BFD防分裂能力 物理机配置BFD不存在死机问题,模拟器有BUG当前1为主,2为从,共连接了1/0/18 2/0/18 2/0/23,其中2/0/23配置了IRF保留接口直接拔掉两条堆叠线结果,终端BFD告警,交换机接口2/0/18停止工作,仅保留接口2/0/23保持工作%Jan 7 12:29:20:050 2021 S5560X-30F-EI_09 BFD/5/BFD_CHANGE_FSM: Sess[1.0.0.1/1.0.0.2, LD/RD:32897/32897, Interface:Vlan4094, SessType:Ctrl, LinkType:INET], Ver:1, Sta: DOWN->INIT, Diag: 0 (No Diagnostic) %Jan 7 12:29:20:055 2021 S5560X-30F-EI_09 BFD/5/BFD_CHANGE_FSM: Sess[1.0.0.1/1.0.0.2, LD/RD:32897/32897, Interface:Vlan4094, SessType:Ctrl, LinkType:INET], Ver:1, Sta: INIT->UP, Diag: 0 (No Diagnostic) %Jan 7 12:29:22:747 2021 S5560X-30F-EI_09 DEV/3/BOARD_REMOVED: Board was removed from slot 2, type is unknown.插回堆叠线,交换机2自动重启2、测试堆叠切换直接拔掉交换机1的电源线交换机2成为主交换机继续工作交换机1插电交换机1成为从交换机,交换机2保持主交换机,通讯恢复总结 爽
-
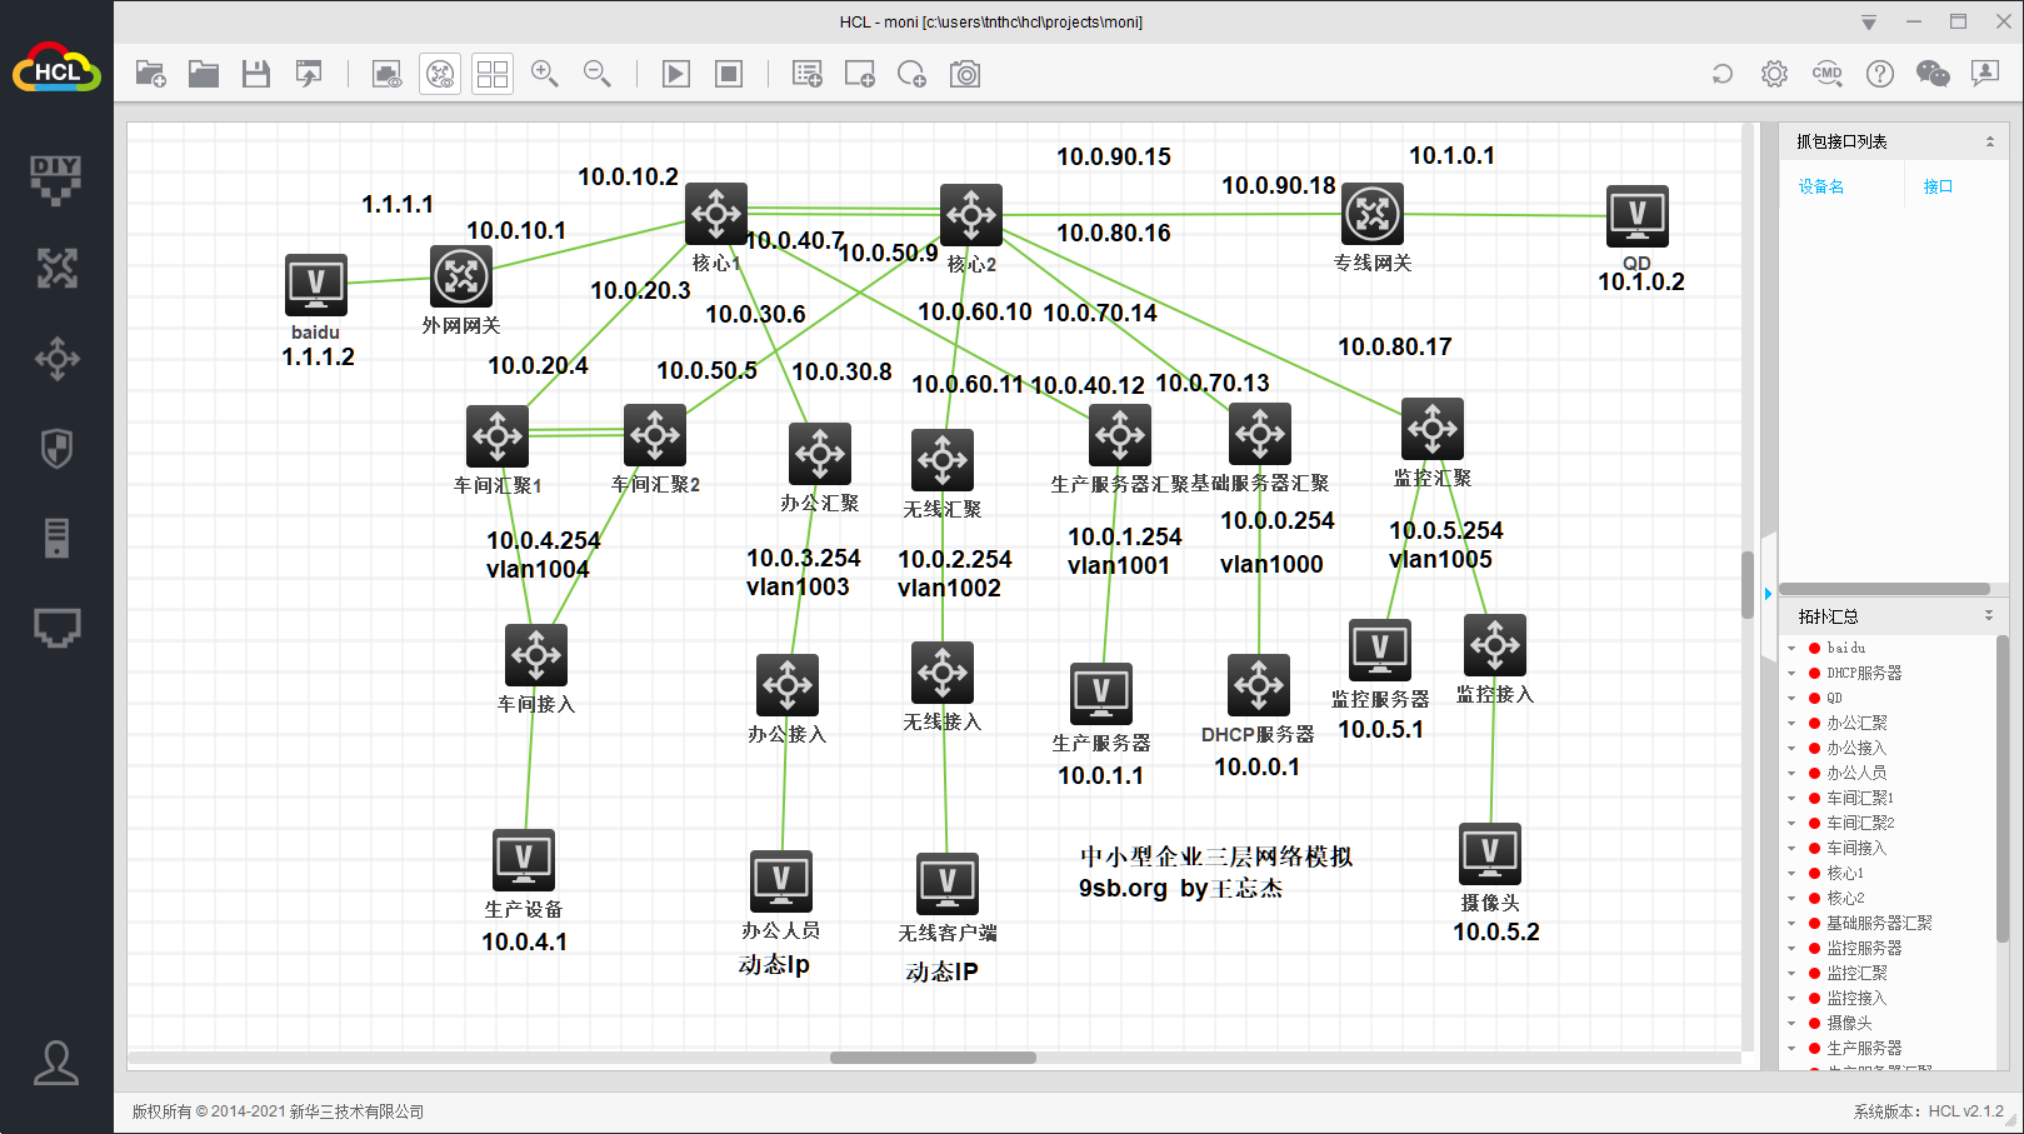
小型企业网络思路规划配置分享,H3C HCL模拟器 整体规划 采用三层网络结构,核心、汇聚三层互联,堆叠采用40G网络,汇聚10G,接入1G,网关下放到汇聚,交换机采用独立管理VLAN。功能实现 1、核心堆叠,汇聚堆叠,动态端口聚合2、配置DHCP服务器,配置DHCP中继,为多个VLAN提供服务3、静态路由与OSPF,配合ACL实现不同网络的访问控制4、外网NAT,专线静态路由5、接入交换机Telnet、管理IP实现6、SNMP网管服务部署7、DHCP仿冒防御8、端口隔离,防范网络风暴和ARP攻击项目文件分享 模拟器为H3C官方HCL模拟器,安装并导入即可{anote icon="" href="https://90apt.com/usr/uploads/2021/06/H3C%E7%BD%91%E7%BB%9C%E6%A8%A1%E6%8B%9F.zip" type="secondary" content="下载"/} 配置详情 1、设置固定IP,配置主机名如图片所示2、核心堆叠,采用40G口堆叠核心1<hexin1>sys System View: return to User View with Ctrl+Z. [hexin1]int range FortyGigE 1/0/53 to FortyGigE 1/0/54 [hexin1-if-range]shu [hexin1-if-range]quit [hexin1]irf member 1 priority 32 [hexin1]irf-port 1/1 [hexin1-irf-port1/1]port group interface FortyGigE 1/0/53 [hexin1-irf-port1/1]port group interface FortyGigE 1/0/54 [hexin1-irf-port1/1]quit [hexin1]irf-port-configuration active [hexin1]int range FortyGigE 1/0/53 to FortyGigE 1/0/54 [hexin1-if-range]un sh [hexin1-if-range]save核心2[hexin2]sys [hexin2]irf member 1 renumber 2 Renumbering the member ID may result in configuration change or loss. Continue?[Y/N]:y [hexin2]quit <hexin2>reboot <hexin2>sys System View: return to User View with Ctrl+Z. [hexin2]interface range FortyGigE 2/0/53 to FortyGigE 2/0/54 [hexin2-if-range]shu [hexin2-if-range]quit [hexin2]irf member 2 priority 1 [hexin2]irf-port 2/2 [hexin2-irf-port2/2]port group interface FortyGigE 2/0/53 [hexin2-irf-port2/2]port group interface FortyGigE 2/0/54 [hexin2-irf-port2/2]qui [hexin2]irf-port-configuration active [hexin2]interface range FortyGigE 2/0/53 to FortyGigE 2/0/54 [hexin2-if-range]un sh [hexin2-if-range]quit [hexin2]save连接堆叠线后,机器自动重启,此时两台交换机终端都会显示为 hexin1 3、车间汇聚堆叠,采用40G口步骤与核心相同,堆叠后两台终端都会显示为 chejianhuiju1 4、按图片为交换机配置IP和VLAN,三层采用路由模式,汇聚下联trunk,接入上联trunk,下联对应vlan车间汇聚做端口聚合[chejianhuiju1]vlan 1004 [chejianhuiju1-vlan1004]int vlan 1004 [chejianhuiju1-Vlan-interface1004]ip add 10.0.4.254 24 [chejianhuiju1-Vlan-interface1004]quit [chejianhuiju1]int Bridge-Aggregation 1 [chejianhuiju1-Bridge-Aggregation1]link-aggregation mode dynamic [chejianhuiju1-Bridge-Aggregation1]quit [chejianhuiju1]int g1/0/1 [chejianhuiju1-GigabitEthernet1/0/1]port link-aggregation group 1 [chejianhuiju1-GigabitEthernet1/0/1]int g2/0/1 [chejianhuiju1-GigabitEthernet2/0/1]port link-aggregation group 1 [chejianhuiju1-GigabitEthernet2/0/1]dis link-aggregation verbose GE1/0/1 0 32768 0 0x8000, 0000-0000-0000 {EF} GE2/0/1 0 32768 0 0x8000, 0000-0000-0000 {EF} [chejianhuiju1-GigabitEthernet2/0/1]vlan 1004 [chejianhuiju1-vlan1004]port Bridge-Aggregation 1 [chejianhuiju1]int Bridge-Aggregation 1 [chejianhuiju1-Bridge-Aggregation1]port link-type trunk [chejianhuiju1-Bridge-Aggregation1]port trunk permit vlan all [chejianhuiju1-Bridge-Aggregation1]save验证生产设备,ping 10.0.20.4 10.0.50.5 10.0.4.254 都通5、配置OSPF,实现车间、办公、生产服务器、基础服务器互通配置核心<hexin1>sys System View: return to User View with Ctrl+Z. [hexin1]ospf [hexin1-ospf-1]area 0 [hexin1-ospf-1-area-0.0.0.0]netwo [hexin1-ospf-1-area-0.0.0.0]network 10.0.70.0 0.0.0.255 [hexin1-ospf-1-area-0.0.0.0]network 10.0.40.0 0.0.0.255 [hexin1-ospf-1-area-0.0.0.0]network 10.0.60.0 0.0.0.255 [hexin1-ospf-1-area-0.0.0.0]network 10.0.30.0 0.0.0.255 [hexin1-ospf-1-area-0.0.0.0]network 10.0.50.0 0.0.0.255 [hexin1-ospf-1-area-0.0.0.0]quit配置车间汇聚<chejianhuiju1>sys System View: return to User View with Ctrl+Z. [chejianhuiju1]ospf [chejianhuiju1-ospf-1]area 0 [chejianhuiju1-ospf-1-area-0.0.0.0]network 10.0.4.0 0.0.0.255 [chejianhuiju1-ospf-1-area-0.0.0.0]network 10.0.20.0 0.0.0.255 [chejianhuiju1-ospf-1-area-0.0.0.0]network 10.0.50.0 0.0.0.255 [chejianhuiju1-ospf-1-area-0.0.0.0]quit生产设备ping核心通,其他配置类似。6、配置DHCP服务器使用三层交换机搭建DHCP服务器,ping测试[H3C]hostname dhcp [dhcp]int g1/0/1 [dhcp-GigabitEthernet1/0/1]port link-mode route [dhcp-GigabitEthernet1/0/1]ip add 10.0.0.1 24 [dhcp-GigabitEthernet1/0/1]save [dhcp-GigabitEthernet1/0/1]quit [dhcp]ip route-static 0.0.0.0 0 10.0.0.254 [dhcp]ping 10.0.0.254 Ping 10.0.0.254 (10.0.0.254): 56 data bytes, press CTRL_C to break 56 bytes from 10.0.0.254: icmp_seq=0 ttl=255 time=0.000 ms创建DHCP池[dhcp]dhcp enable dhcp server ip-pool bangong gateway-list 10.0.3.254 network 10.0.3.0 mask 255.255.255.0 address range 10.0.3.100 10.0.3.200 dns-list 8.8.8.8 expired day 3 # dhcp server ip-pool wuxian gateway-list 10.0.2.254 network 10.0.2.0 mask 255.255.255.0 address range 10.0.2.150 10.0.2.200 dns-list 114.114.114.114 expired day 3 #沿途汇聚、核心都要开启DHCP中继,二层只要有对应VLAN并trunk即可。[jichuhuiju]dhcp enable # interface Vlan-interface1002 dhcp select relay dhcp relay server-address 10.0.0.1 # interface Vlan-interface1003 dhcp select relay dhcp relay server-address 10.0.0.1 # 查看客户端IP,成功获取IP[dhcp]display dhcp server ip-in-use IP address Client identifier/ Lease expiration Type Hardware address 10.0.2.150 0038-6163-312e-3334- Jun 26 20:35:43 2021 Auto(C) 3266-2e31-3730-362d- 4745-302f-302f-31 10.0.3.100 0038-6137-362e-3466- Jun 28 20:35:31 2021 Auto(C) 3864-2e31-3230-362d- 4745-302f-302f-31 7、配置专线,仅办公和无线可以访问办公汇聚、无线汇聚、核心、专线静态路由[wuxianhuiju] ip route-static 10.1.0.0 24 10.0.60.10 [hexin1]ip route-static 10.1.0.0 24 10.0.90.18 [zhuanxianwangguan]ip route-static 10.0.2.0 24 10.0.90.15测试办公和无线都可以访问专线IP10.1.0.28、配置办公和无线能访问外网,但外网无法直接访问内网办公汇聚、无线汇聚、核心默认路由,外网网关静态路由[bangonghuiju]ip route-static 0.0.0.0 0 10.0.30.6 [wuxianhuiju]ip route-static 0.0.0.0 0 10.0.60.10 [hexin1]ip route-static 0.0.0.0 0 10.0.10.1 [waibuwangguan]ip route-static 10.0.3.0 24 10.0.10.2 [waibuwangguan]ip route-static 10.0.2.0 24 10.0.10.2配置最简单NAT访问方式Easy IP[waibuwangguan]acl basic 200 [waibuwangguan-acl-ipv4-basic-2000]rule 0 permit source 10.0.2.0 0.0.0.255 [waibuwangguan-acl-ipv4-basic-2000]acl basic 2001 [waibuwangguan-acl-ipv4-basic-2001]rule 0 permit source 10.0.3.0 0.0.0.255 [waibuwangguan-acl-ipv4-basic-2001]quit [waibuwangguan]int g0/0 [waibuwangguan-GigabitEthernet0/0]nat outbound 2001 [waibuwangguan-GigabitEthernet0/0]nat outbound 2000办公和无线ping外网1.1.1.2通,外网ping内网不通9、POE供电受模拟器限制无法实现,实际在无线接入执行 poe enable 即可10、办公人员通过telnet远程管理车间接入交换机车间汇聚创建管理vlan2000[chejianhuiju1]vlan 2000 [chejianhuiju1-vlan2000]int vlan 2000 [chejianhuiju1-Vlan-interface2000]ip add 192.168.1.254 24车间接入创建管理vlan,开启telnet服务,设置默认路由<chejianjieru>sys System View: return to User View with Ctrl+Z. [chejianjieru]vlan 2000 [chejianjieru-vlan2000]int vlan 2000 [chejianjieru-Vlan-interface2000]ip add 192.168.1.2 24 [chejianjieru-Vlan-interface2000]quit [chejianjieru]user-interface vty 0 4 [chejianjieru-line-vty0-4]authentication-mode scheme [chejianjieru-line-vty0-4]quit [chejianjieru]local-user admin New local user added. [chejianjieru-luser-manage-admin]password simple 123456 [chejianjieru-luser-manage-admin]authorization-attribute user-role level-15 [chejianjieru-luser-manage-admin]service-type telnet [chejianjieru-luser-manage-admin]quit [chejianjieru]telnet server enable [chejianjieru]save [chejianjieru]ip route-static 0.0.0.0 0 192.168.1.254核心添加静态路由[hexin1]ip route-static 192.168.1.0 24 10.0.20.4办公人员远程telnet<bangonghuiju>telnet 192.168.1.2 Trying 192.168.1.2 ... Press CTRL+K to abort Connected to 192.168.1.2 ... ****************************************************************************** * Copyright (c) 2004-2017 New H3C Technologies Co., Ltd. All rights reserved.* * Without the owner's prior written consent, * * no decompiling or reverse-engineering shall be allowed. * ****************************************************************************** login: admin Password: <chejianjieru>11、配置snmp网络管理协议配置向10.0.0.1发送设备信息snmp-agent snmp-agent community write private snmp-agent community read public snmp-agent sys-info version all snmp-agent target-host trap address udp-domain 10.0.0.1 params securityname public v2c12、配置监控网络,办公和无线可以访问监控服务器,不可访问摄像头,摄像头仅与监控服务器互相访问核心设置静态路由,监控汇聚设置默认路由[hexin1]ip route-static 10.0.5.0 24 10.0.80.17 [jiankonghuiju]ip route-static 0.0.0.0 0 10.0.80.16在监控汇聚上联接口配置ACL规则,只允许访问10.0.5.1发出,其他禁止,从而达到只允许监控服务器被访问的目的[jiankonghuiju]acl basic 2000 [jiankonghuiju-acl-ipv4-basic-2000]rule 0 permit source 10.0.5.1 0 [jiankonghuiju-acl-ipv4-basic-2000]rule 1 deny [jiankonghuiju-acl-ipv4-basic-2000]quit [jiankonghuiju]int Ten-GigabitEthernet1/0/49 [jiankonghuiju-Ten-GigabitEthernet1/0/49]packet-filter 2000 outbound测试办公可以ping通10.0.5.1,不能ping通10.0.5.213、配置DHCP snooping,防止仿冒攻击全局开启dhcp snooping,上联端口启用dhcp信任[bangongjieru]dhcp snooping enable [bangongjieru]interface GigabitEthernet1/0/2 [bangongjieru]dhcp snooping trust14、配置端口隔离,减少接入傻瓜交换机造成的网络风暴,防御ARP攻击[H3C]port-isolate group 2 [H3C]int g1/0/1 [H3C-GigabitEthernet1/0/1]port-isolate enable group 2 [H3C-GigabitEthernet1/0/1]int g1/0/2 [H3C-GigabitEthernet1/0/2]port-isolate enable group 2 [H3C-GigabitEthernet1/0/2]quit [H3C]dis port-isolate group 2 Port isolation group information: Group ID: 2 Group members: GigabitEthernet1/0/1 GigabitEthernet1/0/2总结 爽
-
alma8 密钥更换 Import of key(s) didn't help, wrong key(s)? https://almalinux.org/blog/2023-12-20-almalinux-8-key-update/去年年底,我们经历了一次系统故障,导致主密钥丢失,这将使我们能够延长用于签署 AlmaLinux 8 软件包的 GPG 密钥的寿命,它将于 2024 年 1 月到期。虽然我们已经确保这种情况不会再次发生,但某些用户将需要采取特定步骤来导入新的 GPG 密钥。如果您的设备在 AlmaLinux 8 的更新中运行得有点滞后,请阅读下面的详细信息以确定您需要采取的措施。为 AlmaLinux 8 GPG 密钥更改做好准备2024 年 1 月 12 日,我们将开始使用更新的 GPG 密钥对 AlmaLinux 8 的 RPM 包和 repodata 进行签名。在我们进行切换时,采取以下步骤将使您能够继续接收更新而不会出现问题。快速通道如果你想确保你的系统已经包含并信任新的 AlmaLinux 8 GPG 密钥,你可以直接导入它:rpm --import https://repo.almalinux.org/almalinux/RPM-GPG-KEY-AlmaLinux
-
SRS Docker一键搭建直播平台 视频采集端rtmp协议-推送到SRS直播服务器-客户端拉取直播流官方说明https://ossrs.net/lts/zh-cn/docs/v4/doc/introductiondocker run -d -p 1935:1935 -p 1985:1985 -p 8080:8080 ossrs/srs:latest 1935端口为rtmp默认服务端口 1985 为SRS API端口 8080 为web控制台端口一、web控制台使用登录控制台可查看默认rtmp推流地址进入控制台内容为空,通过SRS连接服务连接服务器服务器状态二、快速使用默认推流地址 rtmp://IP/live/livestream默认观看地址 http://IP:8080/live/livestream.flv三、多人使用推流地址+N,如rtmp://IP/live/livestream1rtmp://IP/live/livestream2rtmp://IP/live/livestream3则观看地址为http://IP:8080/live/livestream1.flvhttp://IP:8080/live/livestream2.flvhttp://IP:8080/live/livestream3.flv四、小结部署快速,但缺少密码防护,可以用于临时快速使用
-
使用1Panel面板,快速部署百度千帆在线大模型、llama2本地大模型 问答系统 百度千帆在线大模型llama2本地大模型一、申请百度千帆免费大模型 1、登录百度智能云控制台,开通免费大模型https://console.bce.baidu.com/qianfan/ais/console/onlineService模型服务-在线服务2、模型服务-应用接入-创建应用-获得API Key和Secret Key二、部署Ollama 1Panel面板应用商店 端口允许外网访问安装完成,查看日志获取 key三、部署MaxKB 安装并允许外网访问四、添加大模型 1、百度千帆在线大模型系统设置-模型设置-千帆大模型2、llama2本地大模型系统设置-模型设置-Ollama注意,本文为快速演示,所以只使用最简单的llama2模型,支持8G内存运行,其他模型对配置要求高,需要GPU支持五、配置对话应用 1、创建应用2、千帆大模型3、本地大模型六、使用 打开链接使用正常七、总结 非常简单
-
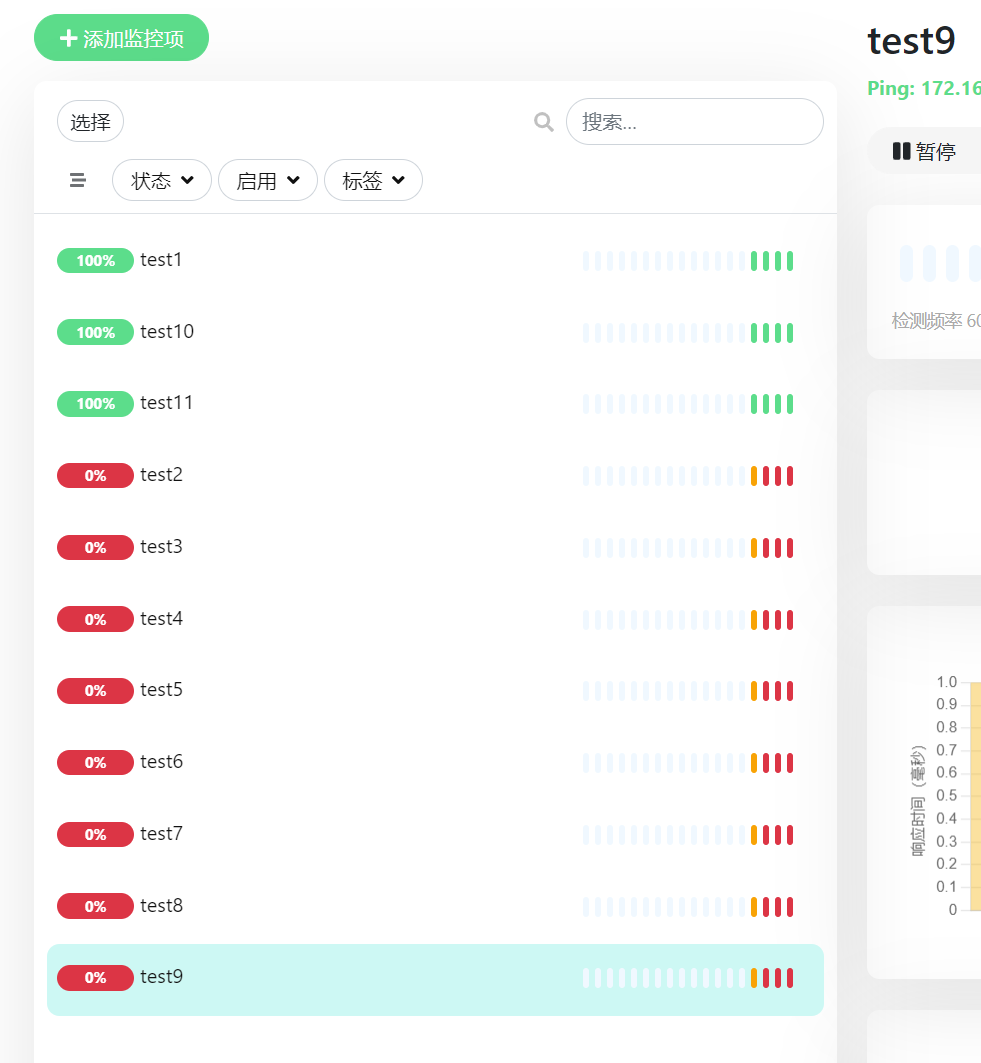
python3开发uptime-kuma批量导入脚本 批量导入IP进行ping检测,如大批量摄像头uptime_kuma_api库使用说明https://github.com/lucasheld/uptime-kuma-api/所有接口https://uptime-kuma-api.readthedocs.io/en/latest/api.htmlfrom uptime_kuma_api import UptimeKumaApi, MonitorType zidian = { "ipadd" : [ {"hostname" : "test1" , "ip" : "172.16.1.1"}, {"hostname" : "test2" , "ip" : "172.16.1.2"}, {"hostname" : "test3" , "ip" : "172.16.1.3"}, {"hostname" : "test4" , "ip" : "172.16.1.4"}, {"hostname": "test5", "ip": "172.16.1.5"}, {"hostname": "test6", "ip": "172.16.1.6"}, {"hostname": "test7", "ip": "172.16.1.7"}, {"hostname": "test8", "ip": "172.16.1.8"}, {"hostname": "test9", "ip": "172.16.1.9"}, {"hostname": "test10", "ip": "172.16.1.10"}, {"hostname": "test11", "ip": "172.16.1.11"} ] } api = UptimeKumaApi('http://1.1.1.1:3001/') api.login('admin', 'mima') for key in zidian["ipadd"]: result = api.add_monitor(type=MonitorType.PING, name=key["hostname"], hostname=key["ip"]) print(result) api.disconnect()运行中导入完成
-
acme.sh自动解析并申请泛域名通配符证书 腾讯云 阿里云 一、部署 acme.shcurl https://get.acme.sh | sh -s email=admin@90apt.com安装后,acmesh会生成计划任务acme.sh --version https://github.com/acmesh-official/acme.sh v3.0.8 crontab -l 37 12 * * * "/root/.acme.sh"/acme.sh --cron --home "/root/.acme.sh" > /dev/null配置默认ca服务器为letsencryptacme.sh --set-default-ca --server letsencrypt二、腾讯云申请泛域名通配符证书1、获取腾讯云 SecretId 和 SecretKeyhttps://console.cloud.tencent.com/cam/capi2、导入环境变量export Tencent_SecretId="AKIDxxxxxxxxxxxxxxxxxxxxxxxxxxxxxxxx" export Tencent_SecretKey="xxxxxxxxxxxxxxxxxxxxxxxxxxxxxxxx"3、申请证书acme.sh --issue --dns dns_tencent -d 90apt.com -d *.90apt.com --debug申请完成-----END CERTIFICATE----- [Thu Jun 20 14:13:23 CST 2024] Your cert is in: /root/.acme.sh/90apt.com_ecc/90apt.com.cer [Thu Jun 20 14:13:23 CST 2024] Your cert key is in: /root/.acme.sh/90apt.com_ecc/90apt.com.key [Thu Jun 20 14:13:23 CST 2024] The intermediate CA cert is in: /root/.acme.sh/90apt.com_ecc/ca.cer [Thu Jun 20 14:13:23 CST 2024] And the full chain certs is there: /root/.acme.sh/90apt.com_ecc/fullchain.cer [Thu Jun 20 14:13:23 CST 2024] _on_issue_success [Thu Jun 20 14:13:23 CST 2024] '' does not contain 'dns'4、查看证书ll /root/.acme.sh/90apt.com_ecc/ total 32 -rw-r--r-- 1 root root 1452 Jun 20 14:13 90apt.com.cer -rw-r--r-- 1 root root 567 Jun 20 14:13 90apt.com.conf -rw-r--r-- 1 root root 473 Jun 20 14:12 90apt.com.csr -rw-r--r-- 1 root root 198 Jun 20 14:12 90apt.com.csr.conf -rw------- 1 root root 227 Jun 20 14:12 90apt.com.key -rw-r--r-- 1 root root 2668 Jun 20 14:13 ca.cer -rw-r--r-- 1 root root 4120 Jun 20 14:13 fullchain.cer三、腾讯云申请泛域名通配符证书1、进入RAM访问控制2、创建用户组3、给用户组增加DNS完整控制权限 AliyunDNSFullAccess4、创建用户5、给用户分配用户组,使其获得DNS完整控制权6、创建AccessKey7、导入环境变量export Ali_Key="sdfsdfsdfljlbjkljlkjsdfoiwje" export Ali_Secret="jlsdflanljkljlfdsaklkjflsa"8、申请证书acme.sh --issue --dns dns_ali -d 90apt.com -d *.90apt.com --debug申请完成[Thu Jun 20 14:41:41 CST 2024] Your cert is in: /root/.acme.sh/90apt.com_ecc/90apt.com.cer [Thu Jun 20 14:41:41 CST 2024] Your cert key is in: /root/.acme.sh/90apt.com_ecc/90apt.com.key [Thu Jun 20 14:41:41 CST 2024] The intermediate CA cert is in: /root/.acme.sh/90apt.com_ecc/ca.cer [Thu Jun 20 14:41:41 CST 2024] And the full chain certs is there: /root/.acme.sh/90apt.com_ecc/fullchain.cer [Thu Jun 20 14:41:41 CST 2024] _on_issue_success [Thu Jun 20 14:41:41 CST 2024] '' does not contain 'dns'9、查看证书ll /root/.acme.sh/90apt.com_ecc/ total 32 -rw-r--r-- 1 root root 2668 Jun 20 14:41 ca.cer -rw-r--r-- 1 root root 1460 Jun 20 14:41 90apt.com.cer -rw-r--r-- 1 root root 569 Jun 20 14:41 90apt.com.conf -rw-r--r-- 1 root root 481 Jun 20 14:40 90apt.com.csr -rw-r--r-- 1 root root 204 Jun 20 14:40 90apt.com.csr.conf -rw------- 1 root root 227 Jun 20 14:40 90apt.com.key -rw-r--r-- 1 root root 4128 Jun 20 14:41 fullchain.cer四、acme.sh程序自动升级:acme.sh --upgrade --auto-upgrade关闭自动升级acme.sh --upgrade --auto-upgrade 0五、debugacme.sh --issue ..... --debug