搜索到
285
篇与
的结果
-
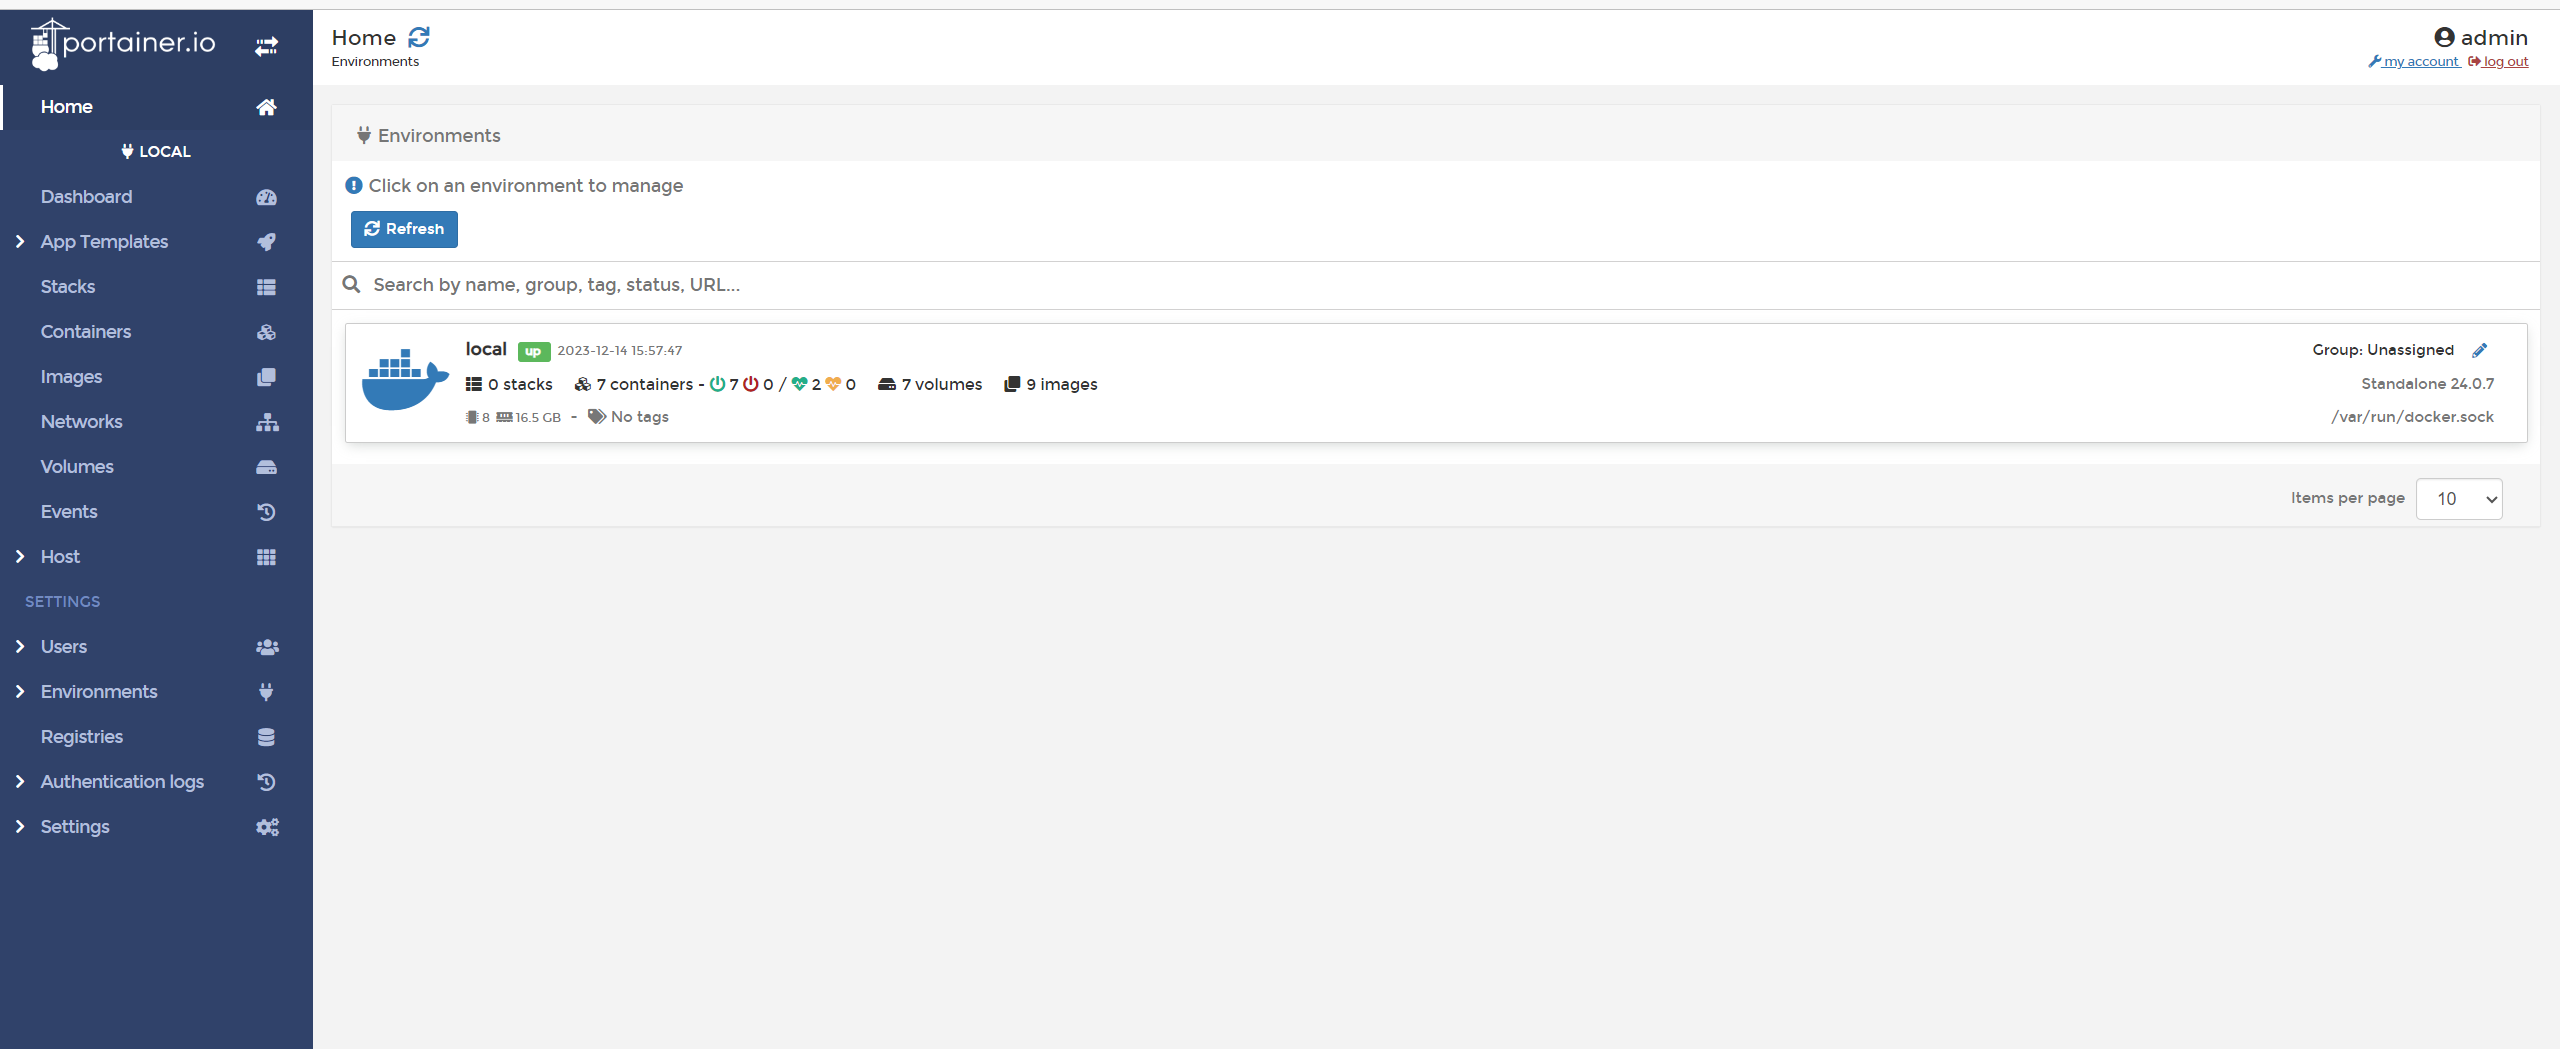
 RHEL9/ALMA9 搭配portainer docker容器管理面板进行应用部署 当前更新时间2023.12.14持续更新中一、安装ALMA9ALMA官网,我是用miniISO镜像https://almalinux.org/zh-hans/get-almalinux/二、系统配置开启SSH登录见红帽官方帮助,默认不允许root SSH登录https://access.redhat.com/documentation/zh-cn/red_hat_ceph_storage/5/html/installation_guide/enabling-ssh-log-in-as-root-user-on-rhel-9_install[root@admin ~]# echo 'PermitRootLogin yes' >> /etc/ssh/sshd_config.d/01-permitrootlogin.conf [root@admin ~]# systemctl restart sshd.service使用中未发现selinux影响docker,可酌情关闭。三、安装dockeryum install -y yum-utils #官方源 yum-config-manager --add-repo https://download.docker.com/linux/centos/docker-ce.repo #阿里云加速源 yum-config-manager --add-repo http://mirrors.aliyun.com/docker-ce/linux/centos/docker-ce.repo yum install docker-ce docker-ce-cli containerd.io四、配置docker网段和加速源镜像源/etc/docker/daemon.json { "bip": "192.168.120.1/24", "registry-mirrors": [ "https://pfti226w.mirror.aliyuncs.com", "https://hub-mirror.c.163.com", "https://docker.m.daocloud.io", "https://ghcr.io", "https://mirror.baidubce.com", "https://docker.nju.edu.cn" ] }运行dockersystemctl enable --now docker五、安装portainer面板创建存储卷docker volume create portainer_data一键部署运行portainer,8000为portainer对接端口,9443为https管理面板docker run -d -p 8000:8000 -p 9443:9443 --name portainer --restart=always -v /var/run/docker.sock:/var/run/docker.sock -v portainer_data:/data portainer/portainer-ce:latest六、面板使用运行后,登录https://IP:9443创建第一个管理员用户登录local即可开始使用主界面容器管理持久化卷管理镜像源配置1、创建容器新建容器容器名称、端口映射等参数高级选项持久化卷 变量 重启策略容器重启会丢失全部运行中产生的数据,所以需要进行容器数据持久化设置,例如nginx容器的/etc/nginx目录配置文件,/usr/share/nginx网页目录某些容器部署时需要配置变量,如mysql8.2需要MySQL_ROOT_PASSWORD变量,否则启动失败重启策略通常配置为always总是 ,以实现开机自启动2、重新创建容器高危操作若容器异常,可重新创建容器,除持久化数据外,容器数据全部丢失此选项也可用于更新容器,适用于使用latest标签的容器3、编辑容器高危操作可修改容器参数,例如映射端口,持久化等,除持久化数据外,容器数据全部丢失4、容器开启、关闭、重启、暂停、恢复、删除5、镜像管理已下载的镜像6、持久化管理持久化卷七、部署应用1、mysql8.2必填变量 MySQL_ROOT_PASSWORD映射端口 3306自动持久化注意,由于mysql8.2修改了默认加密方式,使用客户端可能无法连接!root连接使用DBeaver,默认连接会报Public Key Retrieval is not allowed,需要将驱动属性中allowPublicKeyRetrieval配置为TRUE,即可使用root连接普通用户连接目前大部分应用还不支持mysql8.2的新加密方式,如果遇到mysql无法连接,可新建普通用户,将用户修改为旧密码加密方式。ALTER USER 'typecho'@'%' IDENTIFIED WITH mysql_native_password BY 'passwd';2、nginx映射端口 443 80映射目录 1)nginx配置目录,即nginx的/etc/nginx映射到nginx.conf卷2)nginx网页目录,即nginx的/usr/share/nginx映射到nginx-www卷修改配置或放置网页时,通过卷的挂载目录修改3、php-fpm映射端口 9000映射目录 映射目录为nginx网页目录,即nginx的/usr/share/nginx映射到nginx-www卷,php-fpm的/usr/share/nginx同样映射到nginx-www卷,使php-fpm可以读取nginx网页目录的文件4、librespeed映射端口 80自动持久化5、typecho映射端口 80自动持久化6、uptime-kuma映射端口3001自动持久化八、小结太强大了!
 -

-
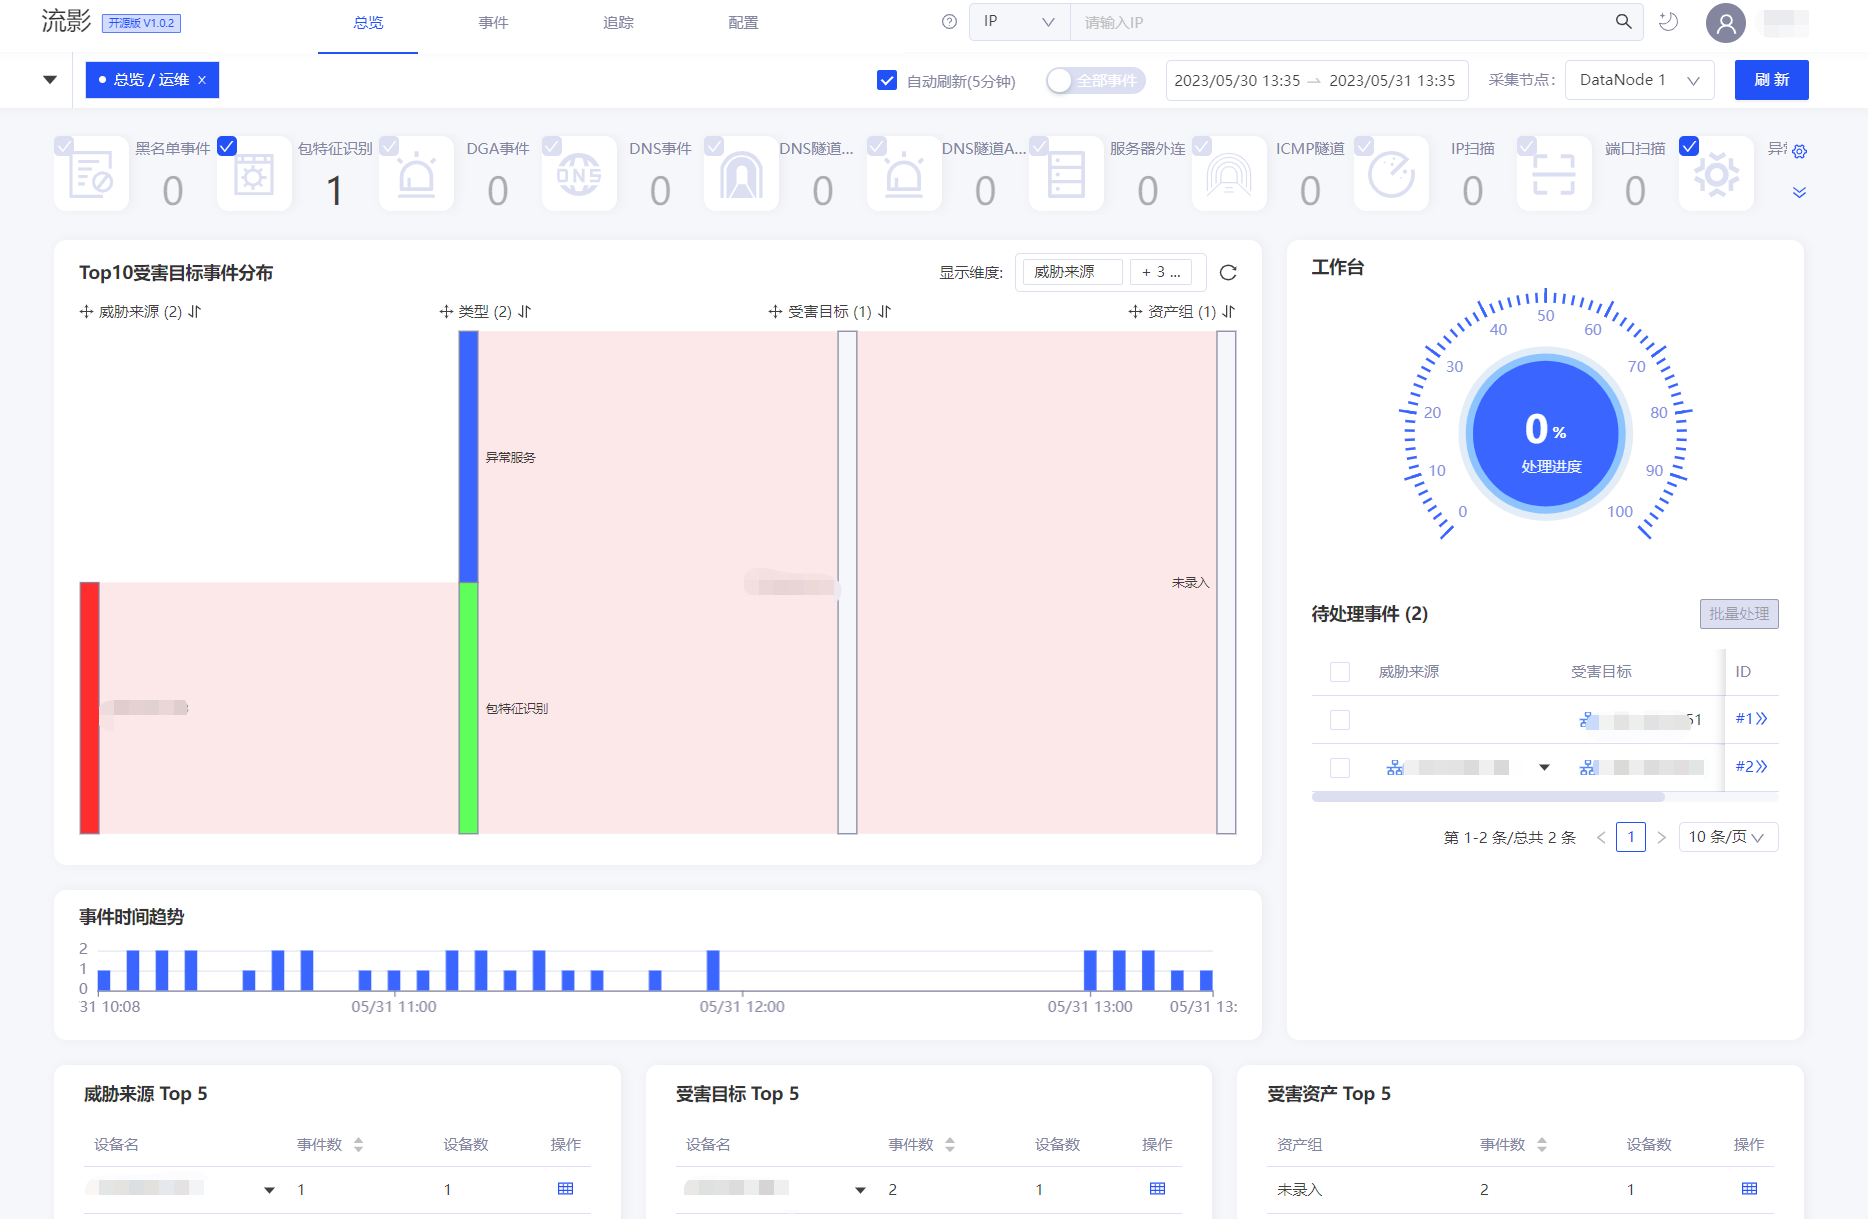
 流影 Flow Shadow 轻量级网络安全感知与网络行为可视化综合分析平台 官网https://abyssalfish-os.github.io/项目安装,我这里使用一键包,系统要求Centos7.9https://abyssalfish-os.github.io/downloads/当前版本为ly-install-package-v1.1.0解压tar xvzf ly-install-package-1.1.0.tar.gz ll -rw-r--r-- 1 root root 242239180 Dec 4 15:19 ly-install-package-1.1.0.tar.gz drwxr-xr-x 2 root root 4096 Nov 29 15:24 ly-install-package-v1.1.0 进入目录,解压依赖包到root目录cd ly-install-package-v1.1.0/ ls agent_deploy_release.sh db.server.v1.1.231123.tar.gz protobuf-3.8.0-1.el7.x86_64.tar.gz Agent.v1.1.0.231124.tar.gz INSTALL.md server_deploy_release.sh all_env.sh localyumsource.tar.gz Server.v1.1.0.231124.tar.gz cgicc-lib-3.2.16-1.el7.x86_64.tar.gz lyprobe-release-v1.0.1.tar.gz tensorflow-2.0.4-1.el7.x86_64.tar.gz cppdb-lib-0.3.1-1.el7.x86_64.tar.gz pf_ring-lib-7.4.0-957.el7.x86_64.E5v2.tar.gz webui.v1.1.0.tar.gz tar zxf localyumsource.tar.gz -C /root安装依赖./all_env.sh安装探针和分析引擎/bin/bash ./agent_deploy_release.sh安装管理和交互页面,过程中会安装mariadb数据库,并提示你配置数据库密码/bin/bash ./server_deploy_release.sh修改默认监听网卡 `安装完毕后,安装部署程序已自动将探针与接收程序的启动命令写入 /etc/rc.local 文件中。 lyprobe为探针,通过-i参数指定所监听的网卡,默认写ens224,根据网卡信息自主更改此参数。`查看当前网卡ip add 2: ens192: <BROADCAST,MULTICAST,UP,LOWER_UP> mtu 1500 qdisc mq state UP group default qlen 1000修改启动脚本中的网卡 /etc/rc.local modprobe pf_ring lyprobe -T "%IPV4_SRC_ADDR %IPV4_DST_ADDR %IN_PKTS %IN_BYTES %FIRST_SWITCHED %LAST_SWITCHED %L4_SRC_PORT %L4_DST_PORT %TCP_FLAGS %PROTOCOL %SRC_TOS %DNS_REQ_DOMAIN %DNS_REQ_TYPE %HTTP_URL %HTTP_REQ_METHOD %HTTP_HOST %HTTP_MIME %HTTP_RET_CODE %SRV_TYPE %SRV_NAME %SRV_VERS %DEV_TYPE %DEV_NAME %DEV_VEND %DEV_VERS %OS_TYPE %OS_NAME %OS_VERS %MID_TYPE %MID_NAME %MID_VERS %THREAT_TYPE %THREAT_NAME %THREAT_VERS %ICMP_DATA %ICMP_SEQ_NUM %ICMP_PAYLOAD_LEN %SRV_TIME %DEV_TIME %OS_TIME %MID_TIME %THREAT_TIME" -i ens192 -n 127.0.0.1:9995 -G -e 0 -w 32768 -k 1 -K /data/cap/3 /Agent/bin/nfcapd -w -D -l /data/flow/3 -p 9995 如果使用vSphere平台,虚拟交换机和虚拟机网卡开启混杂模式空间清理/Agent/bin/cleanup.sh清理异常可将脚本中str_home目录改为/运行/bin/bash /etc/rc.local登录控制台访问地址:http://ip:18080/ui管理员账号:admin,密码LoginLY@2016安装完成,具体使用参考官网文档
 -
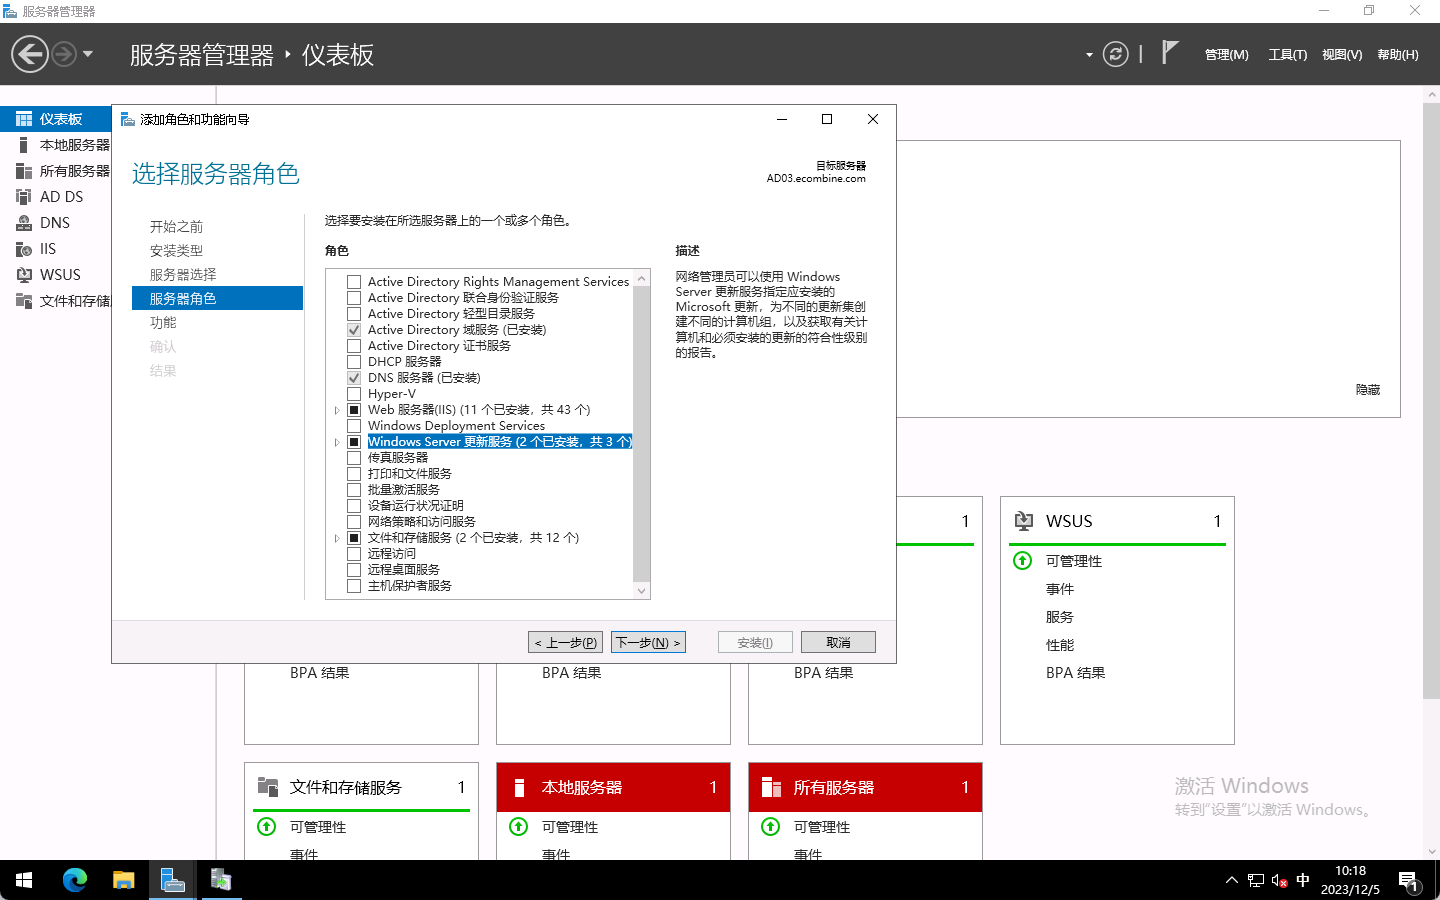
 Windows更新服务部署、域策略批量配置更新 一、前言 WSUS 是在 Windows Server 操作系统中提供的 Windows Server 角色。 它为 Windows 更新在组织中提供了一个中心。 WSUS 支持公司不仅可以延迟更新,还可以选择性地批准更新、选择传递更新时间,并且可以确定接收更新的个别设备或设备组。选择 WSUS 作为 Windows 更新的源时,可以使用组策略将 Windows 客户端设备指向 WSUS 服务器以获取更新。 更新在此处将定期下载到 WSUS 服务器,并且通过 WSUS 管理控制台或组策略进行管理、批准和部署,这简化了企业更新管理事宜。二、安装WSUS服务 勾选windows server更新服务后,下一步下一步即可三、配置WSUS服务 如果打开WSUS界面为英文,则需要进行系统更新,会自动安装中文语言包,更新重启后显示为中文配置向导更新改善计划上游我选择官方点击开始连接获取信息 此处可能需要重试几次才有反应 很慢 移动宽带下更慢我这里选择中文和英文产品其实全选都行,只是选的多每次获取数据的时间会变长我选择全部windows,选择后,只有批准的补丁才会下载更新,我不使用自动审批自动同步,建议避开网络高峰期初始同步可以开始,也可以等自动同步,根据网络,需要几个小时同步完成访问服务器的8530端口进行测试打开网页为空白页是正常的四、客户端测试 配置本地计算机的组策略,位置大体相同,win11会多一级目录,但基本没变 组策略-计算机配置-管理模板-windows组件-windows更新-指定 Intranet Microsoft 更新服务位置客户端选择检查更新,会提示已经是最新版本登录WSUS服务器等WSUS同步完成后,更新-所有更新 审批:未经审批 状态:失败或需要的 选择刷新可以显示当前客户端需要但没审批的更新,全选右键批准批准后服务器会下载补丁,服务器下载完补丁后,客户端再检查更新才会获取到补丁五、域策略推送更新 与单机相同,仅仅是组策略变成了域策略在域中新建一条策略即可六、小结 好好好
 -
 华为FusionCube超融合一体机改造VMware vSphere vSAN超融合虚拟化集群 前言 FusionCube是华为出品的,一套使用华为FusionSphere虚拟化技术打包出售的超融合一体机,我这里使用的三台超融合,包含华为 2288H V5服务器、FusionSphere虚拟化授权、软件服务支持和硬件维保。随着时间推进,华为超融合的软件服务支持已经过期,并且出现了无法关机的情况,由于华为超融合生态与现有的虚拟化生态不兼容,随即决定将华为超融合改造为VMware vSphere vSAN超融合集群。原华为数据会全部丢失。整体思路 为服务器安装ESXi系统,服务器两个网络接口为一组,ESXi控制网络采用千兆网口,vSAN和业务网络采用trunk网络,配置独立VLAN隔离。注意:本次改造为全过程记录,请全部看完后再进行操作;运维最重要的是思路和耐心! {lamp/}外观正面照 背面照由于原标签已经老旧脱落,因此进行标签的重新标记2块NVME 800G 固态2块SAS 600G 机械 RAID1 做系统盘14块SAS 2.4T 机械 进入BIOS/UEFI 重启F11进入 启动管理器进入启动管理器时,会提示输入BIOS密码,默认为Admin@9000安装ESXi7 进入启动盘,我使用的是Ventoy进入ESXi7踩坑1 进入后发现看不到NVME固态硬盘我的想法是,安装完ESXi7后再安装驱动系统安装完成查看网卡对应关系从左往后,2光口2网口2光口,对应ESXi系统中网卡从上到下顺序LOM1-4 SLOT4配置IP地址配置DNS和主机名登录ESXi开启SSH服务使用SSH登录,上传从官网下载的ESXi6.7.ZIP中抽取的NVME VIB驱动使ESXi进入CommunitySupported等级esxcli software acceptance set --level=CommunitySupported安装驱动esxcli software vib install -v 完整路径.vib此时出现了大坑,安装nvme驱动会替换掉网卡驱动,导致开机无法联网。踩坑2 莫慌,重来!第二次安装测试,使用ESXi6.7启动,发现可以看到NVMe固态硬盘这是因为ESXi7为了缩小体积,精简了大量的老旧设备驱动,我们可以通过修改镜像文件,将老的驱动放置在ESXi7中使用。因此,第二次安装测试,我们采用封装ISO的方式进行,从6.7的ISO中解压出NVME.V00文件,替换到ESXi7的NVME_PCI.V00文件,保持名字一致替换镜像另存为导出也不再前往现场,而是采用BMC远程挂载ISO文件的方式安装还是正常安装,测试可以看到NVME固态了安装完成后,再次进入ESXi,也可以看到硬盘这里我不在超融合中安装vCenter了,直接使用其他VC新建集群出于习惯,进行补丁更新此时出现了第二个大坑,更新补丁后,驱动覆盖了,NVME硬盘看不到了。啊?!!!踩坑3 再次重装,本次安装后进行备注,不再进行系统补丁更新按集群向导配置集群,配置分布式交换机下一步时出现黑块遮挡,啊?更换firefox浏览器后可以正常操作,分布式交换机配置完成配置完集群后发现 "缺少功能MWAIT",重启进入BIOS进行开启进入BIOS位于 BIOS - Advanced - Socket Configuration - Processor Configuration - MONITOR/MWAIT然后发现集群没启用VSAN功能,需要新建一个集群,啊?配置vSAN 新建一个vSAN集群,将主机拖入vSAN集群,按向导配置集群声明缓存层和容量层注意,集群的告警一个是我关闭了数据上传,另一个是替换了NVME驱动,所以告警了使用默认vSAN策略默认为RAID1镜像模式,即一个虚拟机存储两份分布在整个集群中,三台物理主机允许一台宕机分布式交换机 工作正常验证 部署1台服务器,容量占用为两倍在线迁移测试正常BUG处理 由于非原生支持vSphere,所以有些主板硬件告警会误报,需要屏蔽掉;同时对于服务器硬件的监控,需要自行配置SNMP或邮箱进行告警通知。总结 历时2天,克服困难,遥遥领先!遥遥领先!遥遥领先!
 -
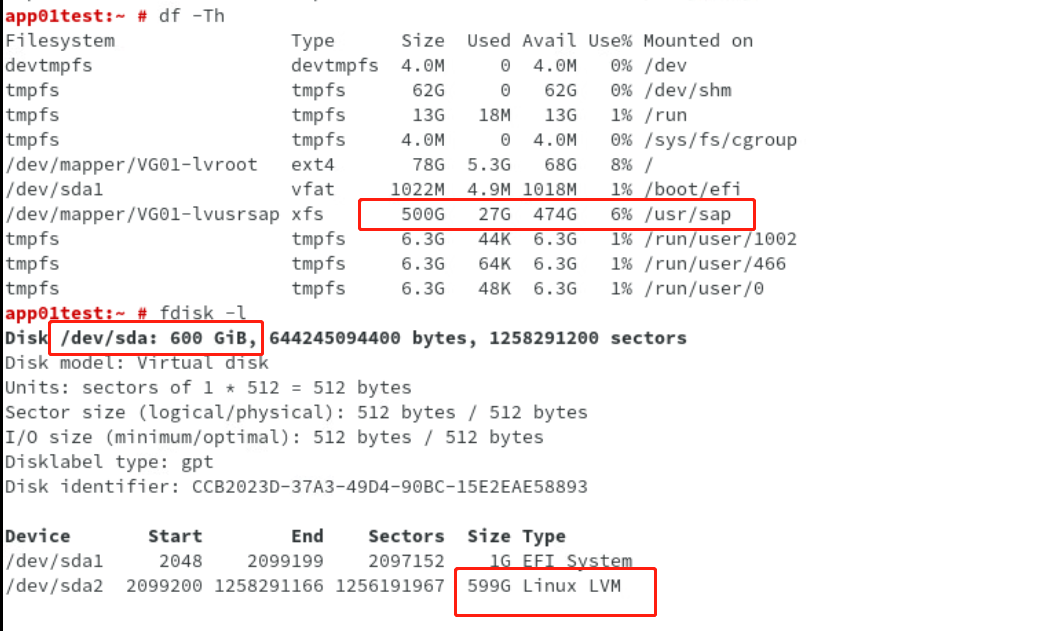
 vSphere7虚拟化 SUSE Enterprise Linux Server 15 LVM 硬盘分区在线扩容 前言 当前/usr/sap分区为500G XFS文件系统,为其追加200G空间,同时要求业务在线不中断操作步骤 1、为虚拟机增加硬盘空间 从600G修改为800G,在线扩容不影响虚拟机运行2、查看硬盘空间此时空间仍为600Gfdisk -llsblk3、刷新磁盘空间从上面可以看到磁盘为sda,重新扫描SCSI总线,识别新的硬盘容量echo "1" > /sys/class/block/sda/device/rescan刷新后,容量识别为800G扩展知识 如果新增硬盘不识别,可以进行SCSI扫描 echo “- - -” > /sys/class/scsi_host/hostX/scan4、通过fdisk查看分区5、修复分区表parted -l修复后再次查看分区则不会报错6、将剩余空间追加至/dev/sda2,即LVM分区 注意!parted实时生效,请谨慎操作!parted /dev/sda 对sda分区调整 unit s 设置Size单位 p free 查看空闲空间 resizepart 2 追加容量到sda2 输入空闲区间 为FreeSpace的End空间 q退出7、LVM PV物理卷更新查看pvdisplay更新PV卷大小pvresize /dev/sda2再次查看PV大小,更新为800G8、LVM LV逻辑卷扩容lvdisplay扩容目标为/dev/VG01/lvusrsaplvextend -l +100%FREE /dev/VG01/lvusrsap再次查看LV卷9、文件系统扩容查看当前分区大小df -ThXFS文件系统分区扩容xfs_growfs /usr/sap查看当前分区大小,在线扩容完成df -Th总结 先理论后实验、先验证后实施,胆大心细、谨小慎微,才是一个合格运维的良好品质。
 -
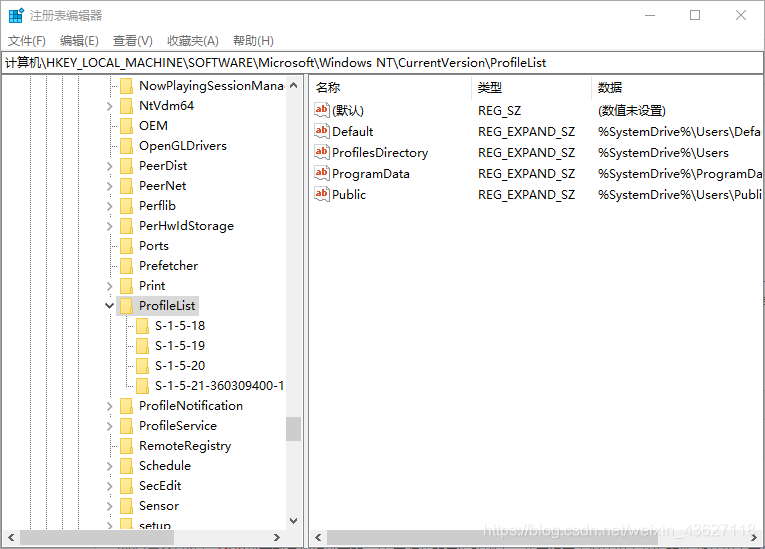
 域用户家目录删除 "无法登陆到你的账户" 参考 https://cloud.tencent.com/developer/article/1732573当域用户家目录出现配置文件错误需要删除重新登录重建时1、删除用户家目录登录本地管理员 administrator后,备份并删除对应的用户家目录如 C:\Users\wangwangjie可以改成 C:\Users\wangwangjiebak2、删除注册表域用户配置定位到计算机\HKEY_LOCAL_MACHINE\SOFTWARE\Microsoft\Windows NT\CurrentVersion\ProfileList这个位置找到自己名字的配置文件,将左侧 S-1-5-21xxxxxxxxxxxxx删除3、重启,重新登陆域用户
 -
 Alma Linux 8安装mysql8 安装软件 配置软件源:/etc/yum.repos.d/mysql-community.repo[mysql-connectors-community] name=MySQL Connectors Community baseurl=https://mirrors.tuna.tsinghua.edu.cn/mysql/yum/mysql-connectors-community-el7-$basearch/ enabled=1 gpgcheck=0 gpgkey=https://repo.mysql.com/RPM-GPG-KEY-mysql [mysql-tools-community] name=MySQL Tools Community baseurl=https://mirrors.tuna.tsinghua.edu.cn/mysql/yum/mysql-tools-community-el7-$basearch/ enabled=1 gpgcheck=0 gpgkey=https://repo.mysql.com/RPM-GPG-KEY-mysql [mysql-8.0-community] name=MySQL 8.0 Community Server baseurl=https://mirrors.tuna.tsinghua.edu.cn/mysql/yum/mysql-8.0-community-el7-$basearch/ enabled=1 gpgcheck=0 gpgkey=https://repo.mysql.com/RPM-GPG-KEY-mysql禁用系统自带mysql模块yum module disable mysql安装mysql服务端yum install mysql-community-server配置 mysql8不区分大小写 必须在数据库启动前配置lower_case_table_names=0 表名存储为给定的大小和比较是区分大小写的 lower_case_table_names = 1 表名存储在磁盘是小写的,但是比较的时候是不区分大小写 lower_case_table_names=2 表名存储为给定的大小写但是比较的时候是小写的 unix,linux下lower_case_table_names默认值为 0 .Windows下默认值是 1 .Mac OS X下默认值是 2修改/etc/my.cnf,在最后一行添加lower_case_table_names=1启动mysqlsystemctl enable --now mysqld查看默认root密码 cat /var/log/mysqld.log[root@hr-test ~]# cat /var/log/mysqld.log 2023-08-03T05:19:39.377361Z 0 [System] [MY-013169] [Server] /usr/sbin/mysqld (mysqld 8.0.34) initializing of server in progress as process 2066 2023-08-03T05:19:39.383196Z 1 [System] [MY-013576] [InnoDB] InnoDB initialization has started. 2023-08-03T05:19:39.615099Z 1 [System] [MY-013577] [InnoDB] InnoDB initialization has ended. 2023-08-03T05:19:40.221227Z 6 [Note] [MY-010454] [Server] A temporary password is generated for root@localhost: i8ybtu&k&GoK 使用默认密码初始化mysqlmysql_secure_installation修改默认root密码、删除匿名用户、禁止root远程登陆、删除test数据库查看lower_case_table_namesmysql -uroot -p mysql> show variables like 'lower_case_table_names'; +------------------------+-------+ | Variable_name | Value | +------------------------+-------+ | lower_case_table_names | 1 | +------------------------+-------+ 1 row in set (0.00 sec) mysql> quit 允许创建函数 解决Mysql报错:This function has none of DETERMINISTIC, NO SQL, or READS SQL DATA in its delog_bin_trust_function_creators=1关闭严格模式 STRICT_TRANS_TABLES : 严格模式NO_ENGINE_SUBSTITUTION : 无引擎提交PAD_CHAR_TO_FULL_LENGTH : 填补字符到全长度编辑MySQL配置文件/etc/my.cnf[mysqld] sql_mode=NO_ENGINE_SUBSTITUTION保存、重启mysql事务隔离级别 read uncommitted(读未提交)read committed(读提交)repeatable read(重复读)Serializable(序列化) 编辑MySQL配置文件/etc/my.cnf[mysqld] transaction_isolation = READ-COMMITTED保存、重启mysql日志时区不对 编辑MySQL配置文件/etc/my.cnflog_timestamps=system日志存在大量反查信息和错误信息 编辑MySQL配置文件/etc/my.cnfskip-name-resolve完成
 -
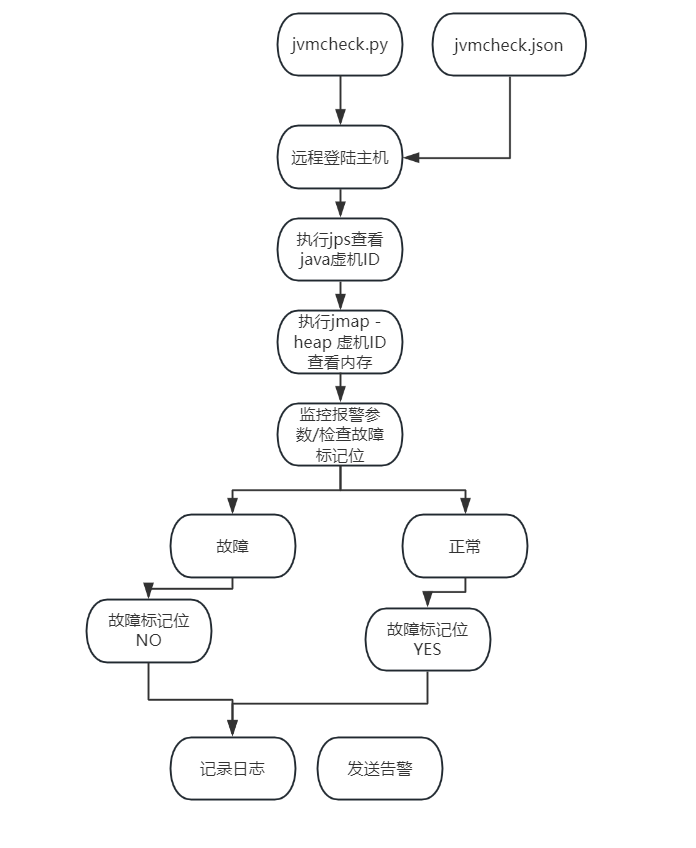
 0基础上手python3编程,远程JVM内存占用监控、企业微信告警 前言 0、添加注释1、采用json配置文件添加主机,可批量监控jvm主机并分别报警2、日志以每天为单位通过web展示,如XX/jvmlog/20231108app02.txt3、添加redis重复报警控制位,不会重复报警4、json配置文件采用编码存储密码,配置文件不存在明文密码5、已开源基础知识 查看JVM内存占用jps 获取jvm的IDjmap -heap ID 查看jvm详细信息------------------------------- Attaching to process ID 15005, please wait... Debugger attached successfully. Server compiler detected. JVM version is 8.1.086 11.0.14+000 using thread-local object allocation. Concurrent Mark-Sweep GC Heap Configuration: MinHeapFreeRatio = 40 MaxHeapFreeRatio = 70 MaxHeapSize = 34359738368 (32768.0MB) NewSize = 11453595648 (10923.0MB) MaxNewSize = 11453595648 (10923.0MB) OldSize = 22906142720 (21845.0MB) NewRatio = 2 SurvivorRatio = 6 MetaspaceSize = 21807104 (20.796875MB) CompressedClassSpaceSize = 268435456 (256.0MB) MaxMetaspaceSize = 10737418240 (10240.0MB) G1HeapRegionSize = 0 (0.0MB) Heap Usage: New Generation (Eden + 1 Survivor Space): capacity = 10021896192 (9557.625MB) used = 1244541496 (1186.8872604370117MB) free = 8777354696 (8370.737739562988MB) 12.418223778784078% used Eden Space: capacity = 8590196736 (8192.25MB) used = 1003974176 (957.4643859863281MB) free = 7586222560 (7234.785614013672MB) 11.687441008103123% used From Space: capacity = 1431699456 (1365.375MB) used = 240567320 (229.4228744506836MB) free = 1191132136 (1135.9521255493164MB) 16.802920402869805% used To Space: capacity = 1431699456 (1365.375MB) used = 0 (0.0MB) free = 1431699456 (1365.375MB) 0.0% used concurrent mark-sweep generation: capacity = 22906142720 (21845.0MB) used = 13349348192 (12730.93051147461MB) free = 9556794528 (9114.06948852539MB) 58.278464231973494% used JVM的内存占用可计算为(New Generation)used + (concurrent mark-sweep generation)used,即为物理内存占用,与JVM配置的内存量即可计算占用百分比架构图 1、执行jvmcheck程序 2、登录远程主机 3、通过jmap命令获取、计算内存占用百分比 4、检查故障标记位、记录日志并进行告警预览 企业微信机器人告警web页面日志查看程序组成 由jvmcheck.py和jvmcheck.json组成,需要配置redis数据库程序代码 jvmcheck.pyimport paramiko,linecache,json,requests,time,base64,redis from io import StringIO def get_config(): config = json.loads(open("/root/jvmcheck.json", encoding='utf-8').read()) #读取配置文件,填写绝对路径 return config class redis_operate(): def redis_set(text1,text2): #radis写入 redis_pool.set(text1, text2) def redis_get(text): #redis读取 return redis_pool.get(text) def getjvm(): try: # 实例化一个transport对象,填写IP和端口 trans = paramiko.Transport((sshdata['ip'], int(sshdata['port']))) # 建立连接,输入用户名密码,密码使用base64解码 trans.connect(username=sshdata['username'], password=base64.b64decode(sshdata['password'])) # 将sshclient的对象的transport指定为以上的trans ssh = paramiko.SSHClient() ssh._transport = trans # 执行命令,和传统方法一样 stdin, stdout, stderr = ssh.exec_command('jps') #执行shell命令 jps = StringIO(stdout.read().decode()) startid = 0 for line in jps: if "Start" in line: #找到运行中的jvm进程ID startid = line.split() stdin, stdout, stderr = ssh.exec_command('jmap -heap ' + startid[0]) #执行shell命令 jmaporiginal = stdout.read().decode() jmap = StringIO(jmaporiginal).readlines() # 关闭连接 trans.close() NewGeneration = int(jmap[25].split()[2]) concurrentmarksweepgeneration = int(jmap[45].split()[2]) #print(NewGeneration) #print(concurrentmarksweepgeneration) used = NewGeneration + concurrentmarksweepgeneration #计算使用的内存总量 Usagerate = used / 34359738368 # JVM配置32G内存 print(Usagerate) if Usagerate > 0.8: #设置为超过80%报警 if redis_operate.redis_get(sshdata['hostname']) != "NO": #读取主机名命名的redis key Usagerate = '%.2f%%' % (Usagerate * 100) post_weixin(sshdata['hostname'] + " " + sshdata['ip'] + "\nJVM内存使用率为" + str( Usagerate) + ",请立即处理。\n点击可查看日志") f = open(sshconfig['path'] + time.strftime('%Y%m%d', time.localtime()) + sshdata['hostname'] + ".txt", 'a') f.write("-------------------------------\n" + time.strftime('%Y-%m-%d %H:%M:%S', time.localtime()) + "\n" + jmaporiginal + "\n") print("发送告警") redis_operate.redis_set(sshdata['hostname'],"NO") #写入主机名命名的redis key值 else: print("告警已存在") else: if redis_operate.redis_get(sshdata['hostname']) != "YES": Usagerate = '%.2f%%' % (Usagerate * 100) post_weixin(sshdata['hostname'] + " " + sshdata['ip'] + "\nJVM内存使用率为" + str( Usagerate) + ",已恢复正常。\n点击可查看日志") redis_operate.redis_set(sshdata['hostname'],"YES") else: print("告警已解除") except: print(sshdata['ip']+"主机连接失败") def post_weixin(stats): #发送微信 url = sshconfig['weixin']['url'] body = { "msgtype": "news", "news": { "articles": [ { "title": sshconfig['weixin']['title'], "description": stats, "url": sshconfig['weixin']['url2']+time.strftime('%Y%m%d', time.localtime())+sshdata['hostname']+".txt", "picurl": sshconfig['weixin']['picurl'] } ] }} response = requests.post(url, json=body) print(response.text) print(response.status_code) sshconfig = get_config() #建立redis连接池 redis_pool = redis.Redis(connection_pool=redis.ConnectionPool(host=sshconfig['redis']['host'], port=sshconfig['redis']['port'], password=sshconfig['redis']['password'], decode_responses=sshconfig['redis']['decode'])) #开始依次执行json文件中的主机 for sshdata in sshconfig['data']: getjvm() print("\n程序执行完成")jvmcheck.json{ "weixin" : { "url" : "https://qyapi.weixin.qq.com/cgi-bin/webhook/send?key=填写自己的", "title": "java虚拟机内存监控", "url2": "http://90apt.com/", "picurl": "自定义图片连接" }, "path" : "./", "redis" : { "host": "IP地址", "port": "端口", "password": "密码", "decode": "True" }, "data" : [ { "ip" : "IP地址" , "username" : "用户名" , "password" : "base64转换后的密码" , "port" : "端口","hostname" : "主机名"}, { "ip" : "IP地址" , "username" : "用户名" , "password" : "base64转换后的密码" , "port" : "端口","hostname" : "主机名"} ] }定时运行 配置定时任务,每五分钟执行一次,并记录日志crontab -e */5 * * * * python3.11 /root/jvmcheck/jvmcheck.py >> /root/jvmcheck/jvmcheck.log 2>&1总结 好好好
 -
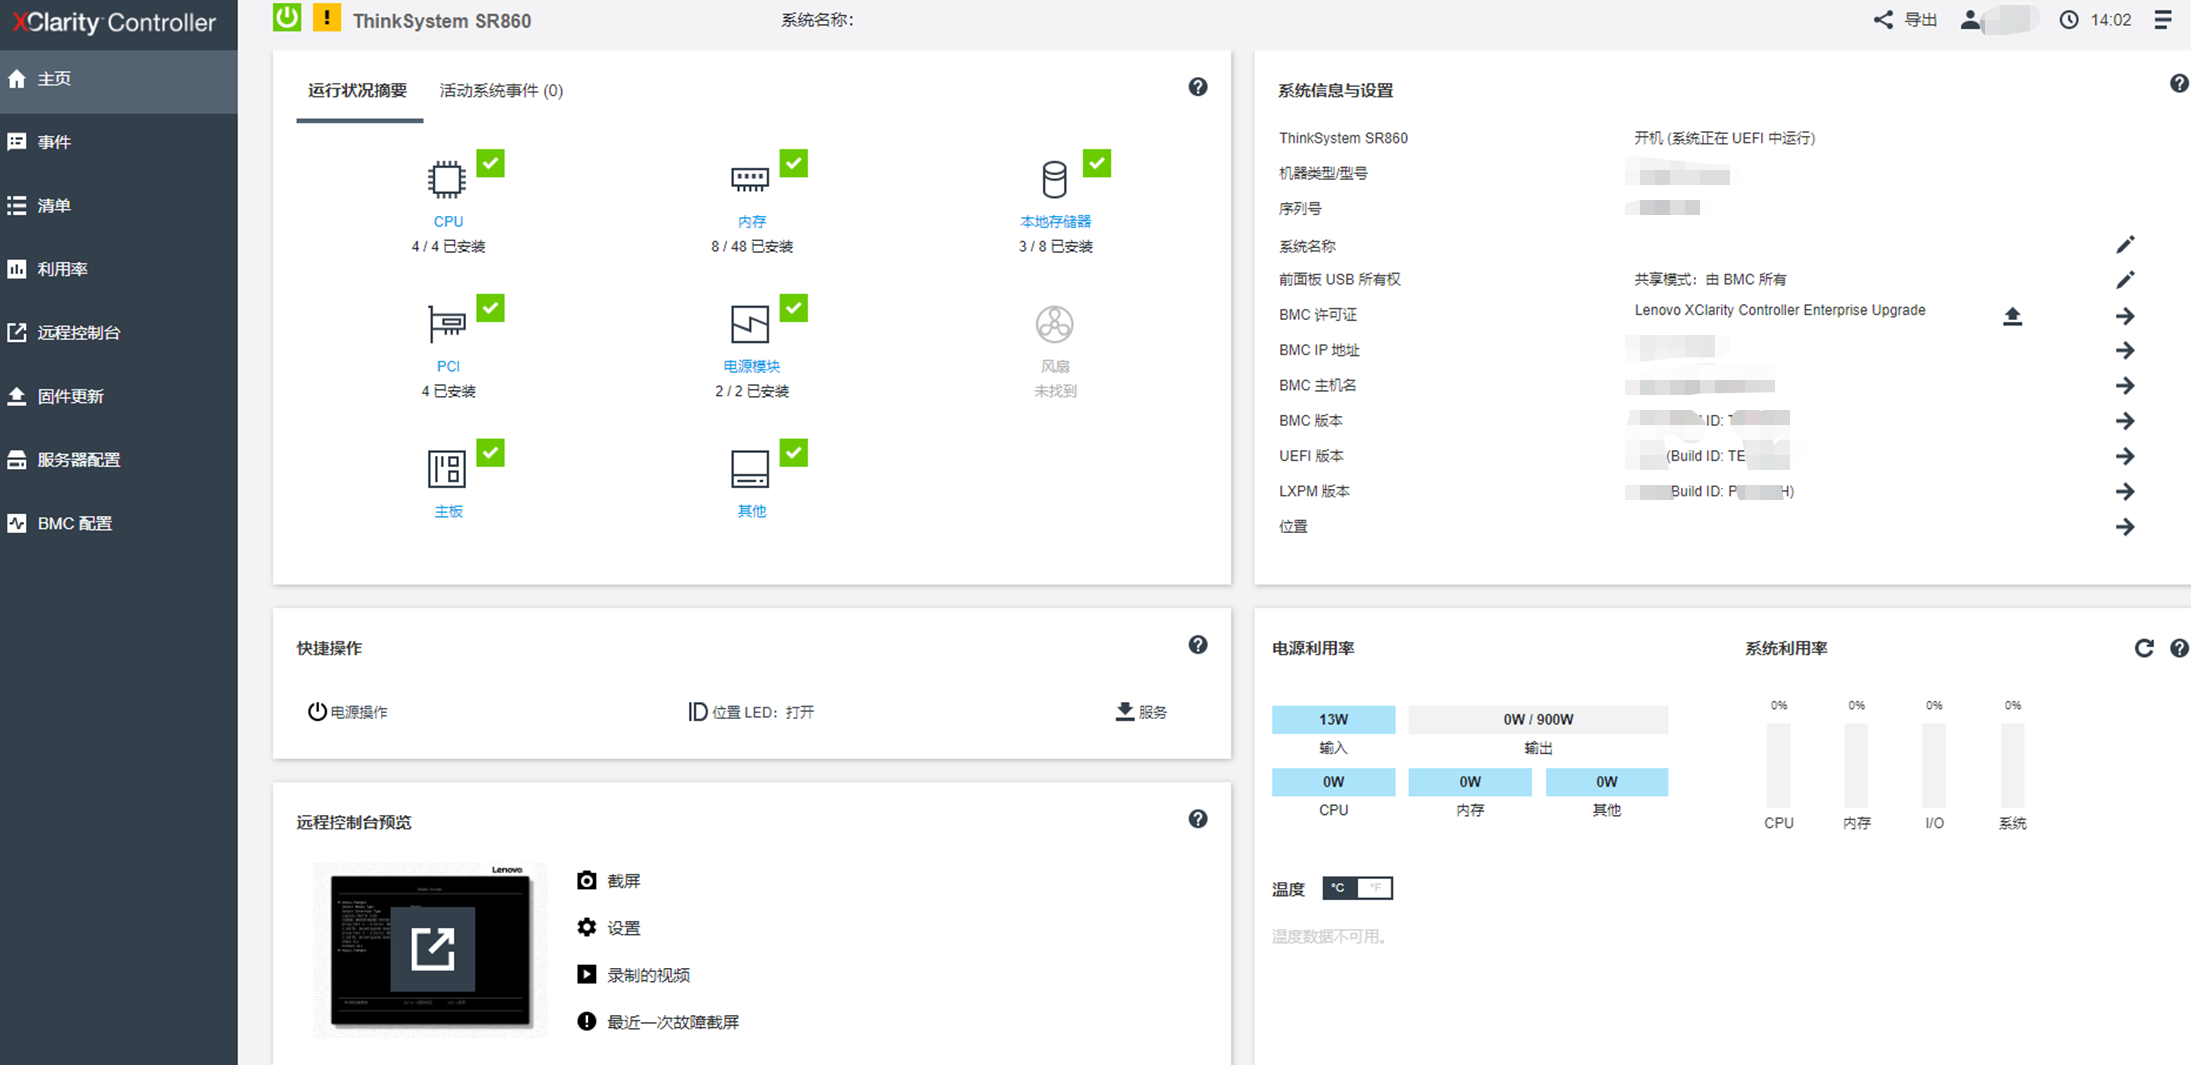
 联想ThinkSystem SR860虚拟化改造,接入IPSAN 服务器外观 SR860是一台四路服务器,同时,此台服务器BMC购买了远程KVM授权,可以通过web网页进行远程控制改造目标 将服务器原有硬盘拆除,仅保留2块硬盘安装RAID1,并安装ESXi7虚拟化系统,接入vCenter后,接入IPSAN。改造步骤 1、记录当前服务器重要信息并进行数据备份IP、网口配置、VLAN配置等,确保没有业务会受到影响。2、点亮服务器定位指示灯3、服务器关机、移除多余硬盘、配置RAID1、只保留一根网线,安装ESXi7登录BMC由于移除了一块硬盘,RAID需要重新配置进入raid配置清除原有配置新建阵列配置RAID1选择两块硬盘保存配置BIOS可以查看RAID配置结果F12选择开机启动项选择金士顿U盘启动我是用Ventoy制作了启动盘系统安装4、配置VLAN、IP和主机名,加入vCenter安装完成配置VLAN、IP、DNS、主机名5、配置IPSAN、配置NTP、进行系统更新、配置虚拟交换机6、配置完成总结 好好好
 -
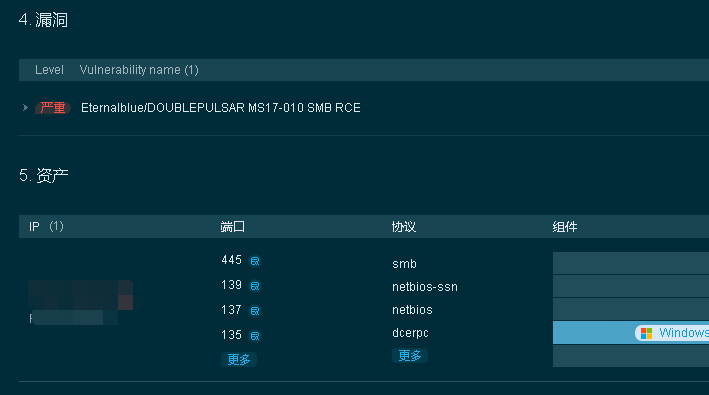
 记一次厂区永恒之蓝挖矿病毒溯源处置实战-MS17-010 文章内IP、地点、部门均为化名处理 事件描述 2023年10月31日,王工收到蜜罐系统持续告警,某IP持续攻击蜜罐445端口,王工立刻进行应急处置。基础知识 445端口:是windows共享文件服务端口MS17-010: 是微软2017年第10号漏洞,该病毒是不法分子利用NSA(National Security Agency,美国国家安全局)泄露的危险漏洞“EternalBlue”(永恒之蓝)进行传播 。溯源过程 2023年10月31日08:19,王工收到蜜罐系统持续告警告警内容:标题: HFish Threat Alert 节点名称: 内置节点 节点IP: 192.168.21.9 攻击类型: attack 扫描类型: 扫描端口: 蜜罐类别: 端口监听 蜜罐类型: TCP 蜜罐名称: TCP端口监听 帐号信息: 源IP: 192.168.210.101 源端口: 51744 目的IP: 192.168.21.9 目的端口: 445 地理位置: 局域网 威协情报: 攻击时间: 2023-10-31 08:19:45 攻击行为: 威胁等级: other 攻击详情: 192.168.210.101:51744 already connected.08:20 王工放下手头其他工作,开始进行溯源溯源手段主要为:1、通过EDR查找是否为已管控主机2、通过goby进行反制探测3、通过上网行为系统查找是否为已认证主机4、通过IP判断物理位置08:22 通过EDR没有查找到此主机08:25 通过goby反制探测,确认目标基本信息,并进行部门通告各位领导同事 当前检测到网络攻击行为,正在对公司内网进行攻击,此设备连接 隐私保护 无线热点,在线时间 隐私保护 小时, IP: 192.168.210.101 MAC地址:隐私保护 主机名:隐私保护 可能为win7系统同时探测到目标具有MS17-010漏洞,判断为目标中了永恒之蓝病毒08:30 通过上网行为系统查找,此主机未通过认证,判断为非域用户设备08:32 通过IP地址进行物理位置查找1、通过IP判断,为无线设备2、登录AC控制器,查找IP和对应的AP3、查找到AP名称为 隐私保护 ,但无法判断AP位置,通过人工判断,为AP名称拼写错误08:35 前往现场处置08:40 抵达现场,现场为一台台式机、一台平板,没有找到目标08:42 对现场AP进行MAC查询,确认设备一定在此AP下08:43 发现现场生产设备运行windows系统,查看IP确认为目标系统,查看主机名为目标系统,经询问现场当前不生产,可以进行相应处理。处置过程 08:45 对目标主机安装EDR安全软件,进行系统补丁更新,随后进行全盘查杀,未发现病毒 此处暴露EDR软件查杀能力严重不足09:30 通过EDR对系统补丁安装完成 09:32 安装火绒杀毒软件进行病毒查杀,全盘扫描到56个病毒,根据描述判断为永恒之蓝挖矿病毒09:38 经过火绒杀毒处理,蜜罐没有再接收到新的攻击告警10:00 返回工位,进行处置记录,进行事件关闭通告。后续措施1、AP重新命名 已完成2、主机重新命名 已完成3、安装EDR软件管控 已完成总结 1、设备部门对设备联网,没有及时通知信息安全部门,导致风险系统暴露在内网中 2、厂家对设备联网调试,没有及时通知信息安全部门,导致病毒持续运行扩散 3、AP命名及主机名命名不规范,导致溯源难度增加
 -


