
搜索到
303
篇与
的结果
-
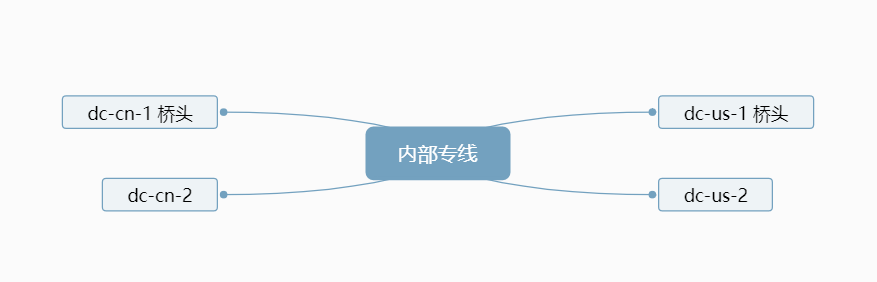
 windows单域多站点部署、桥头服务器、DNS就近解析 一、系统架构 二、实验目的 总部在cn,在us成立分公司,部署内部专线,域数据实时同步浪费带宽,改为每15分钟同步一次,cn和us内部人员就近解析DNS。三、实验参数 windows2022系统域 90apt.comcn 172.16.13.0/24dc-cn-1 172.16.13.11 cn域控1 桥头服务器dc-cn-2 172.16.13.12 cn域控2cn-kehu DHCP获取IP cn客户机 自动获取IPus 172.16.14.0/24dc-us-1 172.16.14.11 us域控1 桥头服务器dc-us-2 172.16.14.12 us域控2us-kehu DHCP获取IP us客户机 自动获取IP四、部署过程 1、四台域控安装配置,加域90apt.com全部加域后,所有域控主机均在同一默认站点,互相复制2、创建两个新站点CN和US,将域控分别移动到对应的站点中3、新建子网,将对应子网分配给对应站点4、设置桥头服务器dc-cn-1和dc-us-15、设置跨站点复制时间默认180分钟6、调整复制对象如dc-cn-2为内部服务器,仅与dc-cn-1复制7、查看同步状态repadmin /replsummary五、验证 1、DNS解析顺序cn-kehu查看90apt的解析IPus-kehu查看90apt的解析IP2、AD复制验证1 同站点快速复制cn域控新建一个 "哈哈" 用户,新建用户或改密码等操作会快速复制,cn另一台域控查看用户同时建立2 跨站点定时复制立即在us域控查看,无此用户20分钟后再次刷新查看,"哈哈" 用户出现3 手动复制若要尽快进行跨站点同步,可以手动选择立即复制,注意,域控复制需要时间,数据越多越慢六、小结 好好好
 -
-
ESP32-wifi MPython dth11 activeMQ MQTT温湿度采集 嵌入式开发 物联网 边缘计算 一、介绍 本项目采用ESP32开发板,每X秒采集一次DTH11温湿度传感器数据,通过ESP32自带WIFI,经MQTT协议传送给ActiveMQ中间件,便于后续开发和使用。二、材料介绍 ESP32 CP2102 带WIFI 22元DTH11 4元透明防水塑料壳 8元MicroUSB电源线 5元三、ActiveMQ服务器配置 我这里使用docker一键部署ActiveMQ,并将MQTT端口映射到1883端口四、硬件安装 将DTH11的正负连接ESP32的3.3V和GND针脚,数据连接至D13针脚五、代码开发 1、ESP32刷写为MPython开发环境2、新建main.py,此脚本ESP32上电即会自动运行main.py 主程序import random from machine import Pin, SPI import time,machine import dht11,network,mrequests from umqtt.simple import MQTTClient import ujson MQTT_CLIENT_ID = f'python-mqtt-{random.randint(0, 1000)}' MQTT_BROKER = "10.0.10.129" MQTT_USER = "" MQTT_PASSWORD = "" MQTT_TOPIC = "mqtt001" wlan = network.WLAN(network.STA_IF) wlan.active(True) dht = dht11.DHT11(Pin(13)) print("Connecting to MQTT server... ", end="") client = MQTTClient(MQTT_CLIENT_ID, MQTT_BROKER, user=MQTT_USER, password=MQTT_PASSWORD) print("Connected!") while True: if wlan.isconnected() == False: print("connect WiFi") try: wlan.connect('WiFissid','wifipassword') except: print("wifi false") #pass else: dht.measure() try: client.connect() message = ujson.dumps({ "temp": dht.temperature(), "humidity": dht.humidity(), }) #print("Reporting to MQTT topic {}: {}".format(MQTT_TOPIC, message)) client.publish(MQTT_TOPIC, message) print("mqtt push ok") client.disconnect() except: print("mqtt push not ok") #pass time.sleep(3)dth11.py DTH11传感器支持库 # DHT11/DHT22 driver for MicroPython on ESP8266 # MIT license; Copyright (c) 2016 Damien P. George try: from esp import dht_readinto except: from pyb import dht_readinto class DHTBase: def __init__(self, pin): self.pin = pin self.buf = bytearray(5) def measure(self): buf = self.buf dht_readinto(self.pin, buf) if (buf[0] + buf[1] + buf[2] + buf[3]) & 0xff != buf[4]: raise Exception("checksum error") class DHT11(DHTBase): def humidity(self): return self.buf[0] def temperature(self): return self.buf[2] class DHT22(DHTBase): def humidity(self): return (self.buf[0] << 8 | self.buf[1]) * 0.1 def temperature(self): t = ((self.buf[2] & 0x7f) << 8 | self.buf[3]) * 0.1 if self.buf[2] & 0x80: t = -t return t mrequests.py 一个比自带的requests更好用的网络库"""A HTTP client module for MicroPython with an API similar to requests.""" import sys try: import socket except ImportError: import usocket as socket MICROPY = sys.implementation.name == "micropython" MAX_READ_SIZE = 4 * 1024 def encode_basic_auth(user, password): from ubinascii import b2a_base64 auth_encoded = b2a_base64(b"%s:%s" % (user, password)).rstrip(b"\n") return {b"Authorization": b"Basic %s" % auth_encoded} def head(url, **kw): return request("HEAD", url, **kw) def get(url, **kw): return request("GET", url, **kw) def post(url, **kw): return request("POST", url, **kw) def put(url, **kw): return request("PUT", url, **kw) def patch(url, **kw): return request("PATCH", url, **kw) def delete(url, **kw): return request("DELETE", url, **kw) def parse_url(url): port = None host = None # str.partition() would be handy here, # but it's not supported on the esp8266 port delim = url.find("//") if delim >= 0: scheme, loc = url[:delim].rstrip(':'), url[delim+2:] else: loc = url scheme = "" psep = loc.find("/") if psep == -1: if scheme: host = loc path = "/" else: path = loc elif psep == 0: path = loc else: path = loc[psep:] host = loc[:psep] if host: hsep = host.rfind(":") if hsep > 0: port = int(host[hsep + 1 :]) host = host[:hsep] return scheme or None, host, port, path class RequestContext: def __init__(self, url, method=None): self.redirect = False self.method = method or "GET" self.scheme, self.host, self._port, self.path = parse_url(url) if not self.scheme or not self.host: raise ValueError("An absolute URL is required.") @property def port(self): return self._port if self._port is not None else 443 if self.scheme == "https" else 80 @property def url(self): return "%s://%s%s" % ( self.scheme, self.host if self._port is None else ("%s:%s" % (self.host, self.port)), self.path, ) def set_location(self, status, location): if status in (301, 302, 307, 308): self.redirect = True elif status == 303 and self.method != "GET": self.redirect = True if self.redirect: scheme, host, port, path = parse_url(location) if scheme and self.scheme == "https" and scheme != "https": self.redirect = False return if status not in (307, 308) and self.method != "HEAD": self.method = "GET" if scheme: self.scheme = scheme if host: self.host = host self._port = port if path.startswith("/"): self.path = path else: self.path = self.path.rsplit("/", 1)[0] + "/" + path class Response: def __init__(self, sock, sockfile, save_headers=False): self.sock = sock self.sf = sockfile self.encoding = "utf-8" self._cached = None self._chunk_size = 0 self._content_size = 0 self.chunked = False self.status_code = None self.reason = "" self.headers = [] if save_headers else None def read(self, size=MAX_READ_SIZE): if self.chunked: if self._chunk_size == 0: l = self.sf.readline() # print("Chunk line:", l) # ignore chunk extensions l = l.split(b";", 1)[0] self._chunk_size = int(l, 16) # print("Chunk size:", self._chunk_size) if self._chunk_size == 0: # End of message sep = sf.read(2) if sep != b"\r\n": raise ValueError("Expected final chunk separator, read %r instead." % sep) return b"" data = self.sf.read(min(size, self._chunk_size)) self._chunk_size -= len(data) if self._chunk_size == 0: sep = self.sf.read(2) if sep != b"\r\n": raise ValueError("Expected chunk separator, read %r instead." % sep) return data else: if size: return self.sf.read(size) else: return self.sf.read(self._content_size) def save(self, fn, chunk_size=1024): read = 0 with open(fn, "wb") as fp: while True: remain = self._content_size - read if remain <= 0: break chunk = self.read(min(chunk_size, remain)) read += len(chunk) if not chunk: break fp.write(chunk) self.close() def _parse_header(self, data): if data[:18].lower() == b"transfer-encoding:" and b"chunked" in data[18:]: self.chunked = True # print("Chunked response detected.") elif data[:15].lower() == b"content-length:": self._content_size = int(data.split(b":", 1)[1]) # print("Content length: %i" % self._content_size) # overwrite this method, if you want to process/store headers differently def add_header(self, data): self._parse_header(data) if self.headers is not None: self.headers.append(data) def close(self): if not MICROPY: self.sf.close() self.sf = None if self.sock: self.sock.close() self.sock = None self._cached = None @property def content(self): if self._cached is None: try: self._cached = self.read(size=None) finally: self.sock.close() self.sock = None return self._cached @property def text(self): return str(self.content, self.encoding) def json(self): import ujson return ujson.loads(self.content) def request( method, url, data=None, json=None, headers={}, auth=None, encoding=None, response_class=Response, save_headers=False, max_redirects=1, timeout=None, ): if auth: headers.update(auth if callable(auth) else encode_basic_auth(auth[0], auth[1])) if json is not None: assert data is None import ujson data = ujson.dumps(json) ctx = RequestContext(url, method) while True: if ctx.scheme not in ("http", "https"): raise ValueError("Protocol scheme %s not supported." % ctx.scheme) ctx.redirect = False # print("Resolving host address...") ai = socket.getaddrinfo(ctx.host, ctx.port, 0, socket.SOCK_STREAM) ai = ai[0] # print("Creating socket...") sock = socket.socket(ai[0], ai[1], ai[2]) sock.settimeout(timeout) try: # print("Connecting to %s:%i..." % (ctx.host, ctx.port)) sock.connect(ai[-1]) if ctx.scheme == "https": try: import ssl except ImportError: import ussl as ssl # print("Wrapping socket with SSL") create_ctx = getattr(ssl, 'create_default_context', None) if create_ctx: sock = create_ctx().wrap_socket(sock, server_hostname=ctx.host) else: sock = ssl.wrap_socket(sock, server_hostname=ctx.host) sf = sock if MICROPY else sock.makefile("rwb") sf.write(b"%s %s HTTP/1.1\r\n" % (ctx.method.encode("ascii"), ctx.path.encode("ascii"))) if not b"Host" in headers: sf.write(b"Host: %s\r\n" % ctx.host.encode()) for k, val in headers.items(): sf.write(k if isinstance(k, bytes) else k.encode('ascii')) sf.write(b": ") sf.write(val if isinstance(val, bytes) else val.encode('ascii')) sf.write(b"\r\n") if data and ctx.method not in ("GET", "HEAD"): if json is not None: sf.write(b"Content-Type: application/json") if encoding: sf.write(b"; charset=%s" % encoding.encode()) sf.write(b"\r\n") sf.write(b"Content-Length: %d\r\n" % len(data)) sf.write(b"Connection: close\r\n\r\n") if data and ctx.method not in ("GET", "HEAD"): sf.write(data if isinstance(data, bytes) else data.encode(encoding or "utf-8")) if not MICROPY: sf.flush() resp = response_class(sock, sf, save_headers=save_headers) l = b"" i = 0 while True: l += sf.read(1) i += 1 if l.endswith(b"\r\n") or i > MAX_READ_SIZE: break # print("Response: %s" % l.decode("ascii")) l = l.split(None, 2) resp.status_code = int(l[1]) if len(l) > 2: resp.reason = l[2].rstrip() while True: l = sf.readline() if not l or l == b"\r\n": break if l.startswith(b"Location:"): ctx.set_location(resp.status_code, l[9:].strip().decode("ascii")) # print("Header: %r" % l) resp.add_header(l) except OSError: sock.close() raise if ctx.redirect: # print("Redirect to: %s" % ctx.url) sock.close() max_redirects -= 1 if max_redirects < 0: raise ValueError("Maximum redirection count exceeded.") else: break return resp 六、运行程序 上电直接运行,注意,代码可以去掉终端输出的print,防止ESP32内存溢出七、监测程序 登录ActiveMQ查看mqttserver.py 在任意电脑上订阅数据# python3.6 import random import time from paho.mqtt import client as mqtt_client broker = '10.0.10.129' port = 1883 topic = "mqtt001" # generate client ID with pub prefix randomly client_id = f'python-mqtt-{random.randint(0, 100)}' def connect_mqtt() -> mqtt_client: def on_connect(client, userdata, flags, rc): if rc == 0: print("Connected to MQTT Broker!") else: print("Failed to connect, return code %d\n", rc) client = mqtt_client.Client(client_id) client.on_connect = on_connect client.connect(broker, port) return client def subscribe(client: mqtt_client): def on_message(client, userdata, msg): print(f"Received `{msg.payload.decode()}` from `{msg.topic}` topic "+time.asctime()) client.subscribe(topic) client.on_message = on_message def run(): client = connect_mqtt() subscribe(client) client.loop_forever() if __name__ == '__main__': run()八、小结 ESP32 MPython太强大了!
-
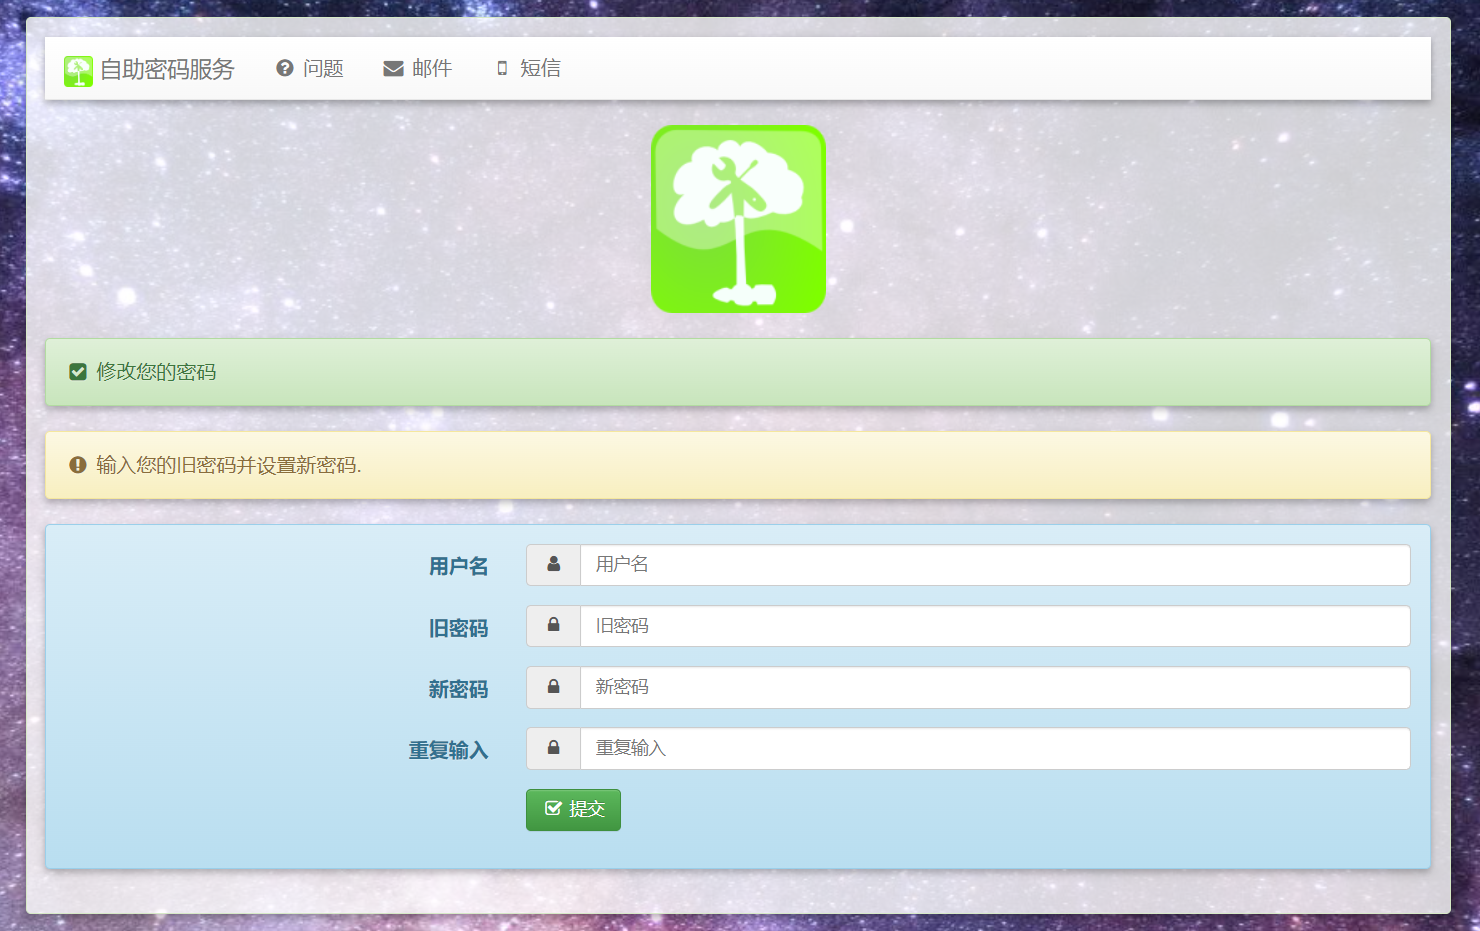
1Panel docker容器版-1分钟部署Self Service Password域账号自助服务台 过往安装版教程https://90apt.com/3907{lamp/}注意:1、docker版主要目的是快速部署连接域控实现域账号改密,太详细的配置请查看过往安装版。2、本教程使用1Panel安装更简单一、前提条件 按过往安装版教程为域控服务器开启AD域证书服务,但不需要导出证书,Self Service Password这边我们会配置忽略证书二、快速部署 1、新建存储卷self-service-password 存放Self Service Password配置文件self-service-password-ldap 存放openldap配置文件2、拉取镜像ltbproject/self-service-password:latest 3、创建容器名称、镜像暴露端口:我把主机的12345映射到容器的80端口网络:桥接网卡即可,1panel-network也是桥接网卡挂载卷:self-service-password 挂载容器 /var/www/conf/ 目录self-service-password-ldap 挂载容器 /etc/ldap/ 目录创建即可4、容器运行点击端口12345可跳转Self Service Password首页三、对接域控 修改挂载卷文件self-service-password卷 config.inc.php文件连接域控关键配置# LDAP $ldap_url = "ldaps://10.0.0.2:636"; //域IP地址,必须是LDAPS协议 $ldap_starttls = false; $ldap_binddn = "CN=admin,CN=Users,DC=test,DC=com"; //域控管理员账号 $ldap_bindpw = 'adminpaword'; //密码 // for GSSAPI authentication, comment out ldap_bind* and uncomment ldap_krb5ccname lines //$ldap_krb5ccname = "/path/to/krb5cc"; $ldap_base = "dc=test,dc=com"; $ldap_login_attribute = "sAMAccountName"; $ldap_fullname_attribute = "cn"; $ldap_filter = "(&(objectClass=user)(sAMAccountName={login})(!(userAccountControl:1.2.840.113556.1.4.803:=2)))"; //连接域控用这个 $ldap_use_exop_passwd = false; $ldap_use_ppolicy_control = false; $ad_mode = true; //域控模式 # Force account unlock when password is changed $ad_options['force_unlock'] = true; //打开 # Force user change password at next login $ad_options['force_pwd_change'] = false; # Allow user with expired password to change password $ad_options['change_expired_password'] = true; //打开 # Who changes the password? # Also applicable for question/answer save # user: the user itself # manager: the above binddn $who_change_password = "manager"; //管理员修改密码 # Encryption, decryption keyphrase, required if $use_tokens = true and $crypt_tokens = true, or $use_sms, or $crypt_answer # Please change it to anything long, random and complicated, you do not have to remember it # Changing it will also invalidate all previous tokens and SMS codes $keyphrase = "tntsec"; //这个随便改,不是默认就行self-service-password-ldap卷 ldap.conf文件此参数用来忽略windows域控的证书验证TLS_REQCERT allow四、改密测试 修改test11用户的密码修改成功五、小结 1Panel面板管理容器真的太方便了!
-
-
1Panel 新一代的 Linux 服务器运维、docker容器管理面板、快速演示,uptime、activemq 一、介绍 1Panel基于容器管理和部署应用,全中文,界面美观,操作简单。本文重点在于使用1Panel进行独立容器的安装管理当前版本v1.9.1官网https://www.1panel.cn/安装https://1panel.cn/docs/installation/online_installation/我使用的是ALMA Linux 9系统启用ssh root登录[root@admin ~]# echo 'PermitRootLogin yes' >> /etc/ssh/sshd_config.d/01-permitrootlogin.conf [root@admin ~]# systemctl restart sshd.service安装dockeryum install -y yum-utils #官方源 yum-config-manager --add-repo https://download.docker.com/linux/centos/docker-ce.repo #阿里云加速源 yum-config-manager --add-repo http://mirrors.aliyun.com/docker-ce/linux/centos/docker-ce.repo yum install docker-ce docker-ce-cli containerd.io安装注意1、1Panel默认生成docker网卡IP为172.17.x.x,如果与你的网段冲突,请使用不冲突的终端连接、安装、登录web修改网卡信息。2、登陆面板后,在面板 容器-配置-基础配置中,配置镜像加速1Panel命令行工具Usage: 1pctl [COMMAND] [ARGS...] 1pctl --help Commands: status 查看 1Panel 服务运行状态 start 启动 1Panel 服务 stop 停止 1Panel 服务 restart 重启 1Panel 服务 uninstall 卸载 1Panel 服务 user-info 获取 1Panel 用户信息 listen-ip 切换 1Panel 监听 IP version 查看 1Panel 版本信息 update 修改 1Panel 系统信息 reset 重置 1Panel 系统信息 restore 恢复 1Panel 服务及数据二、主界面 内置应用商店安装应用界面网站和数据库容器管理面板计划任务主机管理功能文件 监控 终端 防火墙配置 进程管理 SSH管理等系统设置工具箱面板配置三、容器管理 1、应用商店部署容器 如uptime 配置端口、外网访问、CPU内存限额安装中安装完成1Panel自动完成持久化管理2、手动部署容器 如uptime 查询官网可知uptime的持久化目录为容器内/app/data,因此我们需要手动配置持久化卷新建存储卷名称 镜像 端口映射 网络 挂载卷 启动规则 CPU内存容器部署完成持久化测试1p-uptime新建任意内容重启1p-uptime重启后数据依旧存在,持久化正常进入容器终端管理持久化卷文件四、其他 如果你的docker网卡与网络冲突可在 容器-网络 删除1panel-network网卡并新建同名网卡五、部署容器 1、activeMQ拉取symptoma/activemq:latest镜像创建容器名称 镜像 映射端口重启规则 环境变量ACTIVEMQ_PASSWORD=myactivemquserpass ACTIVEMQ_USERNAME=myactivemquser ACTIVEMQ_WEBADMIN_PASSWORD=TestTest ACTIVEMQ_WEBADMIN_USERNAME=roos运行正常六、总结 可替代portainer docker容器面板,功能更全,好好好!
-
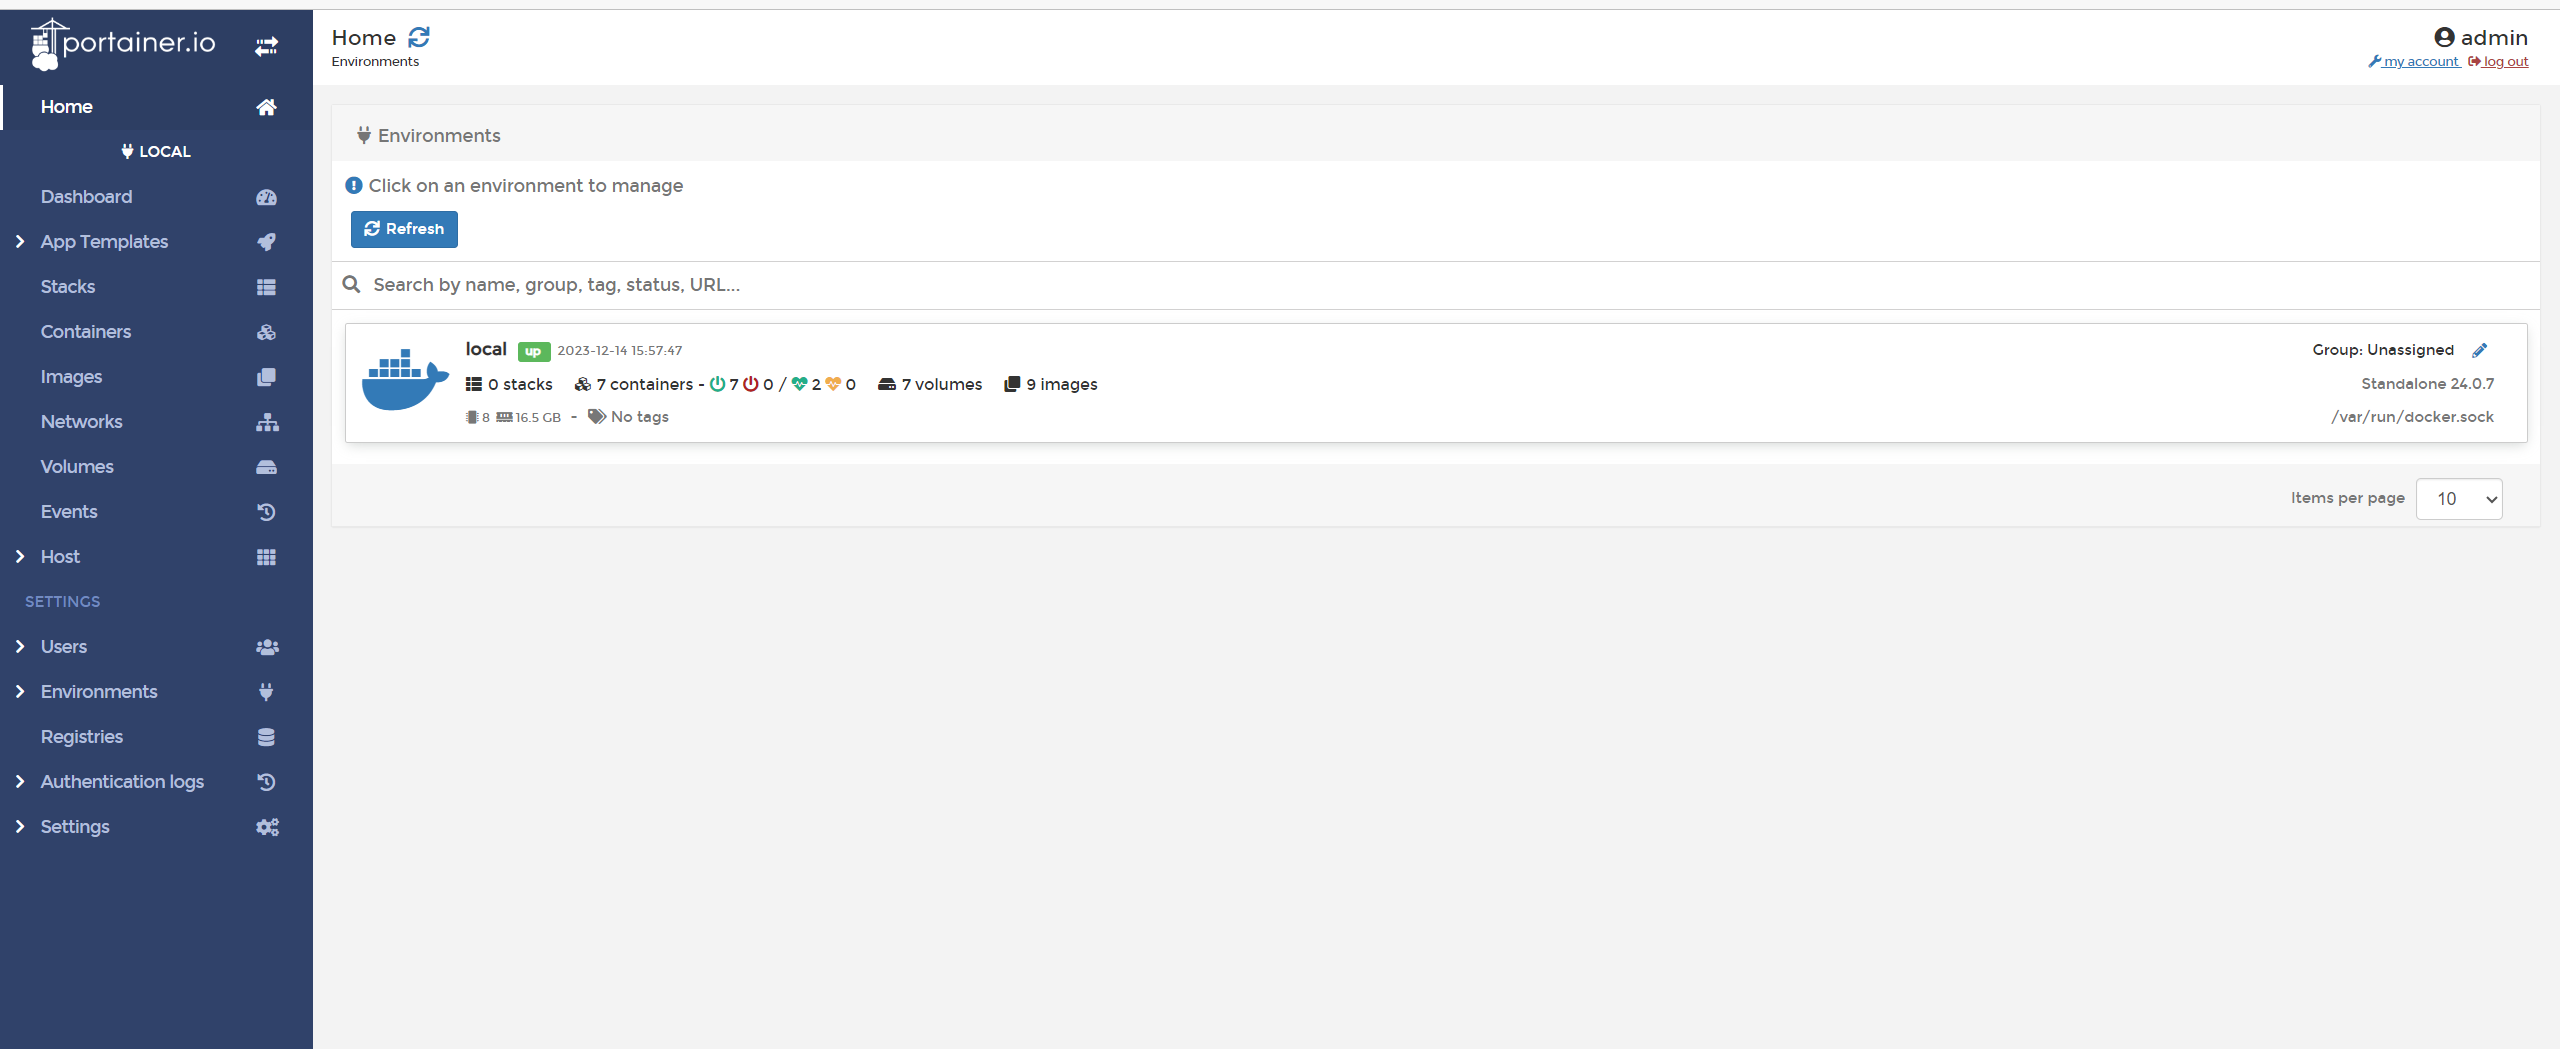
RHEL9/ALMA9 搭配portainer docker容器管理面板进行应用部署 当前更新时间2023.12.14持续更新中一、安装ALMA9ALMA官网,我是用miniISO镜像https://almalinux.org/zh-hans/get-almalinux/二、系统配置开启SSH登录见红帽官方帮助,默认不允许root SSH登录https://access.redhat.com/documentation/zh-cn/red_hat_ceph_storage/5/html/installation_guide/enabling-ssh-log-in-as-root-user-on-rhel-9_install[root@admin ~]# echo 'PermitRootLogin yes' >> /etc/ssh/sshd_config.d/01-permitrootlogin.conf [root@admin ~]# systemctl restart sshd.service使用中未发现selinux影响docker,可酌情关闭。三、安装dockeryum install -y yum-utils #官方源 yum-config-manager --add-repo https://download.docker.com/linux/centos/docker-ce.repo #阿里云加速源 yum-config-manager --add-repo http://mirrors.aliyun.com/docker-ce/linux/centos/docker-ce.repo yum install docker-ce docker-ce-cli containerd.io四、配置docker网段和加速源镜像源/etc/docker/daemon.json { "bip": "192.168.120.1/24", "registry-mirrors": [ "https://pfti226w.mirror.aliyuncs.com", "https://hub-mirror.c.163.com", "https://docker.m.daocloud.io", "https://ghcr.io", "https://mirror.baidubce.com", "https://docker.nju.edu.cn" ] }运行dockersystemctl enable --now docker五、安装portainer面板创建存储卷docker volume create portainer_data一键部署运行portainer,8000为portainer对接端口,9443为https管理面板docker run -d -p 8000:8000 -p 9443:9443 --name portainer --restart=always -v /var/run/docker.sock:/var/run/docker.sock -v portainer_data:/data portainer/portainer-ce:latest六、面板使用运行后,登录https://IP:9443创建第一个管理员用户登录local即可开始使用主界面容器管理持久化卷管理镜像源配置1、创建容器新建容器容器名称、端口映射等参数高级选项持久化卷 变量 重启策略容器重启会丢失全部运行中产生的数据,所以需要进行容器数据持久化设置,例如nginx容器的/etc/nginx目录配置文件,/usr/share/nginx网页目录某些容器部署时需要配置变量,如mysql8.2需要MySQL_ROOT_PASSWORD变量,否则启动失败重启策略通常配置为always总是 ,以实现开机自启动2、重新创建容器高危操作若容器异常,可重新创建容器,除持久化数据外,容器数据全部丢失此选项也可用于更新容器,适用于使用latest标签的容器3、编辑容器高危操作可修改容器参数,例如映射端口,持久化等,除持久化数据外,容器数据全部丢失4、容器开启、关闭、重启、暂停、恢复、删除5、镜像管理已下载的镜像6、持久化管理持久化卷七、部署应用1、mysql8.2必填变量 MySQL_ROOT_PASSWORD映射端口 3306自动持久化注意,由于mysql8.2修改了默认加密方式,使用客户端可能无法连接!root连接使用DBeaver,默认连接会报Public Key Retrieval is not allowed,需要将驱动属性中allowPublicKeyRetrieval配置为TRUE,即可使用root连接普通用户连接目前大部分应用还不支持mysql8.2的新加密方式,如果遇到mysql无法连接,可新建普通用户,将用户修改为旧密码加密方式。ALTER USER 'typecho'@'%' IDENTIFIED WITH mysql_native_password BY 'passwd';2、nginx映射端口 443 80映射目录 1)nginx配置目录,即nginx的/etc/nginx映射到nginx.conf卷2)nginx网页目录,即nginx的/usr/share/nginx映射到nginx-www卷修改配置或放置网页时,通过卷的挂载目录修改3、php-fpm映射端口 9000映射目录 映射目录为nginx网页目录,即nginx的/usr/share/nginx映射到nginx-www卷,php-fpm的/usr/share/nginx同样映射到nginx-www卷,使php-fpm可以读取nginx网页目录的文件4、librespeed映射端口 80自动持久化5、typecho映射端口 80自动持久化6、uptime-kuma映射端口3001自动持久化八、小结太强大了!
-
-
流影 Flow Shadow 轻量级网络安全感知与网络行为可视化综合分析平台 官网https://abyssalfish-os.github.io/项目安装,我这里使用一键包,系统要求Centos7.9https://abyssalfish-os.github.io/downloads/当前版本为ly-install-package-v1.1.0解压tar xvzf ly-install-package-1.1.0.tar.gz ll -rw-r--r-- 1 root root 242239180 Dec 4 15:19 ly-install-package-1.1.0.tar.gz drwxr-xr-x 2 root root 4096 Nov 29 15:24 ly-install-package-v1.1.0 进入目录,解压依赖包到root目录cd ly-install-package-v1.1.0/ ls agent_deploy_release.sh db.server.v1.1.231123.tar.gz protobuf-3.8.0-1.el7.x86_64.tar.gz Agent.v1.1.0.231124.tar.gz INSTALL.md server_deploy_release.sh all_env.sh localyumsource.tar.gz Server.v1.1.0.231124.tar.gz cgicc-lib-3.2.16-1.el7.x86_64.tar.gz lyprobe-release-v1.0.1.tar.gz tensorflow-2.0.4-1.el7.x86_64.tar.gz cppdb-lib-0.3.1-1.el7.x86_64.tar.gz pf_ring-lib-7.4.0-957.el7.x86_64.E5v2.tar.gz webui.v1.1.0.tar.gz tar zxf localyumsource.tar.gz -C /root安装依赖./all_env.sh安装探针和分析引擎/bin/bash ./agent_deploy_release.sh安装管理和交互页面,过程中会安装mariadb数据库,并提示你配置数据库密码/bin/bash ./server_deploy_release.sh修改默认监听网卡 `安装完毕后,安装部署程序已自动将探针与接收程序的启动命令写入 /etc/rc.local 文件中。 lyprobe为探针,通过-i参数指定所监听的网卡,默认写ens224,根据网卡信息自主更改此参数。`查看当前网卡ip add 2: ens192: <BROADCAST,MULTICAST,UP,LOWER_UP> mtu 1500 qdisc mq state UP group default qlen 1000修改启动脚本中的网卡 /etc/rc.local modprobe pf_ring lyprobe -T "%IPV4_SRC_ADDR %IPV4_DST_ADDR %IN_PKTS %IN_BYTES %FIRST_SWITCHED %LAST_SWITCHED %L4_SRC_PORT %L4_DST_PORT %TCP_FLAGS %PROTOCOL %SRC_TOS %DNS_REQ_DOMAIN %DNS_REQ_TYPE %HTTP_URL %HTTP_REQ_METHOD %HTTP_HOST %HTTP_MIME %HTTP_RET_CODE %SRV_TYPE %SRV_NAME %SRV_VERS %DEV_TYPE %DEV_NAME %DEV_VEND %DEV_VERS %OS_TYPE %OS_NAME %OS_VERS %MID_TYPE %MID_NAME %MID_VERS %THREAT_TYPE %THREAT_NAME %THREAT_VERS %ICMP_DATA %ICMP_SEQ_NUM %ICMP_PAYLOAD_LEN %SRV_TIME %DEV_TIME %OS_TIME %MID_TIME %THREAT_TIME" -i ens192 -n 127.0.0.1:9995 -G -e 0 -w 32768 -k 1 -K /data/cap/3 /Agent/bin/nfcapd -w -D -l /data/flow/3 -p 9995 如果使用vSphere平台,虚拟交换机和虚拟机网卡开启混杂模式空间清理/Agent/bin/cleanup.sh清理异常可将脚本中str_home目录改为/运行/bin/bash /etc/rc.local登录控制台访问地址:http://ip:18080/ui管理员账号:admin,密码LoginLY@2016安装完成,具体使用参考官网文档
-
Windows更新服务部署、域策略批量配置更新 一、前言 WSUS 是在 Windows Server 操作系统中提供的 Windows Server 角色。 它为 Windows 更新在组织中提供了一个中心。 WSUS 支持公司不仅可以延迟更新,还可以选择性地批准更新、选择传递更新时间,并且可以确定接收更新的个别设备或设备组。选择 WSUS 作为 Windows 更新的源时,可以使用组策略将 Windows 客户端设备指向 WSUS 服务器以获取更新。 更新在此处将定期下载到 WSUS 服务器,并且通过 WSUS 管理控制台或组策略进行管理、批准和部署,这简化了企业更新管理事宜。二、安装WSUS服务 勾选windows server更新服务后,下一步下一步即可三、配置WSUS服务 如果打开WSUS界面为英文,则需要进行系统更新,会自动安装中文语言包,更新重启后显示为中文配置向导更新改善计划上游我选择官方点击开始连接获取信息 此处可能需要重试几次才有反应 很慢 移动宽带下更慢我这里选择中文和英文产品其实全选都行,只是选的多每次获取数据的时间会变长我选择全部windows,选择后,只有批准的补丁才会下载更新,我不使用自动审批自动同步,建议避开网络高峰期初始同步可以开始,也可以等自动同步,根据网络,需要几个小时同步完成访问服务器的8530端口进行测试打开网页为空白页是正常的四、客户端测试 配置本地计算机的组策略,位置大体相同,win11会多一级目录,但基本没变 组策略-计算机配置-管理模板-windows组件-windows更新-指定 Intranet Microsoft 更新服务位置客户端选择检查更新,会提示已经是最新版本登录WSUS服务器等WSUS同步完成后,更新-所有更新 审批:未经审批 状态:失败或需要的 选择刷新可以显示当前客户端需要但没审批的更新,全选右键批准批准后服务器会下载补丁,服务器下载完补丁后,客户端再检查更新才会获取到补丁五、域策略推送更新 与单机相同,仅仅是组策略变成了域策略在域中新建一条策略即可六、小结 好好好
-
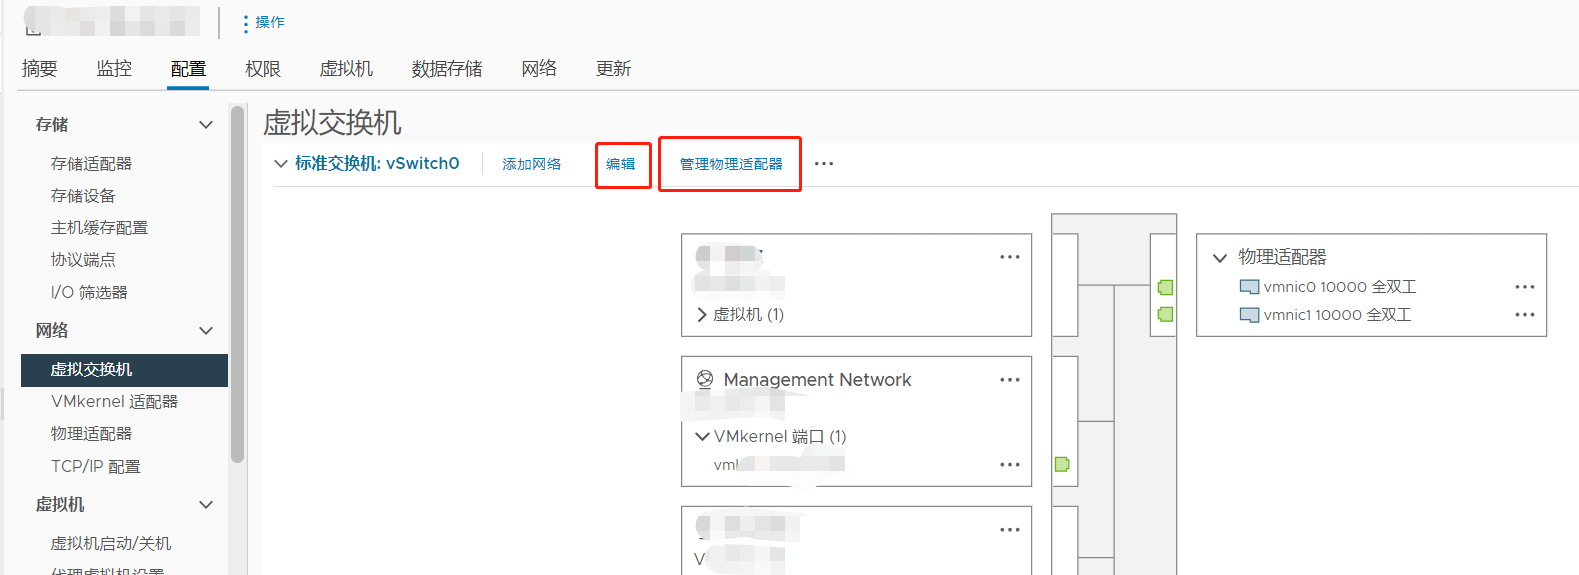
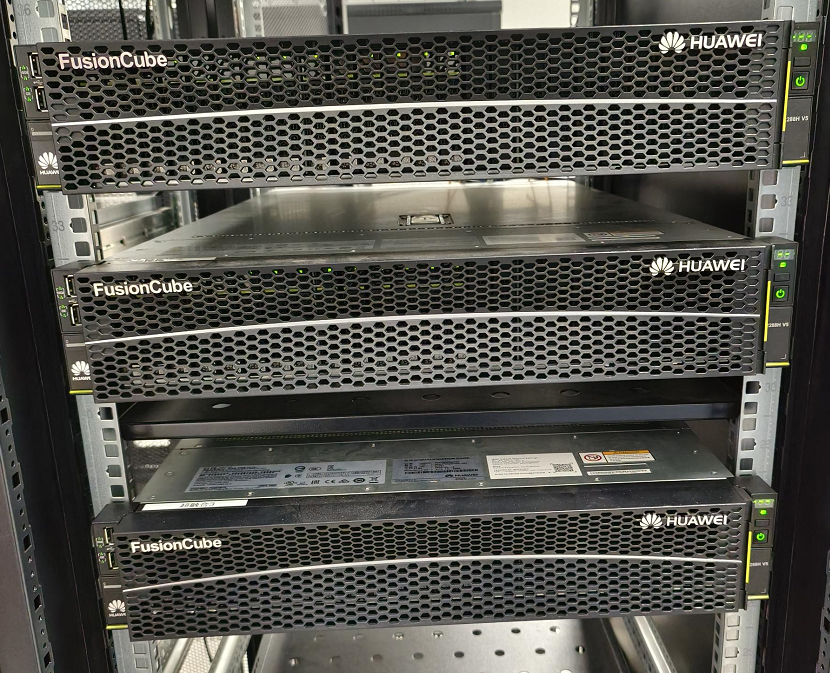
华为FusionCube超融合一体机改造VMware vSphere vSAN超融合虚拟化集群 前言 FusionCube是华为出品的,一套使用华为FusionSphere虚拟化技术打包出售的超融合一体机,我这里使用的三台超融合,包含华为 2288H V5服务器、FusionSphere虚拟化授权、软件服务支持和硬件维保。随着时间推进,华为超融合的软件服务支持已经过期,并且出现了无法关机的情况,由于华为超融合生态与现有的虚拟化生态不兼容,随即决定将华为超融合改造为VMware vSphere vSAN超融合集群。原华为数据会全部丢失。整体思路 为服务器安装ESXi系统,服务器两个网络接口为一组,ESXi控制网络采用千兆网口,vSAN和业务网络采用trunk网络,配置独立VLAN隔离。注意:本次改造为全过程记录,请全部看完后再进行操作;运维最重要的是思路和耐心! {lamp/}外观正面照 背面照由于原标签已经老旧脱落,因此进行标签的重新标记2块NVME 800G 固态2块SAS 600G 机械 RAID1 做系统盘14块SAS 2.4T 机械 进入BIOS/UEFI 重启F11进入 启动管理器进入启动管理器时,会提示输入BIOS密码,默认为Admin@9000安装ESXi7 进入启动盘,我使用的是Ventoy进入ESXi7踩坑1 进入后发现看不到NVME固态硬盘我的想法是,安装完ESXi7后再安装驱动系统安装完成查看网卡对应关系从左往后,2光口2网口2光口,对应ESXi系统中网卡从上到下顺序LOM1-4 SLOT4配置IP地址配置DNS和主机名登录ESXi开启SSH服务使用SSH登录,上传从官网下载的ESXi6.7.ZIP中抽取的NVME VIB驱动使ESXi进入CommunitySupported等级esxcli software acceptance set --level=CommunitySupported安装驱动esxcli software vib install -v 完整路径.vib此时出现了大坑,安装nvme驱动会替换掉网卡驱动,导致开机无法联网。踩坑2 莫慌,重来!第二次安装测试,使用ESXi6.7启动,发现可以看到NVMe固态硬盘这是因为ESXi7为了缩小体积,精简了大量的老旧设备驱动,我们可以通过修改镜像文件,将老的驱动放置在ESXi7中使用。因此,第二次安装测试,我们采用封装ISO的方式进行,从6.7的ISO中解压出NVME.V00文件,替换到ESXi7的NVME_PCI.V00文件,保持名字一致替换镜像另存为导出也不再前往现场,而是采用BMC远程挂载ISO文件的方式安装还是正常安装,测试可以看到NVME固态了安装完成后,再次进入ESXi,也可以看到硬盘这里我不在超融合中安装vCenter了,直接使用其他VC新建集群出于习惯,进行补丁更新此时出现了第二个大坑,更新补丁后,驱动覆盖了,NVME硬盘看不到了。啊?!!!踩坑3 再次重装,本次安装后进行备注,不再进行系统补丁更新按集群向导配置集群,配置分布式交换机下一步时出现黑块遮挡,啊?更换firefox浏览器后可以正常操作,分布式交换机配置完成配置完集群后发现 "缺少功能MWAIT",重启进入BIOS进行开启进入BIOS位于 BIOS - Advanced - Socket Configuration - Processor Configuration - MONITOR/MWAIT然后发现集群没启用VSAN功能,需要新建一个集群,啊?配置vSAN 新建一个vSAN集群,将主机拖入vSAN集群,按向导配置集群声明缓存层和容量层注意,集群的告警一个是我关闭了数据上传,另一个是替换了NVME驱动,所以告警了使用默认vSAN策略默认为RAID1镜像模式,即一个虚拟机存储两份分布在整个集群中,三台物理主机允许一台宕机分布式交换机 工作正常验证 部署1台服务器,容量占用为两倍在线迁移测试正常BUG处理 由于非原生支持vSphere,所以有些主板硬件告警会误报,需要屏蔽掉;同时对于服务器硬件的监控,需要自行配置SNMP或邮箱进行告警通知。总结 历时2天,克服困难,遥遥领先!遥遥领先!遥遥领先!
-
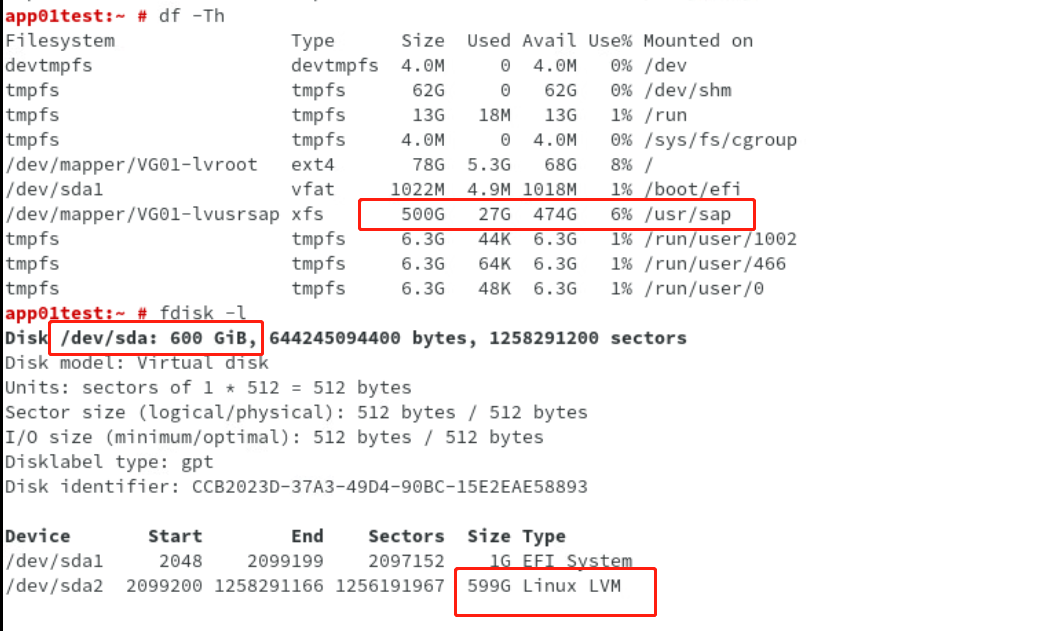
vSphere7虚拟化 SUSE Enterprise Linux Server 15 LVM 硬盘分区在线扩容 前言 当前/usr/sap分区为500G XFS文件系统,为其追加200G空间,同时要求业务在线不中断操作步骤 1、为虚拟机增加硬盘空间 从600G修改为800G,在线扩容不影响虚拟机运行2、查看硬盘空间此时空间仍为600Gfdisk -llsblk3、刷新磁盘空间从上面可以看到磁盘为sda,重新扫描SCSI总线,识别新的硬盘容量echo "1" > /sys/class/block/sda/device/rescan刷新后,容量识别为800G扩展知识 如果新增硬盘不识别,可以进行SCSI扫描 echo “- - -” > /sys/class/scsi_host/hostX/scan4、通过fdisk查看分区5、修复分区表parted -l修复后再次查看分区则不会报错6、将剩余空间追加至/dev/sda2,即LVM分区 注意!parted实时生效,请谨慎操作!parted /dev/sda 对sda分区调整 unit s 设置Size单位 p free 查看空闲空间 resizepart 2 追加容量到sda2 输入空闲区间 为FreeSpace的End空间 q退出7、LVM PV物理卷更新查看pvdisplay更新PV卷大小pvresize /dev/sda2再次查看PV大小,更新为800G8、LVM LV逻辑卷扩容lvdisplay扩容目标为/dev/VG01/lvusrsaplvextend -l +100%FREE /dev/VG01/lvusrsap再次查看LV卷9、文件系统扩容查看当前分区大小df -ThXFS文件系统分区扩容xfs_growfs /usr/sap查看当前分区大小,在线扩容完成df -Th总结 先理论后实验、先验证后实施,胆大心细、谨小慎微,才是一个合格运维的良好品质。