
搜索到
332
篇与
的结果
-

-
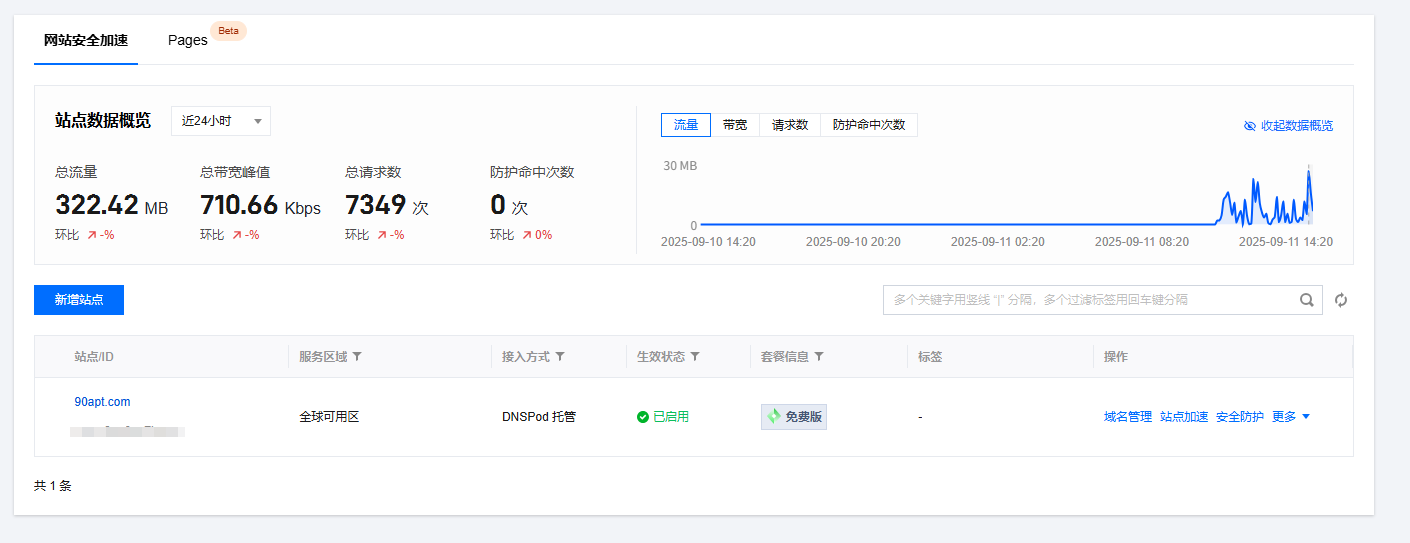
腾讯免费安全CDN边缘安全加速平台 EO (TencentCloud EdgeOne) 本站已接入边缘安全加速平台 EO想免费使用腾讯edge one,分为两种情况,备案域名和未备案域名,未备案域名仅能使用海外节点。一、未备案域名https://edgeone.ai/zh/get-free-plan访问edgeone国际官网,通过测速和看教程,能获得腾讯国际版4个免费套餐,注意,不包含中国大陆二、备案域名https://cloud.tencent.com/act/pro/eo-freeplan?from=28412访问edgeone国内版活动页面,通过扫码抽奖的方式领取兑换码同时也有其他的获取方式三、源站防护1、DNS解析清理90APT仅有两条记录,不包含真实IP2、源站访问白名单在服务器防火墙中配置http、https协议的访问IP为白名单IP,防止对源服务器进行探测四、小结强大!免费!YYDS!
-
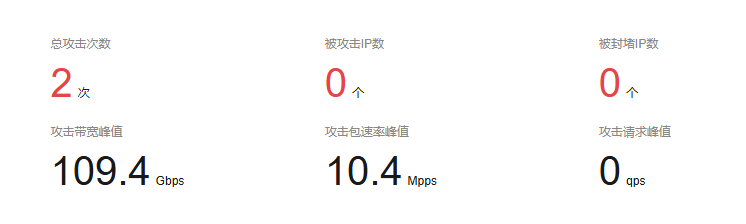
关于近期遭遇三次DDOS攻击 由于想更换服务器,撤掉了防御,在过渡期内被吊毛所害目前已经完成防御部署,后续不会出现此类情况攻击形式为DNS反射放大攻击,即伪造源站查询来使DNS服务器返回大量的包使用的DNS为国外的公共DNS服务DNS服务均运行正常此类攻击操作简单,攻击效果好,不过对 gwm.90apt.com 无效,不影响导航站,两个站点部署原理不同攻击溯源180.114.104.143 中国 江苏 无锡 电信60.255.166.233 中国 四川 成都 广电网223.74.118.98 中国 广东 东莞 移动110.249.201.203 中国 河北 石家庄 联通223.73.67.128 中国 广东 广州 移动18.167.42.190 中国 香港 Amazon数据中心223.160.203.197 中国 云南 广电网
-
-
思想殖民:美国认知战的手段、根源及国际危害-新华社研究院 新华社研究院 目 录前 言 第一章 美国思想殖民的历史现实 1.1美国思想殖民的概念特征 1.2美国思想殖民的历史脉络 1.3美国思想殖民的现实面孔 1.4美国实施思想殖民的基础条件 1.5美国实施思想殖民的深层动因 第二章 美国思想殖民的实践体系 2.1战略体系:历史迭代与纵深拓展 2.2组织体系:多个主体勾连合谋 2.3价值体系:“普世价值”瞒天过海 2.4传播体系:多重渠道立体灌输 2.5内容体系:多种形态隐性渗透 2.6技术体系:数字霸权操控认知 第三章 美国思想殖民的影响危害 3.1侵蚀意识形态,颠覆他国政权 3.2嵌入认知楔子,挑拨地缘冲突 3.3摧毁精神独立,培育亲美势力 3.4强植西式道路,干扰自主发展 3.5瓦解文化自信,加剧文明冲突 结语:打破思想殖民枷锁 推动文明交流互鉴 编写说明与致谢前 言思想领域的战争没有硝烟。2025年初,随着美国政府宣布裁撤美国国际开发署、解散美国国际媒体署,这两家机构长期以来输出意识形态、推动思想渗透、操纵国际舆论、塑造他国认知甚至阴谋颠覆政权的活动不断曝光。国际社会一片哗然。这次“自曝家丑”让世界看到的,只是美国全球思想战争的冰山一角。美国近百年来不遗余力推行的思想殖民活动,再一次暴露在聚光灯下。自二战以来,特别是冷战结束之后,美国以称霸世界的政治、经济、军事、科技实力为基础,向全球输出意识形态,力图用美式价值观占领各国人民的大脑,重塑各国人民的认知,制造对“美国中心”的精神依附。思想殖民是美国对外战略的重要基石。美国著名学者约瑟夫·奈说:“美国面临的关键问题不在于是否拥有21世纪最充足的资源供应,而在于它在多大程度上可以控制政治环境,使其他国家按照美国的意愿行事。”美国前总统国家安全事务助理兹比格涅夫·布热津斯基更加直接地指出,“强化美国文化作为世界各国文化‘榜样’的地位,是美国维持霸权所必需实施的战略”。美国思想殖民对世界和平发展构成严重威胁。它侵蚀意识形态,颠覆他国政权;它嵌入认知楔子,挑拨地缘冲突;它摧毁精神独立,培育亲美势力;它强植西式道路,干扰自主发展。随着人工智能等新技术的发展升级,美国思想殖民操作手法更隐蔽,攻击范围更广泛,更需要一切热爱和平的人们正视和警惕。今天,随着“全球南方”加速觉醒,美国霸权走向衰落,世界进一步看清,美国炮制的价值体系背后,隐藏着自私、伪善与“双标”。种种变化表明,美国精心构建的思想殖民大厦根基开始动摇。在这样一个重要节点,系统研究美国思想殖民的历史、实践与危害,有助于摆脱美国思想迷信、打破美国思想枷锁,帮助世界各国人民更好地维护文化主权,更好地推动世界文明交流互鉴。第一章 美国思想殖民的历史现实美国政治学家汉斯·摩根索认为,“成功的帝国主义政策,不是征服和掌握经济,而是控制人的头脑”。美国通过解构目标国家群体认知、植入美式价值观,在“无形疆域”中实现思想殖民,从而构筑起其霸权体系的深层基石。1.1美国思想殖民的概念特征第二次世界大战之后,民族解放运动席卷全球,众多民族国家如雨后春笋般独立,欧洲列强建立的全球殖民体系土崩瓦解,世界进入“后殖民”时代。作为新的全球霸主,美国发现,面对众多“觉醒”的民族主义国家,单单依赖政治宰制、经济支配、军事威慑等“硬权力”,无法建立和维持长久广泛的殖民统治,而通过文化和价值观等“软权力”,则能以更低成本获得更高殖民收益。披上温情脉脉的面纱、让全世界“自愿”趋从趋附,这就是美国的“思想殖民”。与正常的人类思想文化交流不同,思想殖民是基于不平等、为了不平等的头脑控制。主要体现在:一是强制改造。由于实力地位悬殊,强权国家往往利用霸权地位,强行在目标国家植入自身价值理念,同时选择性地清除特定原生文化和思想。这种强制性的思想改造,常常导致目标国家出现严重的认同危机、文化失语和价值混乱。二是恶意操纵。为了达到“驯化思想”的目的,强权国家常常罔顾道义,在目标群体中灌输服从意识,大量培育依附势力,瓦解精神独立。三是隐蔽渗透。强权国家的思想文化输出往往被包装为“先进理念”“文明进步”等貌似合理的形态,通过文化产品、教育体系、学术交流等隐蔽渠道,潜移默化影响目标对象认知。四是长期侵蚀。思想认识的改变是缓慢的、渐进的。思想殖民往往也需要长周期、持续的日常渗透,甚至漫长的代际传递,才能达到再造思想、重塑认知的目的。“思想征服”一直是帝国统治者们的理想。回顾历史,不同时期的殖民统治者都曾尝试通过国民教育、推广语言、重构历史、编撰典籍等手段,在被征服地区输出思想文化、统一价值观念,为长期控制清除文化障碍、建立思想基础。但是,由于历史条件所限,思想殖民只是在一定空间和时间范围内存在过。在物质和精神交流交融交锋的全球化浪潮中,积累了丰厚资源和强大实力的美国最终站在了思想殖民的历史“潮头”。尤其是两次世界大战之后,现代通信技术快速发展、专业媒体机构大量涌现、社会科学和自然科学领域取得新突破、资本和技术流动出现全球化趋势,为信息和知识的全球传播创造了前所未有的条件,使美国思想殖民驶上快车道。作为战后国际体系的主要缔造者之一,美国一方面向世界输出美国政治经济制度、“民主”“自由”等美式价值观,一方面有目的、有意识地解构非美国思想、压制他国本土文化,着力营造对美国的精神依附和服从意识。一边扩张性“建构”,一边毁灭性“解构”,美国两手花样不断,思想殖民的“成效”也远远超过之前的任何殖民帝国。1.2美国思想殖民的历史脉络透过美国思想殖民的大致脉络,可以大致勾勒出其思想殖民的历史演进过程。萌芽:大陆扩张阶段(18世纪末—19世纪末)。独立后的美国以“天定命运”为思想基础,在美洲大陆迅速扩张领土,通过西进运动、美墨战争等一系列行动,领土在百年间扩张十余倍。门罗总统发表“门罗宣言”,以“反对欧洲干涉”“美洲是美洲人的美洲”为旗号,把拉丁美洲纳入美国势力范围。奠基:全球崛起阶段(20世纪初—20世纪中期)。美国国力在两次世界大战期间快速增强,放弃“孤立”政策积极参与全球事务,向世界输出诸多具有广泛影响的政治经济思想。威尔逊总统提出“十四点计划”和建立国际联盟的构想,罗斯福总统与丘吉尔共同签署《大西洋宪章》确立了二战之后构建国际体系的基本原则,罗斯福总统提出“四大自由”成为国际人权体系的理论基石。此时,美国的思想输出为其日后全面推行思想殖民奠定了历史基础。成形:美苏对抗阶段(20世纪中期—20世纪末)。在美苏对抗中,美国逐渐露出思想殖民的獠牙。美国“马歇尔计划”将经济援助与社会制度选择捆绑,以意识形态划线,打造出资本主义“自由世界”国家阵营,并扛起“领袖”大旗,对抗苏联领导的社会主义阵营。美国组建并不断完善专门的国家宣传机构,以公开宣传、思想渗透、文化外交、学术资助等方式,大量传播反共信息,拉拢亲美精英,培育反共势力,鼓励社会主义国家民众投奔“自由世界”。推进:美国独霸阶段(20世纪末—21世纪初)。苏联解体后美国成为世界唯一超级大国,资本主义意识形态和政治经济制度风靡全球。“华盛顿共识”及新自由主义政治经济理论广泛传播,世界社会主义运动陷入低潮。“9·11”事件之后,美国将“反对恐怖主义”塑造为全球议题,掀起“反恐”运动。在此期间,从克林顿政府将“扩展民主”作为外交支柱,到小布什推行“自由议程”,以美式民主自由为核心的思想殖民持续深入推进。升级:霸权焦虑阶段(21世纪初—至今)。美国霸权遭遇挑战,国内党争不断、社会撕裂加剧、民粹主义走强。从推出“巧实力外交”,到打造“民主国家峰会”,再到提出“美国优先”“让美国再次伟大”等口号,美国不断加强和升级思想殖民战略。美国借助对新技术平台和前沿认知技术的掌控,持续加强对社交平台的意识形态管理,以“打击虚假新闻”“控制外国影响力”等为借口,操控社交平台上的信息流动,主导全球认知塑造。1.3美国思想殖民的现实面孔美国开展思想殖民活动时有黑色、白色、灰色等不同“脸谱”,可以根据不同情形和现实需要,灵活调配出不同“色调”进行伪装。白色传播。白色传播构成了美国思想殖民最显性的层面,它以公开透明、官方背书的方式运作,传播可被公众知晓和验证的信息,旨在塑造正面国家形象并推广其价值观。这类活动一般直接由国务院、文化机构等官方或半官方实体执行,如美国新闻署(后为国际媒体署)长期运作的“美国之音”(VOA)、富布赖特学者交流计划、风靡全球的好莱坞电影以及政府高调的外交声明等。白色传播的核心策略是将美国的生活方式、政治制度和文化产品包装成具有普世吸引力的“现代文明标杆”,其重要价值在于其表面上的可验证性和正当性,为美国的全球领导力披上了文明开放的外衣。黑色传播。黑色传播代表着思想殖民最具隐秘性、欺骗性和侵略性的一环,通常由情报和军事部门在高度机密状态下执行,其核心特征是秘密行动,包括但不限于虚假信息传播、情报搜集、网络攻击等。这类活动旨在干扰目标受众认知、操纵特定议题舆论、破坏敌对国家稳定,以获取战略优势,其存在和源头通常被官方断然否认。中央情报局(CIA)是美国黑色传播的主要执行者,其历史悠久的“知更鸟计划”曾系统性地收买或影响国内外记者以操控报道和舆论。在数字时代,黑色传播手段更为复杂,2013年斯诺登曝光的“棱镜”计划就揭示了美国国家安全局(NSA)对包括盟友在内的全球数十亿民众及政要进行的大规模监控。黑色传播是认知战场上的“暗箭”,它无视国际规则和道德约束,是美国为实现战略目标部署的终极秘密武器。灰色传播。灰色传播游走于“黑”和“白”之间的模糊地带,其特点是半公开性、来源模糊化和一定程度的欺骗性。这类活动通常由美国政府通过企业、非政府组织等第三方机构间接实施,以规避官方责任并制造“民间自发”的假象,其目的在于隐蔽地影响目标国舆论、塑造政治议程或支持特定团体,同时为美国保留“不干涉内政”的辩解空间。美国国家民主基金会(NED)是执行灰色传播的典型工具,名义上是独立非营利组织,但主要资金来自国会拨款。它通过旗下核心机构在全球资助媒体、智库、公民团体和政治活动,如为媒体提供资金,支持特定倾向的报道、放大社会矛盾等。灰色传播利用信息的不透明性,可以在否认干预的同时有效达成渗透目的。“黑白灰”多张面孔相互配合,共同服务于美国的战略利益。这种多层次、立体式的结构设计,能够根据不同目标和环境,灵活选择传播手段,从而达到最佳的传播效果。1.4美国实施思想殖民的基础条件如果说美国在国际政治、经济、军事上的霸权地位,是其思想殖民的“硬性前提”,那么语言文化、话语叙事、大众媒介、学术研究等方面的便利条件,则是其“软性基础”。坐享“世界语”红利。语言是推行思想殖民的基本工具。美国著名政治思想家亨廷顿认为:“语言在世界上的分布反映了世界权力的分配。”17—19世纪,英国通过全球殖民将英语强制推行至美洲、南亚、非洲等地,成为这些地区的行政与教育语言。第二次世界大战之后,美国凭借经济、军事、科技及大众文化优势,倾力向世界推行英语,使得英语国际地位进一步提升,成为全球通用语言。受霸权思维惯性影响,不少美国人理所当然地认为,“如果世界趋向一种共同语言,应该是英语。如果共同的价值观正在形成,它们应该是符合美国人意愿的价值观”。主导国际话语权。叙事主导是美国推进思想殖民的关键。凭借其在经济、技术以及网络传播体系中的话语霸权,美国主导文化的交流与传播,强化其软实力建设。借助话语权优势,美国不断地美化自身,同时极力妖魔化他者,制造出“民主”与“独裁”、“自由”与“专制”、“市场经济体”与“非市场经济体”、“反恐国家”与“支恐国家”等对立阵营,以此把持对世界各国的形象塑造权。占据传播制高点。谁控制了信息流动的阀门,谁就能掌握认知塑造的主动。马克思曾说,用宝剑实现的征服,将用电报和报刊来巩固。今天,美国拥有数量众多的新闻媒体机构、实力强大的大型跨国传媒集团、基于互联网的社交媒体平台以及众多新型互联网科技巨头,牢牢把持着全球新闻信息传播的渠道和平台。在传统媒体时代,“美国主流媒体的镜头摇到哪里,安理会的议程就讨论到哪里”;在数字时代,借助脸书、X、优兔等社交平台,美国实现了“算法到哪里、流量到哪里,议题和认知就到哪里”的舆论操纵。垄断知识生产标准。二战后,美国政府投入大量资金开展知识生产,吸引了全球众多优秀人才,创办了大量知名大学和科研机构,构建起完备的知识生产和自主创新体系,推出大量影响深远的研究成果,迅速成为社会科学和自然科学领域的“超级大国”。时至今日,美国和西方国家在全球学术研究和出版、知识传播、技术创新等领域依然占据主导性地位,借助对知识产权、评价标准的垄断,对非西方国家知识进行系统性排斥。牛津大学教授西蒙·马金森认为,美国在高等教育、学术研究和知识生产上行使着非同寻常的全球霸权,“知识和大学教育的美国化维持着一个美国化的全球社会,并在一个相互促进的进程中支持美国在全球政治经济、文化生活和军事上的主导地位”。1.5美国实施思想殖民的深层动因美国思想殖民旨在巩固文化强权,以此强化政治霸权、维护经济特权。巩固文化强权。思想殖民在全球范围拓展美国文化强权,灌输对美国意识形态的认同。作为思想殖民者,美国极力自我美化,为其价值理念披上“普世”外衣,变“民族性”为“普世性”、化“国家利益”为“国际道义”,最终将“文化殖民”伪装成“价值引领”。美国把自己打扮成美好价值的“践行者”“代言人”“卫道士”,无非是巩固美国在思想文化领域的中心地位,塑造对美“认知崇拜”,培育对美“认知依附”。强化政治霸权。美国思想操控和塑造认知的根本目的,就是将符合美国利益的规则转变为普遍接受的国际制度、国际秩序,并保证自身能够永久享有各种特权。美国对待国际规则的态度是“合则用,不合则弃”,暴露了其宣称的“思想”是假,背后的“霸权”是真。1945年第二次世界大战结束后,在美国主导下,世界各国签署《联合国宪章》、成立联合国,逐步确立诸多国际关系基本准则,搭建起当今国际体系和国际秩序的基本框架。东欧剧变和苏联解体之后,美国一直试图将联合国及其代表的国际体系转变为维护西方主导地位尤其是美国全球霸权地位的重要工具。近些年来,随着全球南方集体崛起,美国发现这一体系对自身特权的束缚越来越明显,于是鼓吹“例外论”,四处“退群”,把美国从国际社会普遍遵守的共同规则的束缚中“解脱”出来,同时抛出“优先论”,直接把美国利益放置于其他国家之前,而且推广“长臂管辖”实践,公然把美国国内法凌驾于国际法之上。维护经济特权。回顾历史,美国屡屡通过“思想殖民”为侵略和掠夺行为做好舆论铺垫、披上“合法外衣”。19世纪末,赫斯特报业集团配合美国扩张需求,渲染西班牙在古巴的“暴行”,为发动美西战争及随后抢占加勒比市场制造舆论。20世纪70年代,美国借媒体渲染“阿拉伯石油武器威胁论”,推动建立“石油美元”体系,将美元霸权与全球能源贸易绑定。2019年,美国资助的非政府组织在玻利维亚煽动民众,舞动“民主”之剑推翻左翼政府,意在攫取全球最高储量的锂资源。今天,美国沿用“舆论先行”策略,以“国家安全”名义打压华为、TikTok等中国企业,无非是为美企争夺全球市场扫除障碍。第二章 美国思想殖民的实践体系美国思想殖民活动有着深厚的实践基础和清晰的战略布局,逐步形成了一套完备的体系支撑。2.1战略体系:历史迭代与纵深拓展美国思想殖民是在强烈的战略意图和清晰的战略布局下开展的,几经历史迭代,已经形成了包括宣传战、信息战、思想战、认知战等在内的多维立体的战略体系。(一)媒体宣传与“宣传战”从两次世界大战到20世纪60年代,美国主要利用报刊、广播媒体“向全世界讲述美国故事”,创办“美国之音”“自由亚洲电台”“自由欧洲电台”等外宣媒体,同苏联领导的社会主义阵营开展长期的宣传战。在顶层设计上,从战争新闻办公室到公共外交咨询委员会、国家心理战略委员会,宣传职能不断扩大升级;在传播渠道方面,加大对外宣广播和报纸等的投入;在内容叙事方面,聚焦于宣传资本主义社会的“自由”和“繁荣”,攻击苏联“专制”下的腐败与贫穷。(二)信息控制与“信息战”20世纪70年代前后,以电视为代表的大众媒介迅速发展,推动美国信息传播结构深刻变革。“信息控制—认知”逐步取代“宣传—认知”范式,成为新的主流传播理论。社会心理学、博弈论、知觉现象学等理论被引入国际战略形势分析和政治决策过程,构建起新的国际政治理论框架,推动美国国家安全观念发生重要变化,其思想殖民也随之进入了信息控制与“信息战”阶段。“信息战”成功案例之一,是美国在20世纪80—90年代成功将日本塑造为美国自身经济问题的“替罪羊”,为美国政府逼迫日方签订半导体协议、广场协议等创造了舆论条件。这一阶段的核心理念,就是通过信息供给、信息干扰、信息剪裁、信息屏蔽、信息阻断等手法,影响甚至塑造舆论,进而实现信息控制的战略目标。(三)战略传播与“思想战”“9·11”事件后,美国在全球发动反恐战争,并以“打击恐怖主义”“维护世界和平”为名,开始以国家外交、安全、军事和宣传体系为基础,构建战略传播体系。2010年,美国政府在《国家战略传播构架》报告中指出,要通过公共事务、公共外交和信息运作等多重手段,针对特定受众精心设计传播和接触活动;在美国及全球推进“普世价值”是美国四大战略利益之一;“我们的安全必须依赖于我们对普世价值的不懈追求”。以此为标志,美国对外传播活动进入战略传播阶段。通过“颜色革命”推翻埃及穆巴拉克政府,是这一时期美国“思想战”的成功案例。调动一切国家资源推动“普世价值”渗透,打赢“思想战”,成为美国思想殖民新的重要目标。(四)认知塑造与“认知战”改变受众的情感、态度与行为一直是美国新闻传播、广告宣传等工作的重要目标。“认知战”概念也早在20世纪90年代就已经出现。但是,直到本世纪初,随着心理科学、神经科学、脑科学、人工智能等新技术研究取得突破性发展,“塑造认知”才真正成为具有现实意义的战略目标。2016年后,美国政府将认知战升级为基于脑科学和神经科学研究的新战域,强调大脑将成为战场的一部分。2022年,美国《国家安全战略》报告将认知战提升到与物理层面作战同等重要的战略地位,标志着认知域完全独立。2023年,美国国会的一系列报告再一次聚焦认知安全。就这样,以技术驱动认知操控,成为美国思想殖民的新手法。同以往思想殖民手法不同的是,“认知塑造”高度依赖新技术发展,尤其是人工智能、社交网络和认知科学等,使精准影响目标受众的认知成为可能。“认知塑造”目标直指“制脑权”,试图通过重构认知,从根本上改变对手或目标受众的思维方式和价值判断。“认知塑造”实施过程更加隐蔽和灵活,能根据目标和场景迅速调整策略。社交媒体是当前美国开展“塑造认知”活动的重要空间。数据显示,美军中央司令部长期在X平台运营大量阿拉伯语虚假账号,2017—2022年间发布超10万条信息,这些账号被列入“白名单”,享有优先推荐权。近年来,深度伪造技术的广泛应用,为美国开展认知战创造了新的便利条件。2020年,美国国防部高级研究计划局(DARPA)开发“深度伪造”工具,可生成逼真的领导人视频。在委内瑞拉危机中,伪造的马杜罗“辞职演讲”在社交媒体广泛传播。2.2组织体系:多个主体勾连合谋与对外传播的运作方式一致,美国思想殖民在组织上也呈现多中心勾连、多主体合谋的特点。(一)政府主导美国庞大的国家宣传机器是思想殖民活动的组织指挥中枢。从一战末期成立的公共信息委员会,到二战后陆续成立国家安全委员会、中央情报局和美国新闻署等国家机构,都直接或间接参与思想殖民活动。今天,在美国政府主导下,美国国会、国家安全委员会、国务院相关决策机构会定期举行会议,根据情报系统提供的信息,拟定特定主题和行动目标,调度和整合各类资源,通过讨论议案、出台法案、颁布禁令等官方手段,共同为思想殖民服务。21世纪以来,美国政府围绕认知战进一步完善思想殖民战略框架。一是出台系列文件,强调“战场塑造”“观念影响”“战略叙事”等认知理念,把“认知域作战”提升到与物理层面作战同等重要程度。二是进一步加强认知规律研究,以打击虚假信息和防止干扰选举两项工作为基础,组建了多个“影响力行动”研究部门,分析外国影响力如何改变美国民众认知、美国又该如何应对外国恶意影响等问题。三是强化机构建设,增强作战能力。2016年12月,美国政府发布《波特曼—墨菲反宣传法案》,为国防部拨付额外预算成立反宣传中心,通过进一步加大政府力量投入来强化意识形态工作。如今,国务院政治军事事务局、对外援助办公室、国会和公共事务办公室、网络空间数字政策局等部门,都被赋予了开展思想渗透与认知研究的职能。2025年,美国政府裁撤美国国际开发署、解散美国国际媒体署,但无论具体部门设置如何调整,无论是民主党还是共和党执政,美国都不会放弃思想殖民。(二)社会联动在美国政府主导之下,媒体机构、智库组织、非政府组织等各类社会主体积极参与舆论操控和认知塑造,形成思想殖民合力。一种常见的套路是,政府首先通过智库等第三方机构进行理论包装和调查铺垫,并提出政策建议,随后借助媒体炒作、专家背书、政客呼应,将利益集团的意图伪装为“社会共识”,再以民意之名推行政策、采取行动。媒体是思想流动的渠道,也是思想博弈的舞台。通过有意识地调控不同群体的发声“音量”、信息“流量”,美国媒体向国际社会输出美国意识形态,宣扬自由世界的美好、批判“专制”国家的罪恶,营造完美的美国形象,唤起全世界对美国的向往。非政府组织是关键的幕后推手。成立于1983年的美国国家民主基金会名义上是独立的非营利组织,但实质是美国政府的“白手套”,其主要资金来自美国国会拨款,主要目标是通过资助政治组织、媒体和公民社会团体,推动全球民主发展,塑造对象国及其民众的认知。前些年中东欧地区的“颜色革命”、中东地区的“阿拉伯之春”、中国香港的“占中运动”,都与该组织密切相关。美国国家民主基金会并非个例,美国国际事务民主协会(NDI)、美国国际共和研究所(IRI)、人权观察、自由之家等也都以类似模式进行操作。智库是活跃在台前的中坚力量。近年来,众多智库在美国政府的授意下,通过炮制概念、抛出命题、发布报告等方式,为美国政府发起的舆论战、认知战提供弹药。为了扩大影响、博取眼球,他们甚至不惜用上深度伪造、木马病毒等技术手段,打造各种“重磅思想武器”。(三)盟友协作美国依托共同价值观建立同盟体系。“价值观联盟”强调与同盟国家的合作与协调,针对共同的敌人发起舆论声讨、思想围剿和规则封锁。2022年初,美国与北约、澳大利亚、日本联合提出,建立一个以美国为主导的网络认知战合作体系。在围绕全球互联网治理的国际博弈中,美国利用“互联网无国界”“信息自由流动”等西方国家共同接受的主张,把欧盟、英国、澳大利亚等传统盟友团结在身边。同时,高举“打击虚假信息”大旗,在世界领导人“民主峰会”、七国集团峰会、北约峰会等场合,积极拉拢“志同道合”的盟友伙伴,全力谋取互联网标准界定权、规则制定权和治理主导权,借此打压俄罗斯、中国等所谓的“专制”国家。“五眼联盟”合作机制是美国思想殖民活动重要的情报来源之一。在英国、加拿大、澳大利亚、新西兰等国家的支持下,美国广泛获取情报信息、炮制认知弹药。不仅如此,“五眼联盟”还以情报披露、道德谴责、法律问责、联合制裁等方式,共同向对手发起认知进攻。2.3价值体系:“普世价值”瞒天过海资本主义民主、自由、平等、人权,以及个人主义、利己主义、物质主义、享乐主义等一系列美式价值观是美国意识形态的核心,也是美国思想殖民重点推销的内容,被美国美化为放之四海而皆准的“普世价值”。越来越多国家和人民认识到,包装精美的美式价值观背后,其实是以维系美国霸权为目标的思想侵入和认知操控。(一)民主、自由、平等、人权民主、自由、平等、人权是人类社会追求的共同价值目标。但美西方国家认为,资本主义是人类社会最美好的制度,只有资本主义市场经济才能保证民主、自由、平等、人权等价值观的实现。但事实恰恰相反,资本主义市场经济本质上服务于私有制和少数人,这些价值观必然流于表面、无法摆脱虚伪本质。美国的自由、平等被资本特权所侵蚀,长期将非洲裔、印第安人、妇女等群体排除在外,即使在民权运动后,系统性种族歧视、阶层固化等问题依然突出。美国的民主也早已被证明是金钱的民主、资本的民主、少数人的民主。而美国所谓的人权,近年来则被黑人歧视、移民歧视、性别歧视等一系列严重的社会问题击得粉碎。尽管如此,美国还是频繁以民主、自由、平等、人权等为借口,干涉他国内政、挑起地缘冲突,维护美国霸权。(二)美国梦“美国梦”一度是美式价值观最为集中的体现。历史上,美国无数政治家、社会活动家、作家都不遗余力地编织“美国梦”,使人们相信,美国是世界上少有的平等、自由、民主的国度,以为在美国只要经过努力奋斗,任何人都能获得美好生活、实现自己的梦想。两百多年来,“美国梦”吸引了无数怀揣梦想的年轻人放弃故土,历经千辛万苦来到美国,希望在这片“公平公正”的土地创造自己的价值。然而,美国社会严重的贫富分化、种族歧视和阶层固化等现实不断戳破这一幻象。人们发现,在这个金钱至上的社会里,那些通过个人奋斗实现阶层跃升和物质富足的成功案例,不过是被无限放大的“幸存者偏差”。“美国梦”是裹着糖衣的认知操控工具,是美国价值观输出的鲜亮包装。美国全国广播公司和益普索民调机构2024年1月公布的民调结果显示,只有不到四分之一的美国人认为“美国梦”仍存在。(三)言论自由言论自由也是美式价值观的重要招牌之一。尽管“言论自由”被明确写入美国宪法修正案,但在现实中,政党纷争、集团利益却在不断假言论自由之名,行损坏言论自由之实。美国民众没有感到真实的言论自由,并且日益看穿和厌倦政客们虚伪的口号和许诺。美国奈特基金会2022年发布《2020年后美国的言论自由》调查报告,被评为“代表了现有关于言论自由最全面的民意研究”。这份报告指出,政治极化和政党纷争已严重削弱美国的言论自由,在政治议题上体现得尤为明显。2022年3月,《纽约时报》发表社论《美国存在言论自由问题》,指出美国社会正陷入左派和右派相互攻击的循环怪圈,美国的言论自由已是明日黄花。在国际上,美国经常打着“言论自由”的幌子操控国际舆论,为其对外政策增添“合理性”和“道德感”。利用言论自由大搞双重标准,释放烟雾弹,声称其他国家散布“虚假信息”,而自己则发布各种真正基于虚假信息的歪曲抹黑报告。2022年5月4日,美国共和党联邦参议员兰德·保罗在国会听证会上表示:“你知道谁是世界历史上最大的虚假信息传播者吗?美国政府。”2.4传播体系:多重渠道立体灌输凭借先进的全球新闻信息传播体系,美国全时空、全天候地向全世界散布美国的价值理念和意识形态,使美国的思想殖民无孔不入、无远弗届。(一)传统新闻媒体机构建国以来,美国培育出一批历史悠久、实力强大、影响广泛的新闻媒体品牌。美联社、纽约时报、华盛顿邮报、华尔街日报、美国三大电视网、美国有线电视新闻网、福克斯新闻网等媒体都是国际舆论场举足轻重的角色。今天,全球传播格局历经多次重大演变,美国国内媒体格局也几度洗牌,但这些老牌媒体依然影响力不减,是美国设置国际议题、引导国际舆论的有效工具。在重大国际事件传播中,美国媒体利用同政府和军方的亲近关系,往往能率先获得、甚至独家垄断消息源,赢得传播优势。(二)跨国文化传媒集团美国还有一大批业务广泛、资本雄厚、影响强大的超大型跨国综合性传媒集团,控制着全球出版、影视、娱乐等文化产品生产和传播,是美国思想殖民的重要工具。1996年美国修改《电信法》放松媒体所有权管制,媒体行业出现大规模收购和兼并浪潮,资源迅速集中到几家大型集团手中。近30年后,美国90%的传媒公司被通用电气、新闻集团、迪士尼、维亚康姆、时代华纳和哥伦比亚广播公司这6大传媒集团控制。这些大型媒体集团依靠强大资金实力,实现了对信息采集、内容制作、分发传输到广告营销的全链条控制,其所掌握的媒体资源覆盖电视、报纸、广播、印刷、影视、流媒体等领域,坐拥全球庞大用户群体。(三)互联网新传播平台美国的传播优势还进一步体现在对基于互联网的传播媒介、平台和公司的把控上。美国通过对全球互联网根服务器、全球域名等资源的控制,主导着全球国际互联网的整体运行。通过法律等多种手段,美国政府牢牢把控本土互联网科技巨头,掌握着海量网络信息的“生杀大权”。脸书、X、优兔、照片墙等全球最受欢迎的社交媒体平台,为美国用算法和谎言编织信息茧房、塑造用户认知提供了新空间新便利。据美国南加州大学的一份报告显示,在X平台上,有9%—15%的活跃用户是社交机器人,制造和传播大量虚假信息。2.5内容体系:多种形态隐性渗透美国资本在全球各地组建跨国企业、掌握学术机构、操控媒体集团,把美国生活方式、价值理念、审美标准植入各种文化产品中推向全世界。(一)创造流行文化“吸引大众”通过构建流行文化产业链,美国将意识形态渗透融入娱乐消费,形成覆盖影视、游戏、商业品牌的大众文娱网络。二战时期美国战时信息局负责人埃尔默·戴维斯指出:“将宣传思想注入大多数人头脑的最简单途径,是让这一思想以娱乐电影为媒介,在人们尚未意识到自己已成为被宣传对象时达到宣传目的”。为使美国民众支持参战,罗斯福总统任命了美国政府与电影界间的协调员,以便美国政府直接介入好莱坞电影的制作,并不断加强对电影内容的监管和指导。二战结束后,美国借助“马歇尔计划”,利用好莱坞电影在德国、意大利等国进行意识形态传播;在法国、英国等战胜国,以经济援助为条件,强迫其开放本国电影市场,协助好莱坞电影占领当地市场。在此后长达几十年的时间里,占据世界70%以上份额的美国电影一直是其思想殖民的重要手段。众多以“英雄主义”为内核的电影将美国塑造为“世界秩序捍卫者”的“正义形象”,引导观众对美国军事力量产生敬畏感。“9·11”事件之后,好莱坞电影又成为美国反恐战争宣传利器,好莱坞和军方甚至结成了互惠互利、各取所需的“军事—娱乐”复合体。随着数字技术的发展,电子游戏也成为美国操纵思想的重要工具。由美国军方主导、耗资超3000万美元打造的《美国陆军》系列游戏,以模拟军事实战为核心玩法,吸引全球约2000万游戏玩家。这种“淡化战争残酷本质、将军事与娱乐界限模糊化”的叙事模式,使玩家在娱乐中接受“美军行动天然正义”的预设。此外,变形金刚等玩具IP通过影视联动构建“正义对抗邪恶”的叙事框架,宣扬美国价值观优越性;可口可乐、麦当劳等品牌则以“美式生活”为载体,通过全球化扩张消解本土文化认同。(二)主导学术教育“培育精英”为了推动美国思想在全球各地落地生根,美国凭借自身在各个学科发展中的领先地位,通过教育培训、学术交流、研究资助、教师派遣等方式,向不同国家和地区的知识精英传播和灌输西方知识体系和文化精神,在精英人群中培育起数量众多、分布广泛的“亲美”群体。美国很早就把文化交流作为“对外政策的第四维”。从1948年开始,美国政府就花费巨资推出“富布赖特项目”,资助世界各国的大学生、学者、文化精英和学术团体到美国学习、访问和研究,被视为“对美国国家长远利益投资的典范”。到20世纪末,该项目资助的各国学者已超过25万人,覆盖140多个国家和地区。许多人回到本国后进入政府、议会、高校和军队等担任要职,大力传播美国的文化意识形态,甚至成为当地反对派的中坚力量。美国还长期把持学术理论建构和评价指标制定,全面诱导各国知识精英“向西看”“向西学”,跟着西方走。冷战结束前后,在国际垄断资本助推下,美国不断向国际社会输出后工业主义理论、货币主义理论、“休克疗法”等理论,误导苏联等国经济走向崩溃。今天,美国及其盟国仍然控制着世界顶级核心期刊名录、世界大学学科排名的话语权,以西方标准主导全球知识生产体系。(三)操控话语叙事“自我美化”自我美化和污蔑他者,是美国思想殖民中最为常见的两套话语叙事。对待自我和对待他者坚持“双重标准”,则是思想殖民最重要的叙事逻辑之一。自我美化 。通过话语操控,美国在自己的历史中植入了许多完美“神话”。在美国重要的教学纪录片《美国:我们的故事》里,北美大陆被描绘成“充满机遇的终极之地”和“一块蕴藏着巨大未开发财富的大陆”,而第一批殖民者则是“勇敢无畏的先锋与开拓者”,他们“为争取自由而斗争,将梦想变为现实,用奋斗造就一个国家”。但硬币的另一面,殖民暴行、战争罪行和种族灭绝,统统被淹没在这“光鲜亮丽”的叙事中。话语操纵还为美国全球扩张定制出漂亮借口。19世纪末20世纪初,在世界列强磨刀霍霍瓜分中国之时,美国提出“门户开放”政策,要求“所有国家在中国享有平等的商业和工业贸易权”,把追逐远东霸权的战略隐藏在冠冕堂皇的道义旗帜之下,让其他列强甚至中国当局都无法从根本上予以拒绝。“门户开放”把美国自身的外交政策上升到“国际道义”的高度,是其通过话语建构维护自身利益的典型例证。污名他者 。美国操控的话语工具还对“他者”展开污名化叙事,建构野蛮、专制、集权与亟待拯救的反面形象。冷战期间,为了从制度上否定苏联领导的社会主义阵营,美国称共产主义为“红色殖民主义”,贬斥苏联为“世界战争的贩子”,给古巴贴上“极权国家”“警察国家”“流氓国家”“支持恐怖主义国家”等标签。冷战后,美国继续渲染意识形态对立,构建“民主—威权”的对立叙事,将非西方制度的国家尤其是社会主义国家描绘成“压制自由”“侵犯人权”的“专制政权”,对伊朗、伊拉克和朝鲜冠以“邪恶轴心”称谓,将中国的和平发展污名化为对“基于规则(实为美国主导的)的国际秩序”的“威胁”。双重标准 。用“双重标准”解释和处理国际问题,是美国最为典型的政治策略之一,也是美国思想殖民中最重要的叙事逻辑。比较典型的案例是,美国自己拒绝加入《联合国海洋法公约》,却指责他国违反公约;自己拒绝签署多项人权条约,却对各国人权事务指手画脚;自己肆无忌惮地利用技术优势监控全球,却把“危害网络安全”的帽子扣到他国头上;自己放松监管酿成金融和经济危机,却对外转嫁后果与责任。这些双重标准的所作所为,已为国际社会所洞悉。2.6技术体系:数字霸权操控认知从无线电波、模拟信号到数字互联网,直至当前人工智能引领的新一轮传播革命,美国始终凭借其对先进传播技术的垄断优势,用“硬实力”巩固“软权力”,用技术霸权推进思想殖民。(一)垄断通信基建美国及其盟友长期垄断全球核心通信基础设施,构建了覆盖全球的信息传输骨架,成为操控全球信息流、实施思想殖民的物理基础。1920年,美国发起并主办第一次世界大战后的首次无线电国际传播会议,开始主导无线电通信领域技术标准和话语权。此后,美国及其盟友一直掌握现代通信技术先发优势,建设、运营和掌控着全球主要的通信卫星、海底电缆与陆地光纤等通信基础设施。近年来,在美国政府的大力支持下,其商业代理太空探索技术公司(SpaceX)计划在太空搭建由约1.2万颗卫星组成的“星链”网络以提供互联网服务,实现由美国技术主导的新一代“全球卫星互联网通信系统”。凭借在基础设施领域的垄断地位,美国选择性切断或干扰目标国家与国际社会的信息通道,塑造对其有利的单一叙事环境,压制异己声音。1999年,北约未经联合国安理会批准对南联盟悍然发动袭击。其间,为阻断南联盟的国际发声渠道,美国向欧洲通信卫星有限公司(Eutelsat)施压,令其停止传输塞尔维亚广播电视(RTS)的卫星节目,随后以色列的阿莫斯一号卫星也停止播出南联盟电视信号。在近年俄乌冲突中,美国也凭借对各类通信基础设施的掌控权,一边对俄罗斯媒体“全面封杀”,一边利用“星链”卫星保障乌方对外发声,引导全球舆论走向。这种对通信渠道的强力控制,是美国思想殖民得以实施的关键保障。(二)挟制社交平台社交媒体与数字平台的兴起,打破了大众传播的传统模式,也开辟了美国思想殖民的新领域。凭借谷歌、元宇宙、X等数字巨头的垄断地位,美国牢牢控制着全球网络空间的关键话语平台。这些平台以算法技术为底层运行逻辑,能够基于海量用户行为数据进行精准画像和深度分析,从而实现内容的个性化推送。这一特性在提高信息分发效率的同时,更被美国战略性地用于定向传播其价值观与意识形态、引导甚至操控国际舆论、塑造特定群体认知,服务于其思想殖民的整体目标。2022年斯坦福大学与社交媒体分析公司格拉菲卡(Graphika)联合发布的一项研究发现,在多个社交媒体平台上,存在冒充独立媒体或虚构人物的账号网络,通过欺骗性宣传手段在中东、中亚等地区传播亲美叙事,并对俄罗斯、中国、伊朗等国进行舆论攻击。与此同时,为了保持“单向输出”模式,防范“敌对思想”反扑,美国还以无差别限流、内容审查、封禁账号等方式,对目标国家的媒体及个人账号进行围堵噤声。2023年,X平台就曾被揭露每天都会收到美国联邦调查局、中央情报局等政府机构提供的封禁名单,并以“传播负面信息”为由封禁大量所谓“由他国政府主导”的社交账号。(三)垄断认知科技面对未来竞争,美国正积极将人工智能、生物技术等前沿认知科技纳入思想殖民的战略体系,并不断推进其军事化进程,以巩固并增强自身在思想领域的强势地位,抢占人类认知竞争的制高点。在人工智能领域,美国前后启动并拉拢盟友参与算法战项目,并与谷歌等科技企业建立合作,以人工智能算法支撑智能化认知战;在生物科技领域,美国及其盟友加快推进神经科学和技术研究,大规模开展植入芯片的脑控实验,企图实现对敌方人员的认知干预与行为控制,为更深层次的认知操控奠定基础。同时,美国还频频将技术问题高度政治化、武器化、意识形态化,通过“芯片联盟”“清洁网络计划”等构建排他性的科技“小圈子”,构筑起新型技术霸权。2021年发布的《关于美国供应链的行政令》规定,将以“共同价值观为前提,加强与盟友在供应链弹性方面的合作”,并“强化对供应链的安全审查”。同年,美国人工智能国家安全委员会提出建立新兴技术联盟,以抵御所谓技术恶意使用和“数字威权国家”的影响。这些计划或行动以维护“共同安全”“共同利益”为幌子,实则是美国凭借自身技术优势对其他国家实施的系统性技术封锁与打压,意图垄断未来认知塑造的技术制高点和规则制定权,为其长久的思想殖民打造坚固的“护城河”。第三章 美国思想殖民的影响危害文化思想的传播交流,有助于推广进步的理念、知识和技术。不可否认,美国的思想文化与意识形态在一定时空条件下具有开创性、进步性,对人类社会发展起到过积极作用,但纵观美国历史、统观美国言行,始终无法摆脱丑陋而腐朽的“殖民主义”内核,给世界各国带来的灾难无法计数。3.1侵蚀意识形态,颠覆他国政权意识形态入侵是美国思想殖民的重要方式。美国善于在敌对国家植入美式价值理念,达到瓦解共识、扰乱人心、制造分裂,直至和平演变、颠覆政权的目的。针对苏联的和平演变就是从思想渗透开始的。美国通过电影、电视、广播、书籍等媒介,将资产阶级的民主、自由、平等、人权等观念灌输给前苏联民众。苏联年轻一代和知识分子阶层逐步接受西方价值观和生活方式,社会内部凝聚力受到严重侵蚀。同时,美国还支持和资助苏联境内的反对派力量,包括政治异见者、知识分子和文化精英等,为他们提供资金、庇护和宣传平台,帮助他们在苏联内部建立反对阵营。这些反对派力量通过出版书籍、发表文章、组织集会等方式,丑化苏联党政形象、黑化苏联历史,令人民失去精神依托。美国还通过各种渠道接触、游说甚至贿赂苏联高层官员和知识分子,改变他们的政治立场和价值观,使他们开始怀疑并批判社会主义制度,逐渐转向支持西方的民主和自由价值观。特别是戈尔巴乔夫上台后,提出一系列改革措施,包括政治多元化、经济市场化、思想自由化等。然而,这些改革措施不仅没能帮助苏联走出困境,反而加速了内部分裂和动荡,最终导致苏联走向分裂和解体。尝到了思想殖民“不战而胜”的甜头后,美国越发肆无忌惮、变本加厉。美国作家威廉·布鲁姆在《民主:美国最致命的输出艺术》中指出,二战结束以来,美国试图推翻50多个外国政府,粗暴干涉至少30个国家的选举。莫斯科国立大学政治学系教授安德烈·马诺伊洛认为,因“颜色革命”引发政变后,民众可能会对掌权的傀儡存有幻想,将其视为“改革者”和“英雄”。但幻想终会幻灭,国家将继续陷入政府倒台、经济凋敝、治安恶化等交织的“宿命”,不断走向衰败和瓦解。3.2嵌入认知楔子,挑拨地缘冲突出于地缘外交目标需要,美国经常在不同利益群体间散布政治谎言、嵌入“认知楔子”,或挑唆对立、煽动分裂,或制造冲突、坐收渔利,甚至亲自下场、教训“不听话”的对手。为除掉眼中钉萨达姆政权,美国鼓噪、捏造伊拉克拥有“大规模杀伤性武器”。2003年美军对伊拉克发动军事行动之前,纽约时报、华盛顿邮报、美国有线电视新闻网等媒体,就萨达姆政权拥有“大规模杀伤性武器”这一议题实施了数月的舆论轰炸,迫使联合国派遣武器核查专家团队前往伊拉克开展调查,却没有找到任何证据。随后,2003年2月5日,美国时任国务卿科林·鲍威尔却在纽约联合国安理会进行了一场举世瞩目的“表演”:他举起一管小小的玻璃瓶,郑重其事地告诉全世界,瓶内的白色粉末就是伊拉克拥有的可以引发核爆般恐慌的“炭疽”。就这样,凭借煽动人心的画面、不容置疑的强硬口吻和伪造加工的情报,美国将“萨达姆藏着大规模杀伤性武器”塑造为“共识”,并以此作为军事行动依据。然而,推翻萨达姆政权后的美军掘地三尺,也没有找到任何蛛丝马迹,战后一年美国才通过报告公布伊拉克并没有“大规模杀伤性武器”。嵌入“认知楔子”愚弄国际社会、谋一己之私,是美国的惯用伎俩。近年曝光的证据显示,美国中央情报局、美国国际开发署、美国国际媒体署、美国国家民主基金会是炮制这类“认知楔子”的重要操盘手。在“国际合作”“对外援助”“媒体交流”“文化推广”等旗号掩盖下,这些机构在海外大量开展“灰色”甚至“黑色”行动,用虚假信息误导公众认知。3.3摧毁精神独立,培育亲美势力受美国长期思想殖民影响,一些发展中国家精英群体被成功“洗脑”,丧失精神独立、丧失民族自信,出现“文化驯服”症,内心“崇美”、言语“媚美”、行事“畏美”。他们在物质、精神、情感上同美国保持密切联系,对美国有莫名的崇拜。他们视美国为标准和榜样,主张全盘接受美式价值观,接受美式政治经济制度,走美国化的发展道路,言必称美国,唯美国马首是瞻,甚至丧失基本的人格国格。前些年,美国在世界各地轮番上演和平演变、颜色革命甚至武力颠覆他国政权的戏码,离不开这些人的“献媚”“带路”。一些国家长期深受思想殖民危害,将美国霸权默认为“强者特权”,对美国价值观形成了“接受服从”的奴性,对美国霸道霸凌行径形成了“隐忍退让”的惯性,以为妥协、让步、顺从就可以换来美国的“仁慈”。2025年初,美国在全球发起所谓“对等关税”战,面对特朗普政府的公然霸凌和赤裸裸的恐吓,一些国家不战而降。究其思想根源,仍是长期顺从形成的“畏美”心态。3.4强植西式道路,干扰自主发展在经济发展领域,美国常常披着学术外衣、打着“科学”旗号,在广大发展中国家强行植入源自美西方的学术思想,导致这些国家难以找到适合国情的独立自主发展道路,甚至走入万劫难复的发展陷阱。从上世纪七八十年代起,针对全球性的经济发展难题,美国鼓吹“新自由主义”理论,炮制出“华盛顿共识”,强调自由化、市场化、私有化,否定公有制、社会主义和国家干预。为了推销这套理论,世界银行和国际货币基金组织以绑定贷款为筹码,通过签署协议的方式,胁迫众多拉丁美洲国家、前苏联加盟共和国、中东国家接受并实施这一系列理论,把这些国家推上美式发展道路。实践证明,这套以美西方国家国情为底色的政治经济理论,在广大发展中国家“水土不服”。例如,智利在20世纪70年代全盘接受新自由主义经济政策,从此陷入严重的通胀和贸易失衡,国内生产总值大幅下跌,工业产能迅速萎缩,比索大幅贬值,数以万计的国有企业职工失去工作,私营银行体系则彻底崩溃。清华大学世界经济学者朱安东研究认为,政治化、范式化的新自由主义是美西方国际垄断资本推行全球一体化理论体系的重要组成部分,其目的是适应资本主义由国家垄断向国际垄断发展的需要、维护美国和美国企业的利益,而接受美国新自由主义经济思想的国家则成为输家。3.5瓦解文化自信,加剧文明冲突思想殖民在全球灌输对美国文化的迷信、瓦解本土文化自信,消解目标国家的主体文化,侵蚀全球文明多样性,加剧不同文明间的对立和冲突。文化失语 。在美式文明长期冲击下,一些发展中国家民族主体意识失落、民族虚无主义泛滥、民族自豪感丧失,从精英阶层到普通民众,从思想观念到衣食住行,处处效仿美西方,甚至唯洋是从。这就是许多学者描述的“后殖民失语症”现象。在学术生产领域,这种失语现象表现为对西方理论范式的深度依附。剑桥大学2023年的研究数据显示,全球排名前100的大学中仅有12%的课程包含非西方知识体系。这种学术单极格局导致广大全球南方国家的学者被迫采用西方理论框架解释本土现象,形成严重的学术失语症。印度学者帕尔塔·查特吉曾尖锐指出:“我们印度知识分子犹如学术买办,将欧洲理论进口到本土经验中加工,再出口给西方学术市场。”这种知识生产模式不仅使本土智慧被边缘化,更强化了西方中心主义的知识等级制。文化植入 。20世纪70年代以来,美国在非洲地区持续推进“人权外交”,试图在非洲“植入”民主文化,从思想根源上影响非洲。然而,美国所推行的“普遍人权”以保护公民政治权利为中心,与非洲国家整体贫穷的现实格格不入,并且同非洲“集体主义”价值存在根本冲突。“普遍人权”不仅造成非洲多国政治混乱,更冲击了当地价值体系,阻碍了非洲本土人权话语的发展。非洲学者指出,美国移植的人权文化隐含着让非洲人变成西方人的期望。文化清洗 。美国针对印第安人开展的文化清洗,几乎将印第安原住民从美国记忆中“彻底清除”。历史上,美国通过屠杀、驱赶、绝育、强制同化等手段对印第安人实行种族灭绝,导致印第安人数量从1492年的500万锐减到20世纪初的25万。美国原住民群体长期受到忽视和歧视,印第安人的文化受到根本性破坏,生命和精神的代际存续受到严重威胁。今天,有关美国原住民的信息在美国主流媒体和流行文化中被系统性地清除。据美国土著教育组织报告,87%的州级历史教材不涉及1900年以后的土著历史。史密森学会等撰文称,美国学校里讲授的有关印第安人的内容充斥不正确的信息,未如实描述原住民的遭遇。美国前共和党联邦参议员桑托勒姆竟公开宣称,“美国是一个从零诞生的国家,之前这里几乎什么都没有……说实话,美国文化中几乎不包含美国原住民文化”。文明冲突 。在思想殖民过程中,美国总是在有意无意间将复杂的全球文明多样性简化为“自我”与“他者”,并将“自我”置于优越位置,对他者采取“俯视”态度。这是其根深蒂固的“白人至上论”“美国中心论”和“文明等级论”思想的流露。出于维护地缘利益的需要,美国还经常将不同文明间的正常差异塑造为根本性、不可调和的价值冲突,甚至刻意挑动不同宗教、民族和地域间的矛盾,最终将世界纳入其预设的、以美国价值为圭臬的冲突性秩序框架之中,持续制造并管理全球范围的“文明断层线”。世纪之交,以美国为首的北约空袭南联盟,战争洪流改变了上百万人的生活轨迹,使得民族矛盾尖锐到无法调和。塞尔维亚历史学家古季奇说,在那个美西方眼中“不民主”的社会主义南斯拉夫时期,塞族人和阿族人能够相互理解,几乎没有沟通障碍,而在美国引入西方民主的25年后,在美国人热心“帮助”下,塞族人和阿族人彻底中断了交流,文明隔阂进一步加剧。结语:打破思想殖民枷锁 推动文明交流互鉴近年来,全球南方国家加速觉醒,打破美国思想殖民枷锁、实现精神独立自主、推动文明交流互鉴的呼声一浪高过一浪。作为全球南方国家中的重要一员,中国基于自身发展经验和各国人民共同心声,提出了全球发展倡议、全球安全倡议、全球文明倡议、全球治理倡议等系列主张,为各国打破价值迷信、摆脱思想依附、走上独立自主发展道路提供了新思路和新方案。精神独立是自主发展的前提 。广大发展中国家只有深刻认识美国思想殖民的危害,才能破除对美国价值观的迷信;只有摆脱对美西方的思想依附,才能实现精神上的独立自主;只有彻底挣脱美西方精神枷锁,才能开辟本国文明发展新路。文化自信是民族强盛的根基 。无论是发展中国家,还是发达国家,都要增强民族文化自信、历史自信、发展自信。文化自信是更基础、更广泛、更深厚的自信,是一个国家、一个民族发展中最基本、最深沉、最持久的力量。有文化自信的民族,才能立得住、站得稳、行得远。交流互鉴是文明共生的法宝 。任何文明都不是遗世独立的孤岛,不同文明只有交流互鉴、取长补短,才能持续向前演进。每个国家和民族的文明都是独特的,都有自己存在的价值,各有千秋也各有不足。鼓噪“文明优越”、认为自己的文明高人一等,是对其他文明的不尊重,只会阻碍人类文明进步的整体步伐。要以文明交融取代文明冲突,以交流互鉴消弭对抗坚冰。历史经验一再证明,任何强加于人的思想模板、文明标准都终将破产,任何操弄他人认知、控制他人头脑的图谋都注定失败。时代车轮滚滚向前,势不可当。当思想殖民的枷锁彻底粉碎,文明互鉴的星火燎原成炬,一个多元共生的世界文明新形态,必将破茧而出!一个全人类休戚与共的命运共同体,必将绽放出更璀璨的光芒!编写说明与致谢《思想殖民——美国认知战的手段、根源及国际危害》智库报告由新华社社长、新华社国家高端智库学术委员会主任傅华任组长,新华社总编辑、新华社国家高端智库学术委员会副主任吕岩松任副组长,新华社副总编辑、新华社国家高端智库学术委员会执行副主任任卫东任执行副组长。课题组成员包括刘刚、薛颖、文建、陈怡、李飞虎、李雪笛、李成、陈谊娜、何小凡、马倩、靳博文等。报告英文核校人员包括杨晴川、王海清、黄尹甲子、陈健。课题于2025年1月启动,历时半年多完成采访、调研、撰写、修改、审校工作。在此期间,课题组围绕美国对外政策演进、思想文化发展、国际传播战略等深入研究,组织相关海内外分社展开实地调研,并与相关部委建立联系,重点采访了中国科学院、军事科学院、中国现代国际关系研究院等机构的知名专家学者,广泛走访国内大型科技企业,全方位摸清美国对全球施行思想殖民的历史和现实。报告撰写过程中,课题组还多次组织研讨会,邀请相关领域的学者及业界专家就具体议题进行研讨,听取意见建议。在报告写作和发布过程中,中国社会科学院和平发展研究所所长王鸿刚、北京大学新闻传播学院院长陈刚、中国现代国际关系研究院美国所副所长张文宗、中国社会科学院大学副校长姜飞、国际关系学院战略传播研究中心主任纪忠慧等专家学者给予了多方面的帮助和指导,在此一并表示诚挚谢意。
-
使用DeepSeek AI大模型修复博客主题两处BUG 我使用的是Joe主题,项目地址https://github.com/HaoOuBa/Joe,近期将网站程序从AppNode更换为1Panel后,观察到博客存在两个错误日志报错1 2025/08/20 11:36:35 [error] 105#105: *114111 FastCGI sent in stderr: "PHP message: PHP Notice: Undefined variable: fontFormat in /www/sites/90apt.com/index/usr/themes/Joe/public/config.php on line 32" while reading response header from upstream, client: 127.0.0.1, server: 90apt.com, request: "GET /5089 HTTP/1.1", upstream: "fastcgi://127.0.0.1:9000", host: "90apt.com", referrer: 报错2 2025/08/20 14:26:50 [error] 105#105: *116889 FastCGI sent in stderr: "PHP message: PHP Fatal error: Uncaught Typecho\Db\Adapter\SQLException: SQLSTATE[42000]: Syntax error or access violation: 1064 You have an error in your SQL syntax; check the manual that corresponds to your MySQL server version for the right syntax to use near 'DESC LIMIT 8 OFFSET 0' at line 1 in /www/sites/90apt.com/index/var/Typecho/Db/Adapter/Pdo.php:111Stack trace: #0 /www/sites/90apt.com/index/var/Typecho/Db.php(391): Typecho\Db\Adapter\Pdo->query() #1 /www/sites/90apt.com/index/var/Typecho/Db.php(424): Typecho\Db->query() #2 /www/sites/90apt.com/index/usr/themes/Joe/core/route.php(381): Typecho\Db->fetchAll() #3 /www/sites/90apt.com/index/usr/themes/Joe/core/core.php(70): _getArticleFiling() #4 /www/sites/90apt.com/index/var/Widget/Archive.php(752): themeInit() #5 /www/sites/90apt.com/index/var/Typecho/Widget.php(155): Widget\Archive->execute() #6 /www/sites/90apt.com/index/var/Typecho/Widget.php(209): Typecho\Widget::widget() #7 /www/sites/90apt.com/index/var/Widget/ExceptionHandle.php(2" while reading response header from upstream,报错1 AI判断修复错误解释 这是一个 PHP Notice(通知) 级别的错误,具体原因是: 错误信息:Undefined variable: fontFormat 含义:在代码中使用了一个名为 $fontFormat 的变量,但这个变量在使用之前并没有被定义(即没有赋值)。 发生位置:在文件 /www/sites/90apt.com/index/usr/themes/Joe/public/config.php 的第 32 行。 简单来说,PHP 引擎在执行到第32行时,发现代码想要读取 $fontFormat 的值,但它完全不知道这个变量是什么,因为它从未被创建过,所以抛出了一个通知(Notice)。 在您提供的代码中,我发现了可能导致 Notice 错误的根源。问题出现在 $fontFormat 变量的使用上。 问题分析 在您的代码中,$fontFormat 变量是通过一系列条件判断来赋值的: php <?php $fontUrl = $this->options->JCustomFont; if (strpos($fontUrl, 'woff2') !== false) $fontFormat = 'woff2'; elseif (strpos($fontUrl, 'woff') !== false) $fontFormat = 'woff'; elseif (strpos($fontUrl, 'ttf') !== false) $fontFormat = 'truetype'; elseif (strpos($fontUrl, 'eot') !== false) $fontFormat = 'embedded-opentype'; elseif (strpos($fontUrl, 'svg') !== false) $fontFormat = 'svg'; ?> 问题是:如果 $fontUrl 不包含任何这些扩展名,或者为空,$fontFormat 变量将不会被定义。然后在 CSS 部分: php <?php if ($fontFormat) : ?>src: url('<?php echo $fontUrl ?>') format('<?php echo $fontFormat ?>'); <?php endif; ?> 这里直接使用了 $fontFormat 变量,但没有确保它已经被定义。 解决方案 方案1:初始化变量(推荐) 在条件判断之前先初始化变量: php <?php $fontUrl = $this->options->JCustomFont; $fontFormat = ''; // 初始化变量 if (strpos($fontUrl, 'woff2') !== false) $fontFormat = 'woff2'; elseif (strpos($fontUrl, 'woff') !== false) $fontFormat = 'woff'; elseif (strpos($fontUrl, 'ttf') !== false) $fontFormat = 'truetype'; elseif (strpos($fontUrl, 'eot') !== false) $fontFormat = 'embedded-opentype'; elseif (strpos($fontUrl, 'svg') !== false) $fontFormat = 'svg'; ?> 方案2:使用 isset() 检查 修改 CSS 部分的条件判断: php <?php if (isset($fontFormat) && $fontFormat) : ?>src: url('<?php echo $fontUrl ?>') format('<?php echo $fontFormat ?>'); <?php endif; ?>报错2 AI判断修复这个错误是 SQL 语法错误,具体原因是你的 SQL 查询语句中缺少了 ORDER BY 子句所需的列名。错误信息显示: sql DESC LIMIT 8 OFFSET 0 MySQL 期望在 DESC 前有一个具体的列名(例如 ORDER BY created DESC),但当前查询中直接使用了 DESC,导致语法错误。 这个错误是由于在_getArticleFiling函数中的SQL查询语法问题导致的。具体来说,问题出现在第381行附近的SQL语句中,其中GROUP BY子句后面直接使用了DESC,而没有指定排序的列名。 以下是修复方案: 找到这个有问题的SQL语句: php $sql = "SELECT FROM_UNIXTIME(created, '%Y 年 %m 月') as date FROM `{$prefix}contents` WHERE created < {$time} AND (password is NULL or password = '') AND status = 'publish' AND type = 'post' GROUP BY FROM_UNIXTIME(created, '%Y 年 %m 月') DESC LIMIT {$pageSize} OFFSET {$offset}"; 将其修改为: php $sql = "SELECT FROM_UNIXTIME(created, '%Y 年 %m 月') as date FROM `{$prefix}contents` WHERE created < {$time} AND (password is NULL or password = '') AND status = 'publish' AND type = 'post' GROUP BY date ORDER BY date DESC LIMIT {$pageSize} OFFSET {$offset}"; 主要修改点: 将GROUP BY FROM_UNIXTIME(created, '%Y 年 %m 月') DESC改为GROUP BY date ORDER BY date DESC 使用别名date进行分组和排序,这样更清晰且符合SQL语法小结 不懂代码的小白也能修复BUG,AI无敌
-
python3 zabbix API tokens连接,通过键值key读取数据 程序完全由deepseek编写 https://chat.deepseek.com/本次提供两个版本,一个全面查询版,一个极简版1、全面查询版import requests import json import datetime import sys from urllib3 import disable_warnings from urllib3.exceptions import InsecureRequestWarning # 禁用 SSL 警告(仅用于自签名证书) disable_warnings(InsecureRequestWarning) class ZabbixAPI: def __init__(self, url, api_token): self.url = url self.api_token = api_token self.headers = {"Content-Type": "application/json-rpc"} def _make_request(self, method, params): """发送 API 请求""" payload = { "jsonrpc": "2.0", "method": method, "params": params, "auth": self.api_token, "id": 1 } try: response = requests.post( self.url, data=json.dumps(payload), headers=self.headers, verify=False # 生产环境应使用有效证书并改为 True ) response.raise_for_status() result = response.json() if "error" in result: error_msg = result["error"]["data"] raise Exception(f"API 错误: {error_msg}") return result.get("result", []) except requests.exceptions.RequestException as e: raise Exception(f"请求失败: {e}") def get_items_by_key(self, key, host=None): """通过键值获取监控项列表""" params = { "output": ["itemid", "name", "key_", "hostid", "value_type"], "search": {"key_": key}, "selectHosts": ["host"], } # 如果指定了主机名,添加主机过滤 if host: params["search"]["host"] = host items = self._make_request("item.get", params) # 整理结果格式 formatted_items = [] for item in items: host_name = item["hosts"][0]["host"] if item.get("hosts") else "未知主机" formatted_items.append({ "itemid": item["itemid"], "name": item["name"], "key": item["key_"], "hostid": item["hostid"], "host": host_name, "value_type": item["value_type"] }) return formatted_items def get_latest_item_value(self, item_id): """获取指定监控项的最新数值""" params = { "output": ["itemid", "value", "clock"], "itemids": item_id, "sortfield": "clock", "sortorder": "DESC", "limit": 1 } history_data = self._make_request("history.get", params) return history_data[0] if history_data else None def display_items(items): """显示监控项列表""" if not items: print("未找到匹配的监控项") return print("\n找到以下监控项:") print("-" * 80) print(f"{'序号':<5} | {'主机':<20} | {'监控项名称':<30} | {'键值':<30}") print("-" * 80) for idx, item in enumerate(items, 1): print(f"{idx:<5} | {item['host'][:20]:<20} | {item['name'][:30]:<30} | {item['key'][:30]:<30}") print("-" * 80) def main(): # 配置信息 ZABBIX_URL = "https://your-zabbix-server/zabbix/api_jsonrpc.php" API_TOKEN = "your_api_token_here" # 替换为你的 API Token # 创建 API 客户端 zabbix = ZabbixAPI(ZABBIX_URL, API_TOKEN) print("=" * 60) print("Zabbix 监控项数据查询工具 (通过键值查询)") print("=" * 60) # 获取用户输入的键值 key = input("请输入要查询的键值 (如 'system.cpu.util[,idle]'): ").strip() if not key: print("错误:键值不能为空") return # 可选:指定主机名 host_filter = input("可选:输入主机名进行过滤 (直接回车跳过): ").strip() or None # 搜索监控项 print(f"\n搜索键值 '{key}'...") items = zabbix.get_items_by_key(key, host_filter) if not items: print(f"未找到匹配键值 '{key}' 的监控项") return display_items(items) # 如果只有一个监控项,直接显示结果 if len(items) == 1: selected_item = items[0] else: # 让用户选择监控项 while True: try: choice = input("\n请输入要查询的监控项序号 (输入 'q' 退出): ").strip() if choice.lower() == 'q': print("程序已退出") return choice_idx = int(choice) - 1 if 0 <= choice_idx < len(items): selected_item = items[choice_idx] break else: print(f"错误:请输入 1-{len(items)} 之间的数字") except ValueError: print("错误:请输入有效的数字") # 获取最新数值 print(f"\n获取监控项 '{selected_item['name']}' 的最新数据...") item_value = zabbix.get_latest_item_value(selected_item["itemid"]) if not item_value: print(f"警告:监控项 {selected_item['itemid']} 没有可用数据") return # 转换时间戳为可读格式 timestamp = int(item_value["clock"]) last_check = datetime.datetime.fromtimestamp(timestamp) # 输出结果 print("\n" + "=" * 60) print(f"主机: {selected_item['host']}") print(f"监控项 ID: {selected_item['itemid']}") print(f"监控项名称: {selected_item['name']}") print(f"键值: {selected_item['key']}") print(f"最新数值: {item_value['value']}") print(f"最后检查时间: {last_check.strftime('%Y-%m-%d %H:%M:%S')}") print(f"原始时间戳: {timestamp}") print("=" * 60) if __name__ == "__main__": try: main() except KeyboardInterrupt: print("\n程序被用户中断") sys.exit(0) except Exception as e: print(f"\n发生错误: {e}") sys.exit(1)运行效果============================================================ Zabbix 监控项数据查询工具 (通过键值查询) ============================================================ 请输入要查询的键值 (如 'system.cpu.util[,idle]'): wendu 可选:输入主机名进行过滤 (直接回车跳过): donghuanxitong 搜索键值 'wendu'... 找到以下监控项: -------------------------------------------------------------------------------- 序号 | 主机 | 监控项名称 | 键值 -------------------------------------------------------------------------------- 1 | donghuanxitong | 机房温度 | wendu -------------------------------------------------------------------------------- 获取监控项 '机房温度' 的最新数据... ============================================================ 主机: donghuanxitong 监控项 ID: 147134 监控项名称: 机房温度 键值: wendu 最新数值: 24 最后检查时间: 2025-07-10 10:03:49 原始时间戳: 1752113029 ============================================================ 进程已结束,退出代码02、极简版import requests import json # 配置信息 ZABBIX_URL = "https://your-zabbix-server/zabbix/api_jsonrpc.php" API_TOKEN = "your_api_token_here" # 替换为你的 API Token KEY = "system.cpu.util[,idle]" # 替换为要查询的键值 HOST = "your-host-name" # 替换为目标主机名(可选) # 通过键值获取监控项ID def get_item_id(key, host=None): payload = { "jsonrpc": "2.0", "method": "item.get", "params": { "output": ["itemid"], "search": {"key_": key}, "filter": {"host": [host]} if host else {} }, "auth": API_TOKEN, "id": 1 } response = requests.post(ZABBIX_URL, json=payload, verify=False) items = response.json().get("result", []) return items[0]["itemid"] if items else None # 获取监控项最新数值 def get_latest_value(item_id): payload = { "jsonrpc": "2.0", "method": "history.get", "params": { "output": ["value"], "itemids": item_id, "sortfield": "clock", "sortorder": "DESC", "limit": 1 }, "auth": API_TOKEN, "id": 2 } response = requests.post(ZABBIX_URL, json=payload, verify=False) history = response.json().get("result", []) return history[0]["value"] if history else None # 主程序 if __name__ == "__main__": # 获取监控项ID item_id = get_item_id(KEY, HOST) if not item_id: print(f"错误: 未找到键值 '{KEY}' 的监控项") exit(1) # 获取最新数值 value = get_latest_value(item_id) if value is None: print(f"警告: 监控项 {item_id} 没有可用数据") exit(2) # 输出结果 print(value)运行效果24 进程已结束,退出代码0
-
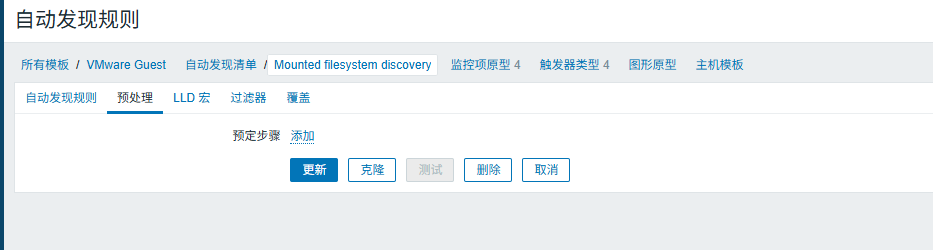
zabbix7.0 7.2 VMware Guest模板 "Unknown file system path" 模板BUG 在zabbix7.0 7.2的默认VMware Guest模板中,自动发现Mounted filesystem discovery,官方增加了一个预处理JavaScript,此脚本会导致windows系统获取的C盘是 c: 而不是 c:\ ,从而获取不到磁盘空间,提示 Unknown file system path更妙的是,这个JavaScript删掉模板就能正常工作了,因为在zabbix6.0里就没有这个预处理,也不影响linux主机,只是针对windows的预处理const data = JSON.parse(value); for (var i in data) { if (data[i]['{#FSNAME}'].endsWith('\\')) { data[i]['{#FSNAME}'] = data[i]['{#FSNAME}'].replace(/\\+$/, ''); } } return JSON.stringify(data);删除预处理即可删除后可以获取磁盘空间
-
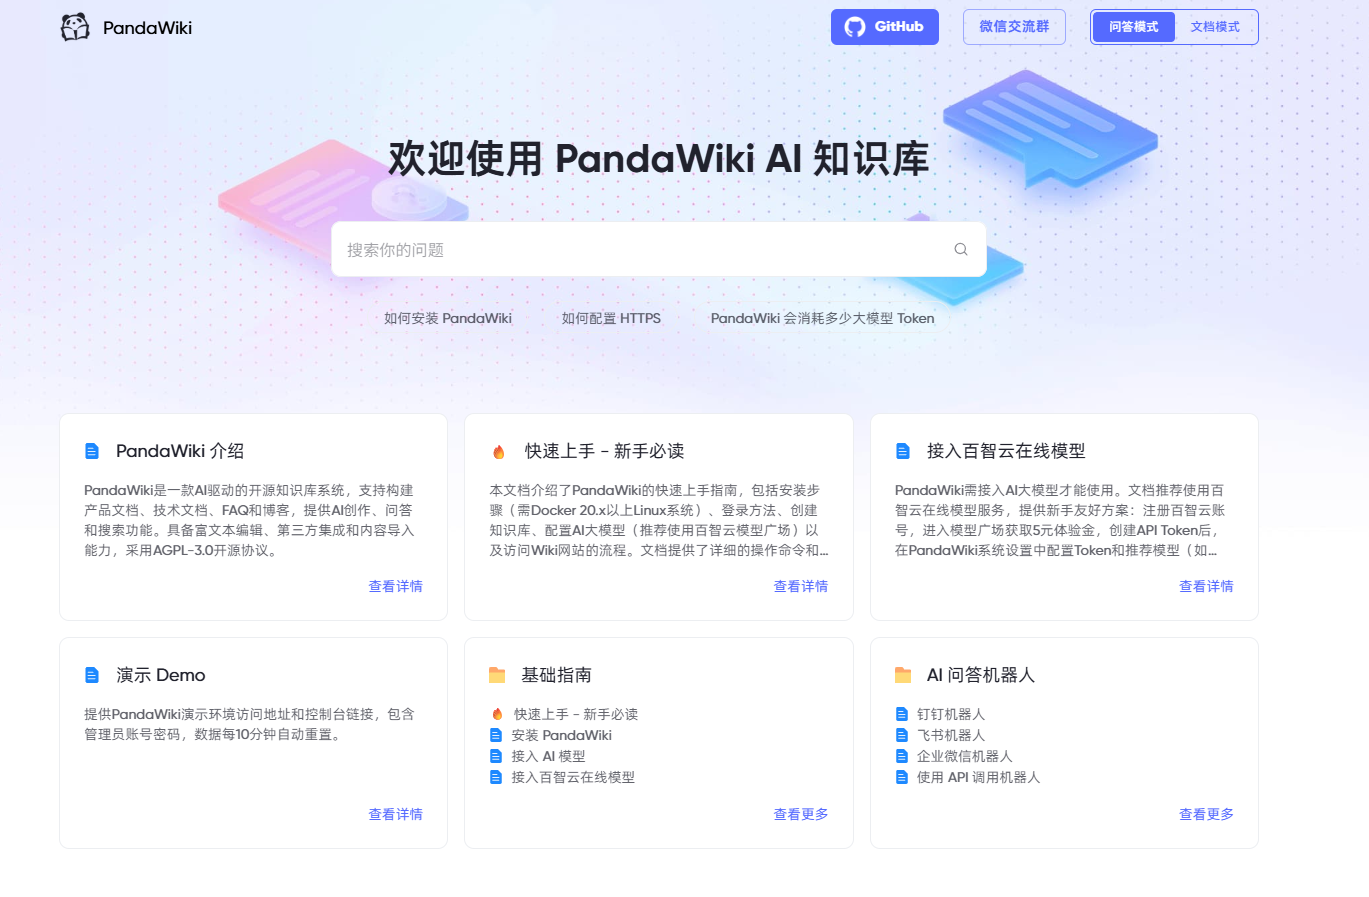
强大、简洁、快速、持续更新 PandaWiki新一代 AI 大模型驱动的开源知识库搭建系统 PandaWiki是什么PandaWiki 是一款 AI 大模型驱动的开源知识库搭建系统,帮助你快速构建智能化的 产品文档、技术文档、FAQ、博客系统,借助大模型的力量为你提供 AI 创作、AI 问答、AI 搜索等能力。{message type="info" content="注意,当前时间为2025年6月13日,当前PandaWiki最新版本为1.2.0,文章演示功能均为当前版本功能软件仍在快速迭代,更多功能快速加入中"/}PandaWiki特点既具备快速的AI大模型知识库搭建能力,又具备传统WIKI的文档能力;相比以往的AI大模型知识库,Pandawifi搭建极其简单,引入大模型,加载文档,即可使用!截图展示首页-问答模式首页-文档模式对话后台管理模型接入官方网站https://pandawiki.docs.baizhi.cloud/安装部署官方安装手册https://pandawiki.docs.baizhi.cloud/node/01971602-bb4e-7c90-99df-6d3c38cfd6d5一键安装bash -c "$(curl -fsSLk https://release.baizhi.cloud/panda-wiki/manager.sh)"接入模型模型我使用的都是硅基流动的付费模型,使用我的邀请连接注册硅基流动,你也可以获得14元硅基流动帐号余额https://cloud.siliconflow.cn/i/Gz5Rnrc8创建知识库修改访问方式创建文档我使用的是90apt网站的sitemap文件导入开始使用至此已经部署完成,开始进行对话吧90apt知识库http://ai.90apt.com/进行问答测试意见建议1、完全本地化PandaWiKi共需要三个模型,当前版本中,语言大模型、Embedding模型已实现对接本地ollama,Rerank模型暂时还不支持,已反馈官方后续支持2、图片支持当前版本中还不支持识别图片,已反馈官方后续支持3、反代BUG当前对反代HOST限制严格,如后端为域名+端口,前端必须为相同域名和相同端口,导致反代较困难,所以90APT知识库使用了8080端口。小结当前PandaWiki仍在快速迭代中,但目前已经是部署最简单的WIKI系统。
-
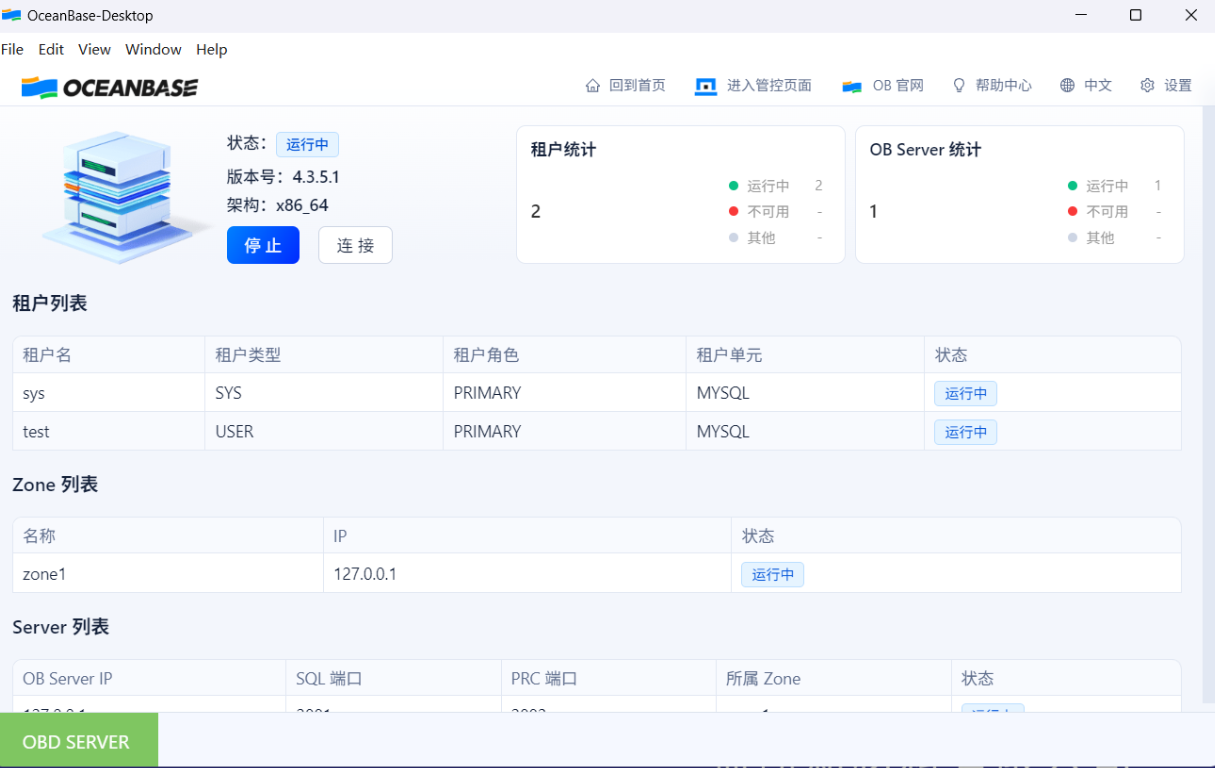
一键安装、图形配置、快速开发 OceanBase 桌面版部署开发体验 一句话介绍OceanBase 桌面版是一款具备部分OCP云平台图形化管理功能、可一键部署、方便用户快速进行数据库开发的平台化数据库软件。OceanBase 桌面版介绍OceanBase Desktop 是一个用于管理和操作 OceanBase 数据库的桌面应用程序。它提供了图形化界面,使用户能够方便地进行数据库管理、查询执行、数据导入导出等操作。OceanBase Desktop 具有如下特性:图形化界面:直观易用的图形化界面,简化数据库管理任务。数据库管理:支持创建和管理数据库实例。查询执行:提供 SQL 查询命令行。监控与日志:实时监控数据库状态。下载地址:https://www.oceanbase.com/softwarecenter文档地址:https://www.oceanbase.com/docs/common-oceanbase-database-cn-1000000002866370安装前须知OceanBase桌面版对配置需求2核6G内存,但OceanBase桌面版需依赖 WSL(Windows Subsyetem for Linux,适用于 Linux 的 Windows 子系统),并且只能使用WSL2,此功能实际是虚拟化技术,对系统资源占用较多。我的电脑为4核心8线程16G内存,使用windows11操作系统,在开机后开启浏览器和微信TIM后,通常占用内存为50%左右,再开启OceanBase桌面版,内存占用会在80%左右如果在启动开发工具和web环境,则内存占用会超过90%因此,若要使用OceanBase 桌面版,建议配置为4核8线程、32G内存,硬盘剩余空间建议50G以上,整体使用会更加流畅。OceanBase 桌面版安装准备工作我使用的操作系统为windows11 24H2、windows10 LTSC 2021开启虚拟化查看虚拟化是否开若未开启,则进入bios开启英特尔处理器开启方法Intel Virtualization Technology 改为[ON]AMD处理器开启方法OC->CPU Features->SVM Mode 选项改成[Enabled]安装WSL使用管理员命令提示符 一键开启WSL2wsl --install软件安装OceanBase 桌面版启动启动默认密码为空OceanBase 桌面版使用使用命令行连接数据库wsl.exe -d oceanbase-desktop --exec obclient -h127.0.0.1 -P2881 -uroot@test -Doceanbase -A Copyright (c) 2000, 2018, OceanBase and/or its affiliates. All rights reserved. Type 'help;' or '\h' for help. Type '\c' to clear the current input statement. obclient(root@test)[oceanbase]>管控页面停止数据库OceanBase 桌面版开发GUI图形界面简单使用桌面版默认有两个租户,一个sys,一个test,若你电脑资源不够强,则使用test租户即可,不必新建租户我们通过gui界面为test租户创建数据库和用户进入test租户创建一个数据库创建一个用户,并赋予数据库权限注意密码有复杂度要求可使用数据库连接工具登录数据库obclient -h127.0.0.1 -P2881 -uhaha@test -p如DBeaver,已支持OceanBase数据库登陆成功基于 OceanBase 桌面版进行python开发我这里我简单演示使用python进行OB数据库连接和初始化import mysql.connector mqdb = mysql.connector.connect( host="127.0.0.1", user="haha@test", passwd="设置的密码", database="haha", port=2881 ) mqcursor = mqdb.cursor() mqcursor.execute("CREATE TABLE mqdata (id INT AUTO_INCREMENT PRIMARY KEY,time VARCHAR(255), name VARCHAR(255), number VARCHAR(255))") mqcursor.execute("CREATE TABLE configkey (name VARCHAR(255), config VARCHAR(255))") insert_sql = "INSERT INTO configkey (name, config) VALUES ('config','1')" mqcursor.execute(insert_sql) mqdb.commit() mqcursor.close()查看数据库表后续可正常进行数据库开发使用意见与建议影响使用的BUG在运行一个OceanBase 桌面版的情况下,再次点击启动OceanBase 桌面版图标,会导致数据库崩溃退出,只能重启电脑解决,建议启动时判断是否已启动建议右下角增加后台运行托盘图标小结OceanBase 桌面版能够为数据库的学习提供更简单的部署体验,可以在项目开发阶段本地很方便的进行数据库使用,但对配置有一定要求,大家一起来体验一下吧~
-
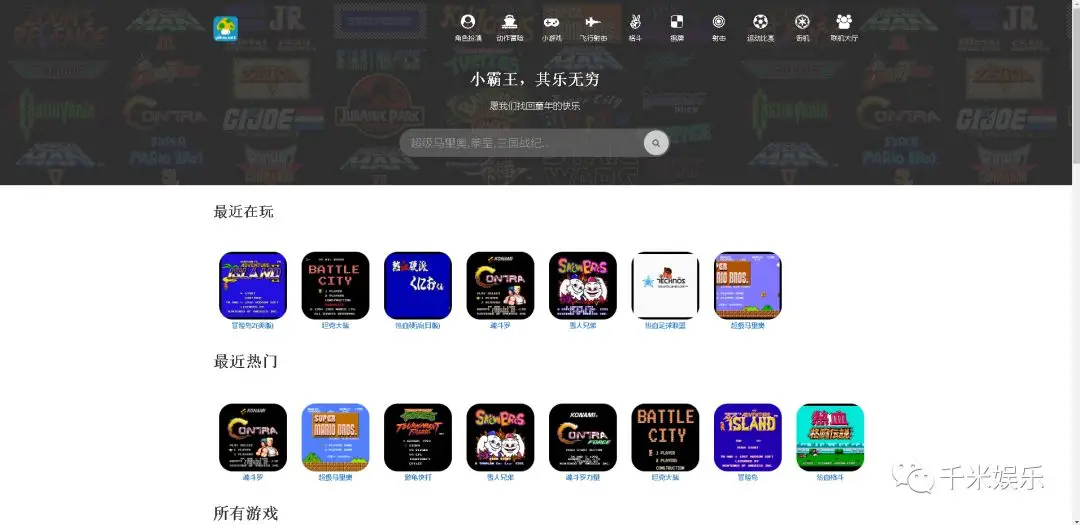
一个可以在线玩红白机的网站 网站的由来:某天做了个梦,梦到小时候在黑白电视机前和小伙伴抢着玩小霸王游戏机。醒来后,回忆起自己小时候为了买一个卡带,攒了好久的硬币,最后买到卡带后的那种开心。。感慨万千,就做了个网站回忆回忆。只是回不去童年的那个时光了。网站介绍:网址: https://www.yikm.net 公众号回复官网,即可点击网址开始玩耍。域名没什么特别的意义,为了好记,可以记成“一千米”。1.网站首页导航可以根据自己喜欢的游戏类型选择。会记录8种最近在玩的游戏,方便下次打开的时候直接继续玩(注意这个记录是存储在本地的,换个浏览器就会无效。。)。2.随便选一个游戏进去,选个最喜欢的超级马里奥。可以看到右侧菜单里有几个选项。第一个是键盘设置,鼠标点击需要设置的按键,按下键盘的按键就能设置了。同时可以点击第一排的“手柄”切换到手柄设置界面,也可以自由设置习惯的按键。游戏支持存档功能,但是存档也是存在本地的。。换个浏览器也会没有。没办法,我懒。支持金手指功能。金手指覆盖了部分游戏,如果需要加金手指的欢迎联系我。3.联机功能联机需要点击首页导航的"联机大厅"进入联机界面,需要先用qq登录。创建房间后,别人可以进入到你的房间开始联机。(部分网络原因会没法连通。由于服务器限制,有时候会卡顿。。特别是2p)由于目前只支持电脑,所以玩的人会少一些。4.手机上玩,在浏览器里打开即可。苹果手机用户可以在Safari中打开,然后添加到主屏幕,这样不会有浏览器的地址栏,防止误按。或者在微信中打开网址。有空记得关注下公众号,最后祝各位玩的开心,找回童年的那份快乐。
-
解决运维痛点,提高运维安全性-雷池 SafeLine WAF新功能身份认证深度体验 雷池介绍使用雷池 SafeLine WAF已经两年多了,在1.5.x版本时就已经开始测试使用,并在推出LTS版本后转入LTS分支。近期雷池 SafeLine WAF重点更新了身份认证功能,并提供了SSO单点登录认证,因此本次对此功能进行深度体验。业务痛点在公司运维中,会部署一些独立的自开发运维工具,如MQ消息队列监控工具、JVM虚拟机内存监控工具、交换机巡检备份工具;本次介绍我自己开发使用的MQ消息队列监控工具结合雷池的使用。MQ消息队列监控工具整个工具由下面几部分组成MQ消息队列-Agent采集写入数据库、分析、企业微信webhook告警(python)-企业微信webhook消息配置为PHP网页-PHP网页可视化展示最近的MQ分析数据库由于开发的工具较多,均没有配置独立的身份认证,即任何人都可以通过连接访问雷池WAF身份认证为防止隐私泄露,本次全新安装雷池WAF雷池WAF安装安装docker使用anolis8.10操作系统,关闭防火墙,安装docker{alert type="info"}关闭防火墙是为了防止干扰实验结果{/alert}1、安装dockeryum install -y yum-utils #阿里云加速源 yum-config-manager --add-repo http://mirrors.aliyun.com/docker-ce/linux/centos/docker-ce.repo yum install docker-ce docker-ce-cli containerd.io2、配置docker网段和加速源/etc/docker/daemon.json { "bip": "192.168.120.1/24", "registry-mirrors": [ "https://docker.1panel.live" ] }3、启动服务systemctl enable --now docker4、关闭防火墙systemctl disable --now firewalld安装雷池yum install python3 bash -c "$(curl -fsSLk https://waf-ce.chaitin.cn/release/latest/manager.sh)"部署完成MQ消息队列监控工具部署部署php环境yum install httpd php php-mysqli php-json systemctl enable --now httpd将MQ查询的PHP程序放入/var/www/html/index.php,运行正常雷池WAF身份认证配置添加应用防护可配置基础账号密码认证也可配置三方账号密码认证,注意个人免费版和收费版可配置项不同配置基础身份认证演示可配置授权访问或直接访问直接访问效果错误账号密码效果通过验证效果显示正在进入并跳转审批授权效果配置为审批授权登陆提示未授权雷池-身份认证 进行授权审批通过后,页面自动跳转,访问成功微信开放平台对接效果由于微信开放平台需要实名认证,这里无法演示,最终效果为扫码登录身份认证高级功能-特定条件身份认证可设置条件、IP范围、地理范围身份认证高级功能-用户认证信息传递官方文档如何配置将用户认证信息传递给应用服务器? 用户认证成功后,雷池会重定向到以下地址,其中http://example.com/application是在应用配置的认证回调地址: http://example.com/application?code=123456&redirect_uri=用户原访问地址 在雷池控制台 通用设置-控制台管理 页面找到 API Token ,获取 Token 应用在 认证回调地址 中实现用 code 来请求雷池的/.safeline/auth/api/user接口获取认证用户信息,code 只能使用一次 // 请求: GET http://safeline-console.com/.safeline/auth/api/user?code=123456 X-SLCE-API-TOKEN: safeline-api-token // 响应: Content-Type: application/json { "code": 0, // 0: 成功,非0: 失败 "msg": "错误描述", "data": { "id": 1, "username": "username" } } 应用成功获取到用户信息之后缓存登录信息,用于后续判断当前用户是否登录,然后重定向到 redirect_uri注意GET http://safeline-console.com/这里域名是应用的域名,不是雷池控制台,即GET http://example.com/.safeline/auth/api/user?code=123456简单DEMO实现获取雷池身份验证用户名auth.php<?php // 打印更多报错信息 error_reporting(E_ALL); ini_set('display_errors', 1); // 判断是否是HTTPS $protocol = (!empty($_SERVER['HTTPS']) && $_SERVER['HTTPS'] !== 'off' || $_SERVER['SERVER_PORT'] == 443) ? "https://" : "http://"; // 获取域名和请求URI $currentUrl = $protocol . $_SERVER['HTTP_HOST'] . $_SERVER['REQUEST_URI']; $parsedUrl = parse_url($currentUrl); $queryString = $parsedUrl['query']; parse_str($queryString, $queryParams); $code = isset($queryParams['code']) ? $queryParams['code'] : null; $url = 'http://这里是我的应用域名/.safeline/auth/api/user?code=' . urlencode($code); // 替换为实际API地址 $ch = curl_init(); curl_setopt_array($ch, [ CURLOPT_URL => $url, CURLOPT_HTTPHEADER => [ 'X-SLCE-API-TOKEN: 这里是我的密钥' ], CURLOPT_RETURNTRANSFER => true, CURLOPT_SSL_VERIFYPEER => false, CURLOPT_SSL_VERIFYHOST => false ]); $response = curl_exec($ch); if(curl_errno($ch)){ die('CURL Error: '.curl_error($ch)); } $httpCode = curl_getinfo($ch, CURLINFO_HTTP_CODE); if($httpCode !== 200){ die('HTTP Error: '.$httpCode); } print_r($response); $data = json_decode($response, true); if(json_last_error() !== JSON_ERROR_NONE){ die('JSON解析失败: '.json_last_error_msg()); } print_r($data); curl_close($ch);配置回调地址登陆测试登录heihei返回用户名heiheiArray ( [code] => 0 [msg] => [data] => Array ( [id] => 2 [username] => heihei ) )拿到用户名后,下一步可以写入session或cookie,跳转页面,完成权限认证操作意见与建议1、登录界面无法直接回车登录,需要鼠标点击登录,建议改为回车登录2、身份认证审核信息,建议使用浏览器消息通知机制,直接在标签页弹消息提醒小结太强大了!